Friday, April 19, 2013

Drawing American Sign Language Hands

My private art lessons are very organic-what we study ebbs and flows with what I think the student would be interested in or in an area they may need to develop further. One day, my student and her mom were discussing a piece my student had done (at home) and there was some, ahem, disagreement as to how readable the hand was in the drawing. After a little more discussion, my student admitted that, although she felt she drew hands perfectly fine, they were "hard" and she "hated drawing them." Hmmmm...well, never one to shy away from a challenge, I tried to think of a way we could practice drawing hands in a way that seemed fun. 


This spells "ART."

So, here's what we did:

The first week, we spent practicing drawing hands in different positions. I found this great tutorial online at Neon Dragon Art that I thought would work well to illustrate the anatomy of the hand as well as seeing a hand as a 3D form from the beginning. We worked our way through the different variations Jessica "Neon Dragon" Peffer presented, using our own hands as "models." It is quite difficult to draw something as complex as the human hand--especially when you don't want to! But we kept trying and trying. We had a couple shaky starts and we needed to keep remembering to look at our 3D models--our own hand, and draw what we saw, not what we thought was there.

Once my student was confident drawing hands in a variety of positions, I brought out the American Sign Language chart that shows the letters of the alphabet using photos of hands. We practiced the letters and she chose a word she wanted illustrate. At first she chose "CREATE" but the thought of drawing 5 more hands (one for each letter of the word) proved too much so she settled on "ART" instead.

She did a great job drawing the hands in pencil and then outlining them in Sharpie. For the background, she chose to do a Jackson Pollock-inspired drippy painting using watercolors and temperas that she drizzles and splattered all over. The colors were custom-mixed--she had a plan--they are her favorite colors.

Once everything was done, she brought the pieces together (making sure the hands were in the correct order). She was very happy with her piece (as am I!) and *hopefully* she'd say it isn't too bad drawing hands after all.

Thursday, April 18, 2013

All About Me: More Faith Ringgold Story Quilts

The other day I started a new series of classes called "All About Me" which is, sigh, not actually about ME, but has children creating artwork inspired by THEM: their portraits, their names, their interests.


With the first project I wanted to do something that would get their imaginations going, so we created quilt squares inspired by Faith Ringgold's "Tar Beach." I had originally posted this lesson here.

This project is great because the main character of the story is the same age as my students (about 3rd grade). In this lesson, the children are asked "where would you fly if you could go anywhere, real or imagined?" This project is a wonderful way to get to know my students--they come up with the best places to fly to! This project originally took two one-hour class sessions with my homeschool kiddos, but I only wanted to devote one class to this project with my after school kiddos. So, I downsized the project a bit. Here's how:

  • For the background, we used 8" x 10" rectangles of mat board 
  • For their drawn image, we used a 6" square of white paper
  • For the area they wrote on, we used a 2" x 6" rectangle
  • The patterned paper pieces, we used 1" squares (as in the other post)
How'd it go?

I was very happy with the process! The prep was easy and the project very portable (that's important since I am an "art-on-a-cart" teacher. We had time to read the entire book, discuss it a bit and then take our time drawing where we would go if we could fly. After the initial discussion, the children just worked along. This was a bit of a larger group than the last time I presented this project (we had 13 Daisy Girl Scouts visiting the classroom), but it was a smooth-running lesson. Some of the children finished about 10 minutes early (we meet for an hour and fifteen minutes). Early finishers could look at quilt-related books or work on quilt coloring pages.

When they were done, I put all of the quilt squares together and magically our finished quilt appeared. Enjoy! 

If I could fly I would go to...
the moon, Atlantis, Hawaii, out for ice cream,
to the beach, to Chihuahua Land, to a horse farm...

Wednesday, April 17, 2013

Inspired By Spring and Alma Woodsey Thomas

I posted a project idea about African American artist Alma Woodsey Thomas awhile back, check out the post here. Thomas was a art teacher for almost 4 decades, became a prolific Abstract Expressionist painter during her retirement, and had her first show at 80 years old! WOW! How inspiring!
Here's the group project: "Sunset Over the Ocean."
For my last Modern Art class with my homeschool kiddos, I thought we'd do a relaxed collage project based on Thomas' work. The children had fun and created some very beautiful pieces. It was also a great opportunity to use up all of those paper scraps I've been collecting all year!

When they were done their personal pieces, they could work together to create a group piece that will be on display at the Grande Finale next month. I love how the group project came out--so different than the one the group in the original post created (and I loved that one too!). Amazing!

Enjoy this one-day, earth-friendly project!

"Colours"

"Falling Fire"

"Falling Leaves"

"Flowering Meadow"

This one had a title,
but he wrote it after I took the picture!
I think the bits are falling stars...

"Color Wave"

Monday, April 15, 2013

Walk Like An Egyptian Costumes

I just finished up week 4 of Egyptian Art with my after school kiddos. We created some great projects during our time together, and this was the final project: 3D funerary masks that you can wear as a costume.

The idea for making these came from the book, "The Ancient Egypt Pack: A Three-Dimensional Celebration of Egyptian Mythology, Culture, Art, Life and the Afterlife," by Christos Kondeatis & Sara Maitland. I picked this little gem up at a used bookstore for a couple of bucks and it was just perfect for my Egyptian Art class because it has all sorts of little pop ups and fold-outs that echoed the projects we were doing in class. One of the pieces that comes with the book is a 3D model of the famous gold Tutankhamun funeral mask that you can put together. My copy of the book did not come with the directions on how to put the mask's 25 pieces together, but I thought the children would love to create their own 3D models of the masks. Then, as I was doing research for my class, I saw a few sites that offered printable and wearable versions of King Tut's headdress, mask and the necklace/chest plate.

With a bit of downloading and printing, I was able to provide the children with printables they could color in their down time. I printed the pieces at home on white card stock and had the children use watercolors to add color to the pieces. For the gold, I had them use metallic gold acrylic. Colored pencils would also work, but would be super-tedious I think. During our last class, we assembled the pieces into wearables and they had fun posing in their unique creations.

This project could be done in many ways, if you have a bit more time or you wanted the children to have more creative input besides just coloring, you could make templates using the outlines of these pieces and have the children add their own details. The children had fun wearing the masks, as you can see below...I think it was a neat project to do and I will probably do it again (or some variation) next year.

Here are the sites you can find the printable elements of the Egyptian costumes. Thank you so much for the creators of these pieces! Give them some love and use their pieces in the way they intended (for free use with the kids in your life!). Enjoy!

Printable King Tut Headdress
First Palette has a great printable headdress. You can either print out version to color or one that it already colored and ready-to-go. They also have lots of other great Egyptian projects (along with lots of other great project ideas).

Printable Mask and Necklace
Alpha Mom has an adorable mask (complete with beard) along with a very elaborate-looking necklace. These projects are easy to print out and assemble. Very cool!


Wednesday, April 10, 2013

Kinder Picasso "Hand With Bouquet"

I've been visiting the Kinders at a local school (Clark Elementary in Amherst, NH) once a month doing an art enrichment program. I usually tie in a book or music or fine art (and sometimes all three) to make the experience a rich and multi-layered one. I have absolutely LOVED working with the children--Kinders are so cool. They are up for anything and so smart!


We've done some fall- and winter-themed art, but Spring is here! So I thought we'd create a piece that celebrates warm weather, flowers and color! I'm not a huge Picasso fan, but when I saw the piece 
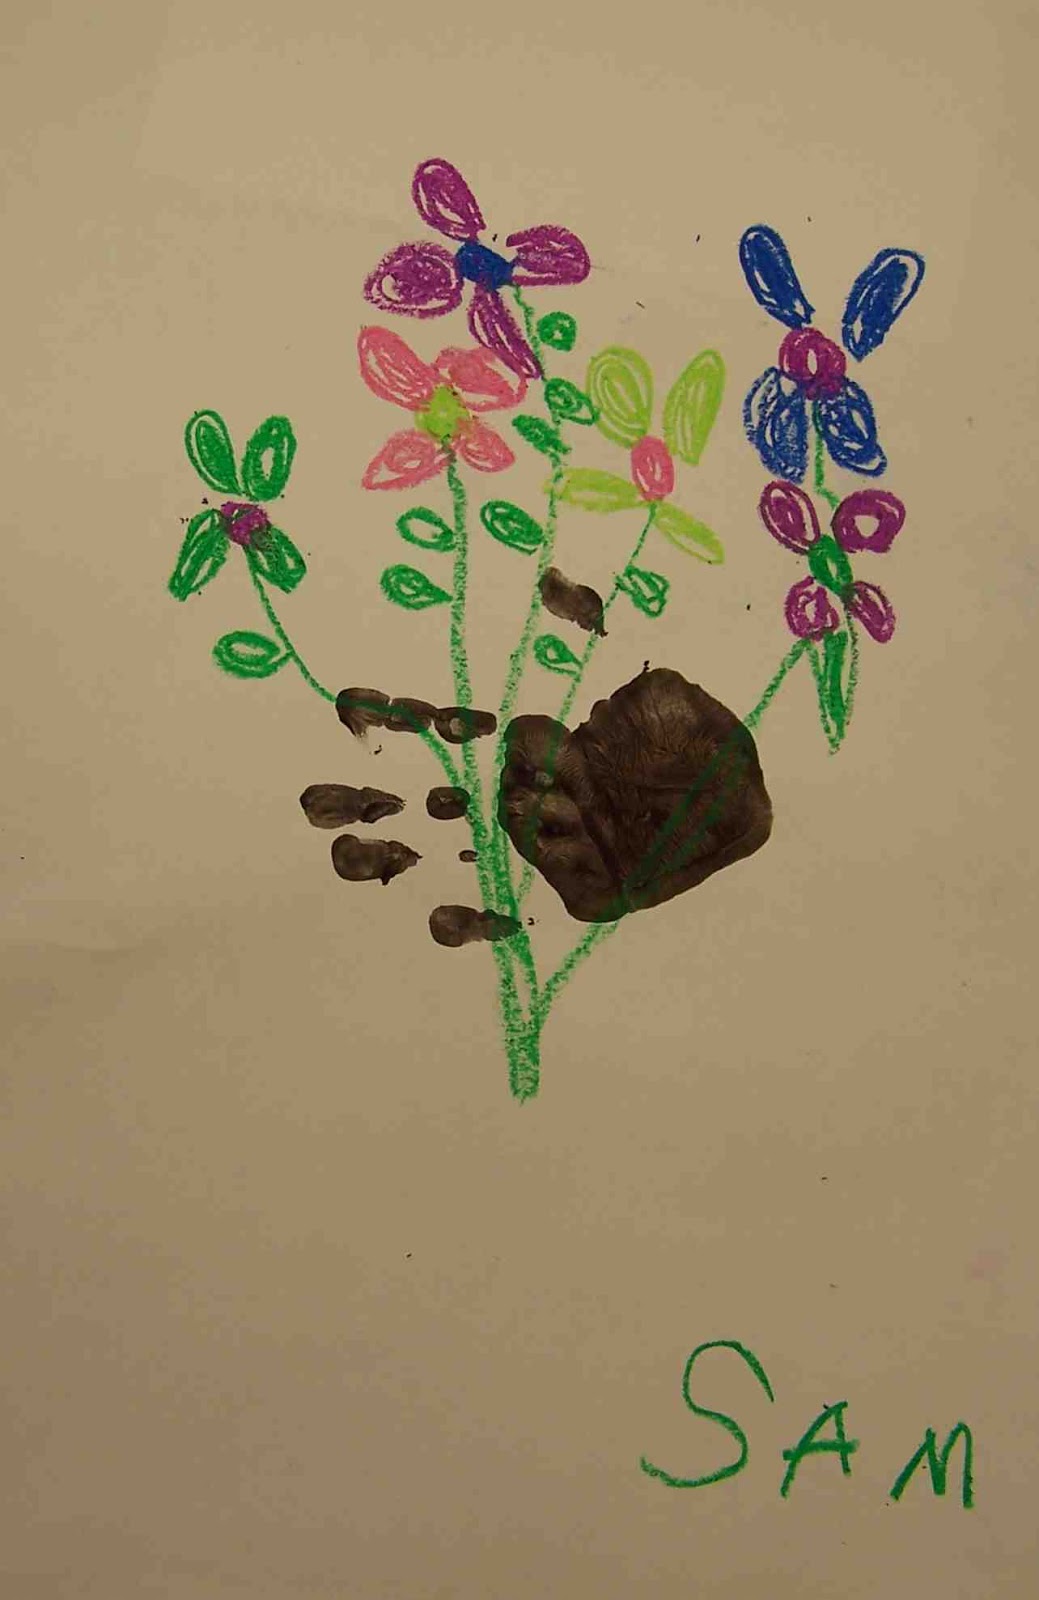
"Hand With Bouquet" I immediately thought the children would love it. I experimented a bit with using cut paper and paper muffin liners to make a daffodil bouquet (which came out fine), but then I saw this version on the blog "Splish, Splash, Splatter." Rebecca uses the child's hand print as the hand holding the bouquet--WOW! Now, I'm a mom and anything that has a handprint in it instantly gets a place in my heart (and on the wall). It was a no-brainer--this was gonna happen!

But, I have to say, I was a bit worried about handprints and Kinders and only having a half hour per session...but it went great! We have a small sink in the art room, so I brought in two plastic bins, filled them with water, and had the children wash their hands in those. This allowed all 18 kids (or so) to wash their hands in about 5-7 minutes. I had a grown-up helper at the bins keeping an eye on things-I'm sure that helped!

I am so thrilled with the results and so were the kiddos! This lesson was fun and inexpensive and has a great "WOW" factor. It would be lovely for Mother's Day, too. I particularly enjoyed painting my own hand and then giving each student a high five before they printed their hand on the paper (that allowed me to check that they had covered their entire hand in paint and make sure they placed their hand properly on the page). I think the children thought I was silly-but it was so fun!

Here's how we did these colorful pieces:

Kinder Picasso "Hand With Bouquet"

Supplies Needed:

  • One 12" x 18" piece of white construction paper
  • Paintbrush
  • Paper plate for palette
  • Black tempera
  • Oil pastels/cray pas (assorted colors, but you'll definitely need green)
Directions:

1. Paint your palm, thumb and fingers with the paintbrush and black tempera paint. Make sure you get a nice coat on your hand and go all the way to the tips of your fingers. Press your hand onto the white paper, leaving a handprint. The handprint should be perpendicular to the page. Now you can wash your hand.

2. Look at the picture of Picasso's "Hand With Bouquet." How does he make the flowers? What shapes does he use? Turn your paper so the thumb is up. Check out the examples to see what I mean. This gives a more realistic idea of the hand "holding" the flowers.
Our inspiration:
"Hand With Bouquet" by Pablo Picasso
I instructed the children to use the craypas to draw a large circle for the center of their flower and then color it in. Then add petals going around the center. Use whatever colors you want, but make 4-5 flowers on the area of the paper above the hand.

3. Then add the stems. They should go from each flower, to the hand, and out the other side. Add a couple of leaves to make your bouquet look realistic.

4. Don't forget to sign your work like Picasso, using a craypas.

Welcome spring!


Saturday, April 6, 2013

Milton Glaser/Bob Dylan Inspired Self-Portraits

Back in college, I took a entire semester of "The History of Graphic Design." One of the designers and illustrators we learned about was Milton Glaser. He is probably best known as the creator of the iconic "I (Heart) NY" logo.


Another design of his that has always stayed with me is the illustration he did for Columbia Records showing a silhouette of Bob Dylan with his hair drawn in colorful strands. The color and movement in this piece is just so great. It says "creativity" to me and it really does look like Dylan!


Milton Glaser/Bob Dylan-Inspired Self Portraits

Supplies Needed: 

  • A printout of the profile of the student (fill the entire 8 1/2" x 11" sheet of paper)
  • Black piece of construction paper
  • Stapler
  • Pencil
  • Scissors
  • One 9" x 12" sheet of white construction paper
  • Glue stick
  • Black permanent marker (we used Sharpies)
  • Various colored markers
  • Scraps of colored paper for name, optional
Directions:

1. On the printout of the photo, use your pencil to draw a line outlining the body and the skin of the student (not the hair)--no inner details. Staple the printout to a sheet of black construction paper. Cut through both layers of paper along the pencil line (careful to not cut into the hair portion--you'll need that later).

2. Glue the black cutout of the head/body to the white piece of construction paper.

3. Cut out the hair from the printout. Discard the background. Place the hair onto the background and trace around it with the pencil. 

4. Use your pencil to divide the hair into locks. Refer to the printout of your hair to see the direction of how the hair flows. Once all of the hair area is divided up into "tubes" use a Sharpie to trace your pencil lines.

5. Add color to your hair using the markers.

6. Write your name on scrap bits of construction paper, cut out and glue to the bottom edge of the silhouette. 

Look at that funky, creative self-portrait!


Friday, April 5, 2013

Kindergarten 2D Shape Robots

I saw this fantastic art project on Teach Preschool and knew I just  HAD to do it with my son's Kindergarten class! So this past Tuesday I was able to go in and spend a robot-themed afternoon with them. We had so much fun! Here are the robots they made using 2D shapes:


Deborah at Teach Preschool is totally great! I wish she lived near me so I could send my little ones off to her! Every day she sends out posts that are full of great learning ideas for the Preschool set. I've found that my Kinder guy also enjoys some of the activities from her site.

So check out her original post for the Shape Robots here.

Here are some of my notes on the lesson:

  • This project is great for Preschool and Kinder-aged kiddos. Both boys and girls enjoyed creating their robots.
  • This project tied in nicely with what my son was learning at this time: 2D versus 3D shapes and had a bunch of different shapes for them to use, identify and talk about while they were working.
  • This project has some very interesting kinetic-learning opportunities. The shapes are secured by poking bits of pipe cleaner through the shapes and into the foam. The kids loved doing that and really enjoyed that the legs and arms could move once they were secured with the pipe cleaner "bolts."
  • The featured book, "The Robot Book," by Heather Brown was a bit hard to find locally since it currently out of print but it is being rereleased in June. I ordered it from Amazon and it has become a favorite in our house. It talks about the parts of a robot, but it is ultimately what's inside the robot (it's heart) that counts. You could get along without the book, I guess. But I was glad to have it. It is a board book with moving parts which tied in perfectly to our robots. 
  • I was able to buy the craft foam sheets for the shapes at Michael's and just spent a few minutes cutting random shapes out of the foam: big rectangles, little rectangles, squares, half circles, and triangles. I also had peel and stick hearts and stars available, too. Maybe having circles would be nice, but I didn't have any and I wasn't going to cut them!
  • I bought the 1/2" thick styrofoam sheets at the dollar store in the floral section. They were 12" square and I was able to get three 5" x 7" rectangles from them and then I used the scraps to piece together another one (so I got four 5" x 7" styrofoam pieces from one 12" x 12" styrofoam piece). I hot glued the styrofoam rectangles to an 8 x 10" piece of mat board.
  • The only thing we used glue for were the googly eyes.
  • I encouraged the children to add details (button, switches, patterns, lines) with a Sharpie. They were more than happy to do so!
  • I worked with about 6 children at a time and at the other "stations" or centers they could play with gears (like Deborah suggested) or play Robot Bingo which I picked up at the dollar store (score!!).
It was a great day and I had a lovely afternoon with the children! They were all so proud of their robots and had a great time exploring shape and line and form. Thank you to Mrs. Greany for having me visit and to Deborah at Teach Preschool for the super-awesome lesson!

Thursday, April 4, 2013

Easy-Peasy Pizza Sculptures!

I'm always looking for a better way to do projects. I had done pizza sculptures a la Claes Oldenburg before (see here) and I thought that my Modern Art kiddos would like them too. I had originally had students create the pizza form from two pieces of newsprint stapled and stuffed with crumpled up newspapers ad then paint the sauce and toppings. While that worked out OK, the pizzas got a bit muddy with all of those toppings being painted over one another before they were dry. So, I got to thinkin'...
YUM! Bacon, sausage and pepperoni pizza!

I bought some red and kraft-colored wrapping paper at IKEA this past Christmas and thought the weight and color of them would be nice for the sculptures. I thought the children could cut a brown triangle for the bottom crust part and a top triangle from red for the sauce part...however, I used all of the red wrapping paper at Christmastime. Oops! But I had a plan...

I had the children cut both triangles for the pizza from the kraft paper, staple & stuff and then paint the sauce on with red tempera. While they were drying, the children created their toppings from construction paper scraps. This worked out great for timing and they came out great--love the bright red sauce!

The toppings are a study in size, shape and color! I had some take-out menus from pizza places and we made a huge list of toppings the children could use on their pizzas. I also made my "at least three" rule with the toppings: the children had to create at least three different toppings for their pizza (not including the cheese). Most of them were happy to oblige!

So have a no-calorie pizza party for your class or family and have fun using up all of those paper scraps you've been hanging onto!

Easy-Peasy Pizza Sculptures

Supplies Needed:


  • Medium weight paper (large sheets or a roll of paper)
  • Triangle templates cut from poster board (bottom crust template should be about 5" longer than the top crust so you can roll the triangle up and make the crust of the pizza)
  • Pencil
  • Scissors
  • Ruler
  • Newspaper or paper scraps to stuff the form
  • Stapler with staples
  • Red tempera paint (or white if you like a white sauce)
  • Paint brushes
  • Water bucket, paper towels
  • Paper scraps for pizza toppings
  • Elmer's glue
Directions:

1. Cut two triangles from kraft paper for the top and the bottom of the pizza slice. As I said above, the bottom crust triangle should be about 5" longer than the top crust so you can roll the triangle up and make the crust of the pizza.

2. Layer the two triangles on top of one another and staple along the two pointy, side edges or the pizza, through both layers. Leave the crust edge open, creating a pocket.

3. Crumple up newspaper, lightly, and stuff the pizza slightly, to give the pizza slice some dimension. 

4. Roll the open edge of the pizza slice inward a couple inches to create the pizza crust and secure with a couple of staples. You now have a giant slice of pizza!

5. Use tempera paints to paint the sauce on your slice of pizza. 

6. While it dries, you can use paper scraps to create toppings. To create the toppings you can rip, or cut the paper, or even use different punches as you see fit. To create multiple shapes (for mushrooms or other unique veggies), fold the paper multiple times and then cut through all the layers--you'll make a number of uniform shapes at once. Much better (and faster) than cutting out individual mushrooms!


6. When the paint is dry, attach the toppings to your pizza slice with glue. I had the children dribble the Elmer's glue in a zigzag motion over the sauce and then sprinkle the toppings on. Lightly press the toppings into the glue (the glue will dry clear).

YUM! Let's eat!


Related Posts Plugin for WordPress, Blogger...