Showing posts with label model. Show all posts

Friday, August 14, 2015

REPOST: Symmetrical Paper and Clay Butterflies

It's been a long summer here in New Hampshire--my kiddos have been on break since June 10th and don't start school again until September 8th--WOW! So, the long and lazy days of summer need some crafting with mom time. Here's a butterfly that Little Miss did today. This is a post from back in September of 2012, but it's a good one--very fun (and shhh....educational too!). ENJOY!


And here's the original post:

Do you know some students who are studying butterflies? This is a great project for children in Kindergarten and elementary school. You can work in so many great concepts with this project: parts of an insect, symmetry, pattern, and more.


I started by having my students cut out the wings and design them and then I walked them through the making of the butterfly body. We finished up by adding the details such as antennae and legs. I really enjoyed this project because it taught science and art concepts, but it also because it allowed the students some self expression; a win/win in my book!

Clay Butterfly With Paper Wings

Supplies Needed:

  • One 6" x 9" piece of construction paper for the wings (light color)
  • Pencil with eraser
  • Scissors
  • Assorted markers
  • Model Magic by Crayola (about the size of a chicken egg), whatever color you want
  • 3 pipe cleaners (chenille stems), whatever color you want

Directions:

1. Fold the construction paper in half the short way (hamburger or taco fold).

2. Arrange the construction paper so the fold is on the left. Draw a capital letter "B" on the paper extending it so the top and bottom of the "B" touch the top and bottom of the paper.

3. Cut out the "B" shape, but don't cut the middle line (in between the upper and bottom bumps). Write your name on the paper and open it up so your name is face down. These are your butterfly wings.

4. Decorate the wings with whatever designs you would like: big dots, little dots, lines, etc. I showed a couple of butterfly books to the children before they started drawing. I asked them to make their designs symmetrical, or the same on both wings.

5. I then gave each child a ball of Model Magic the size of a chicken egg. I had them pull off a piece and roll it into a 3/4-1" ball. This is the butterfly's head. Place this ball of dough at the top of your butterfly's wings and press down slightly.

6. Divide the remainder of the dough in half (two equal parts). Form he first into a ball. This is the thorax for your butterfly. Place this ball of dough below your butterfly's head on the wings and press down slightly.

7. Roll the remainder of the dough into a hot dog shape about 3" long or so. This is the abdomen of your butterfly. Place this ball of dough below your butterfly's thorax on the wings and press down slightly.

8. Use scissors to cut each pipe cleaner into three equal sections. Poke 2 pipe cleaner pieces into the butterfly's head as his antennae. Wrap another pipe cleaner piece into a coil and poke it into the head for the butterfly's proboscis.

9. Poke the remaining 6 pipe cleaner pieces into the butterfly's thorax (3 on one side, 3 on the other). These are the butterfly's legs.

You're done! Enjoy your colorful butterfly!

Wednesday, August 14, 2013

Survey Says: CLAY!

I'm going to be returning to my teaching schedule soon and wanted to poll my previous after school students to see what they wanted to see more of in the coming year and the media that won was: CLAY!

This is probably no surprise to some of you, but this means I am going to make a serious effort to include some awesome clay projects with this year's classes! This does take a bit of planning since I don't have a kiln--this means air dry clay it is. I have some plans for Model Magic, Crayola Air Dry Clay, and plans to test a couple of new (to me) air dry clays on the market. Any suggestions?

Another downfall: drying space. Since I'm "art on a cart" I don't have space to store the items safely where I teach while they dry. That means I pack all the clay items up, load them in the car and bring them home to dry until the next class. This stresses me out! I worry that one of my kids will get into them or the dog will knock them over. I'm come up with some good ways to transport and store clay creations in progress, but it will be nice when I don't have to worry about moving them.

So, without further ado, I repost this lovely "Forever Sandcastle" post I did awhile back. The lesson is from Family Fun magazine and is really fun for the children to make. Make one yourself and enjoy those summertime memories all year long!

Whip up a batch of air dry sand clay
to make a forever sandcastle of your own!

Monday, April 15, 2013

Walk Like An Egyptian Costumes

I just finished up week 4 of Egyptian Art with my after school kiddos. We created some great projects during our time together, and this was the final project: 3D funerary masks that you can wear as a costume.

The idea for making these came from the book, "The Ancient Egypt Pack: A Three-Dimensional Celebration of Egyptian Mythology, Culture, Art, Life and the Afterlife," by Christos Kondeatis & Sara Maitland. I picked this little gem up at a used bookstore for a couple of bucks and it was just perfect for my Egyptian Art class because it has all sorts of little pop ups and fold-outs that echoed the projects we were doing in class. One of the pieces that comes with the book is a 3D model of the famous gold Tutankhamun funeral mask that you can put together. My copy of the book did not come with the directions on how to put the mask's 25 pieces together, but I thought the children would love to create their own 3D models of the masks. Then, as I was doing research for my class, I saw a few sites that offered printable and wearable versions of King Tut's headdress, mask and the necklace/chest plate.

With a bit of downloading and printing, I was able to provide the children with printables they could color in their down time. I printed the pieces at home on white card stock and had the children use watercolors to add color to the pieces. For the gold, I had them use metallic gold acrylic. Colored pencils would also work, but would be super-tedious I think. During our last class, we assembled the pieces into wearables and they had fun posing in their unique creations.

This project could be done in many ways, if you have a bit more time or you wanted the children to have more creative input besides just coloring, you could make templates using the outlines of these pieces and have the children add their own details. The children had fun wearing the masks, as you can see below...I think it was a neat project to do and I will probably do it again (or some variation) next year.

Here are the sites you can find the printable elements of the Egyptian costumes. Thank you so much for the creators of these pieces! Give them some love and use their pieces in the way they intended (for free use with the kids in your life!). Enjoy!

Printable King Tut Headdress
First Palette has a great printable headdress. You can either print out version to color or one that it already colored and ready-to-go. They also have lots of other great Egyptian projects (along with lots of other great project ideas).

Printable Mask and Necklace
Alpha Mom has an adorable mask (complete with beard) along with a very elaborate-looking necklace. These projects are easy to print out and assemble. Very cool!


Monday, March 4, 2013

Lung Project Done

Many of you read about my experience watching my son make a 3D plaster cast of his body for a science project on the respiratory system...well, the project is done (and he got an A+!). This was a great project from a mom point-of-view: the supplies were cheap, it allowed for TONS of creativity on my son's part, and he could pretty much handle the whole thing himself--oh, and it didn't chew up a entire weekend! He worked on it one Saturday morning (taking breaks to go sledding and visit with company). And he was super-proud of it! That's my kind of project!

So here are the finished picts. Hopefully it inspires you to try something new!


The details of the project (in case you were wondering):

The plaster cast was made using three packages of plaster tape bought at Michael's. The strips were about 4" wide and 8' long--we cut them to size (some 4" strips, some 8" strips and some 12" strips), dipped them in warm water, and then applied them to my son's body (make sure you coat the model's body with petroleum jelly before putting the strips on).

The dried cast was painted with leftover house paint my son found in our garage (I am worried I needed that paint, but c'est la vie!).

The red stuff (used for the nasal cavity, mouth, trachea, and bronchi) is model magic--I think he used one standard size package.

The lungs are sponges that he used scissors to cut into lung shapes.

The bronchioles are made from some leftover moss we had that he sprayed with red and blue spray paint (which he also found in the garage).

The whole thing is mounted on foam core (from the Dollar Store) that was covered in leftover colored paper. He also went crazy using the hot glue gun on this project.

Monday, February 4, 2013

Creeped Out in NH

I have realized two things this morning:

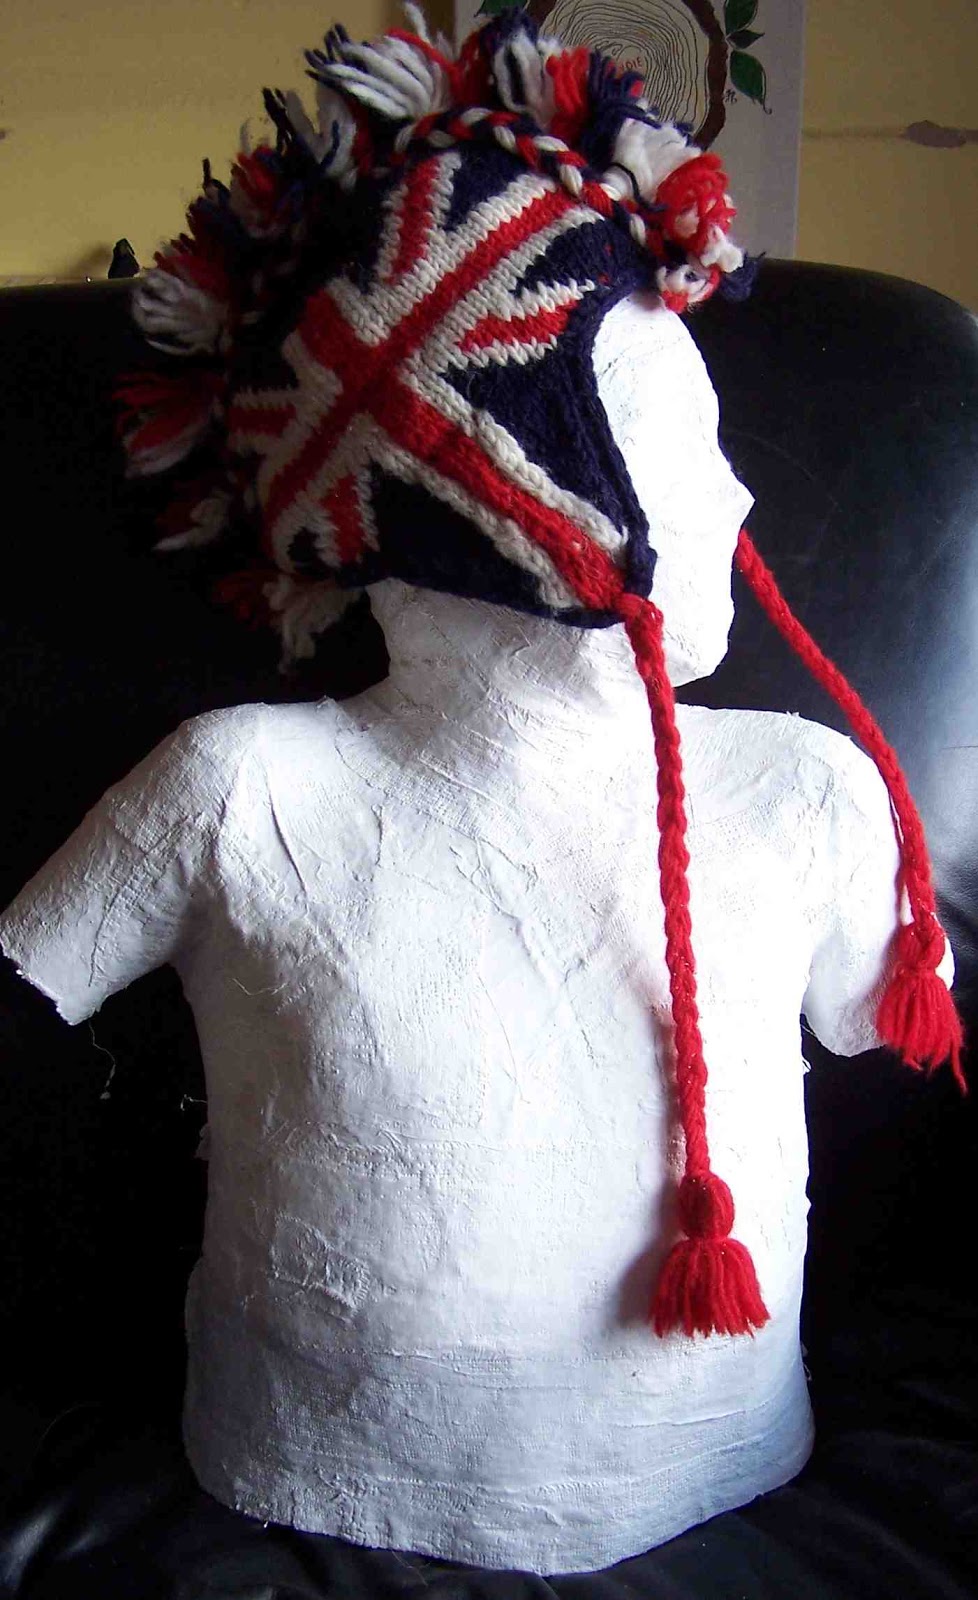
1. It is very disturbing to have a life size plaster model of your child lying on your dining room table.
2. I have a SERIOUSLY messed-up sense of humor. So much so, that this morning I sent two of my kids off to school a wee bit disturbed...

Model Son wearing Real Son's favorite hat...

My son, who is 10, loves to do projects for school--it is where he truly shines. He loves to come up with very elaborate ways to express his ideas and this creative thinking has caused us to explore all sorts of techniques that I probably wouldn't have thought to do with him: papier mache, carving styrofoam, soldering, cutting marshmallow Peeps (that's another story). Allowing creative freedom has its drawbacks, too. His model of the ocean floor cost about $50 to make even with coupons and discounts and some creative scrounging on mom's part. But, I want to encourage that creativity--it's great for him to craft something himself and make something he is proud of (and, who knows, he might become a model maker for George Lucas someday!).

Anyhoo, on to freaking out my kids...so I was worried when he came home the other day and said he said he had to create a 3D model of the human respiratory system. He had ideas. He wanted to sculpt the entire torso. He wanted it full size. He wanted it to be Model Magic (YIKES! My wallet just has a heart attack!!). I tried to use my powers of persuasion to get him to make it smaller (read: cheaper), but he said "no." He realized that creating a full size human form and then "cutting it in half and scooping out the insides" was going to be wasteful. I finally suggested paster tape--the stuff they used to use to make casts for broken arms in the "olden days." I explained the process and he was intrigued. I was worried.

We did some research on the how-to's and while he watched the Super Bowl last night, I layered the strips on him (I wanted him to do ALL the work originally and use a sibling as a model, but my little ones weren't into it and it was probably for the best--1st son says it was cold and freaky being in the plaster. However he did layer on the 2nd layer of strips and do all the art direction (which is hard to do when your face is covered in plaster strips).

But, I have to tell you, I was completely unprepared for the feelings I felt seeing my child in a full body cast...as I layered the strips up his torso and onto his head and face I felt so sad. We were laughing and giggling, but inside I was conflicted. So strange. The strange feelings were even more pronounced when we removed the cast. I cannot begin to describe the weirdness of seeing a life-size model of your child lying on the floor, or, as it is now, lying on the dining room table. Very strange.

It wasn't until this morning, when my son and I were discussing the weirdness of it all, that I revealed my creepy side. I told him that I should have taken his iPod and snapped pictures of the model doing all sorts of things around the house: watching TV, wearing my son's mohawk winter hat, driving the car--I just couldn't stop myself--I rattled off a list of things that Model Son and I would do while Real Son was at school. I realized the creepiness when Real Son looked at me with one eyebrow raised...he was laughing, but in that "if-I-humor-her-maybe-she'll-stop" kind of way.

I later related the story to son #2 and he also was a little wary. Especially when I told him I thought it would be funny to paint the model with glow in the dark paint and hang it upside down in his closet to scare to bejeebies out of him at night. Seriously, that would be AWESOME!!

So, when I get the calls from the school counselors today I will know why, but I think I'll let my husband talk with them. I think I might make the situation even worse!

Model Son, do you want to watch Downton Abbey? Hmmm?
I'll take your silence for a "yes."

Saturday, September 1, 2012

Clay and Paper Butterflies

Do you know some students who are studying butterflies? This is a great project for children in Kindergarten and elementary school. You can work in so many great concepts with this project: parts of an insect, symmetry, pattern, and more.


I started by having my students cut out the wings and design them and then I walked them through the making of the butterfly body. We finished up by adding the details such as antennae and legs. I really enjoyed this project because it taught science and art concepts, but it also because it allowed the students some self expression; a win/win in my book!

Clay Butterfly With Paper Wings

Supplies Needed:

  • One 6" x 9" piece of construction paper for the wings (light color)
  • Pencil with eraser
  • Scissors
  • Assorted markers
  • Model Magic by Crayola (about the size of a chicken egg), whatever color you want
  • 3 pipe cleaners (chenille stems), whatever color you want

Directions:

1. Fold the construction paper in half the short way (hamburger or taco fold).

2. Arrange the construction paper so the fold is on the left. Draw a capital letter "B" on the paper extending it so the top and bottom of the "B" touch the top and bottom of the paper.

3. Cut out the "B" shape, but don't cut the middle line (in between the upper and bottom bumps). Write your name on the paper and open it up so your name is face down. These are your butterfly wings.

4. Decorate the wings with whatever designs you would like: big dots, little dots, lines, etc. I showed a couple of butterfly books to the children before they started drawing. I asked them to make their designs symmetrical, or the same on both wings.

5. I then gave each child a ball of Model Magic the size of a chicken egg. I had them pull off a piece and roll it into a 3/4-1" ball. This is the butterfly's head. Place this ball of dough at the top of your butterfly's wings and press down slightly.

6. Divide the remainder of the dough in half (two equal parts). Form he first into a ball. This is the thorax for your butterfly. Place this ball of dough below your butterfly's head on the wings and press down slightly.

7. Roll the remainder of the dough into a hot dog shape about 3" long or so. This is the abdomen of your butterfly. Place this ball of dough below your butterfly's thorax on the wings and press down slightly.

8. Use scissors to cut each pipe cleaner into three equal sections. Poke 2 pipe cleaner pieces into the butterfly's head as his antennae. Wrap another pipe cleaner piece into a coil and poke it into the head for the butterfly's proboscis.

9. Poke the remaining 6 pipe cleaner pieces into the butterfly's thorax (3 on one side, 3 on the other). These are the butterfly's legs.

You're done! Enjoy your colorful butterfly!

Related Posts Plugin for WordPress, Blogger...