Showing posts with label father's day. Show all posts

Thursday, June 13, 2013

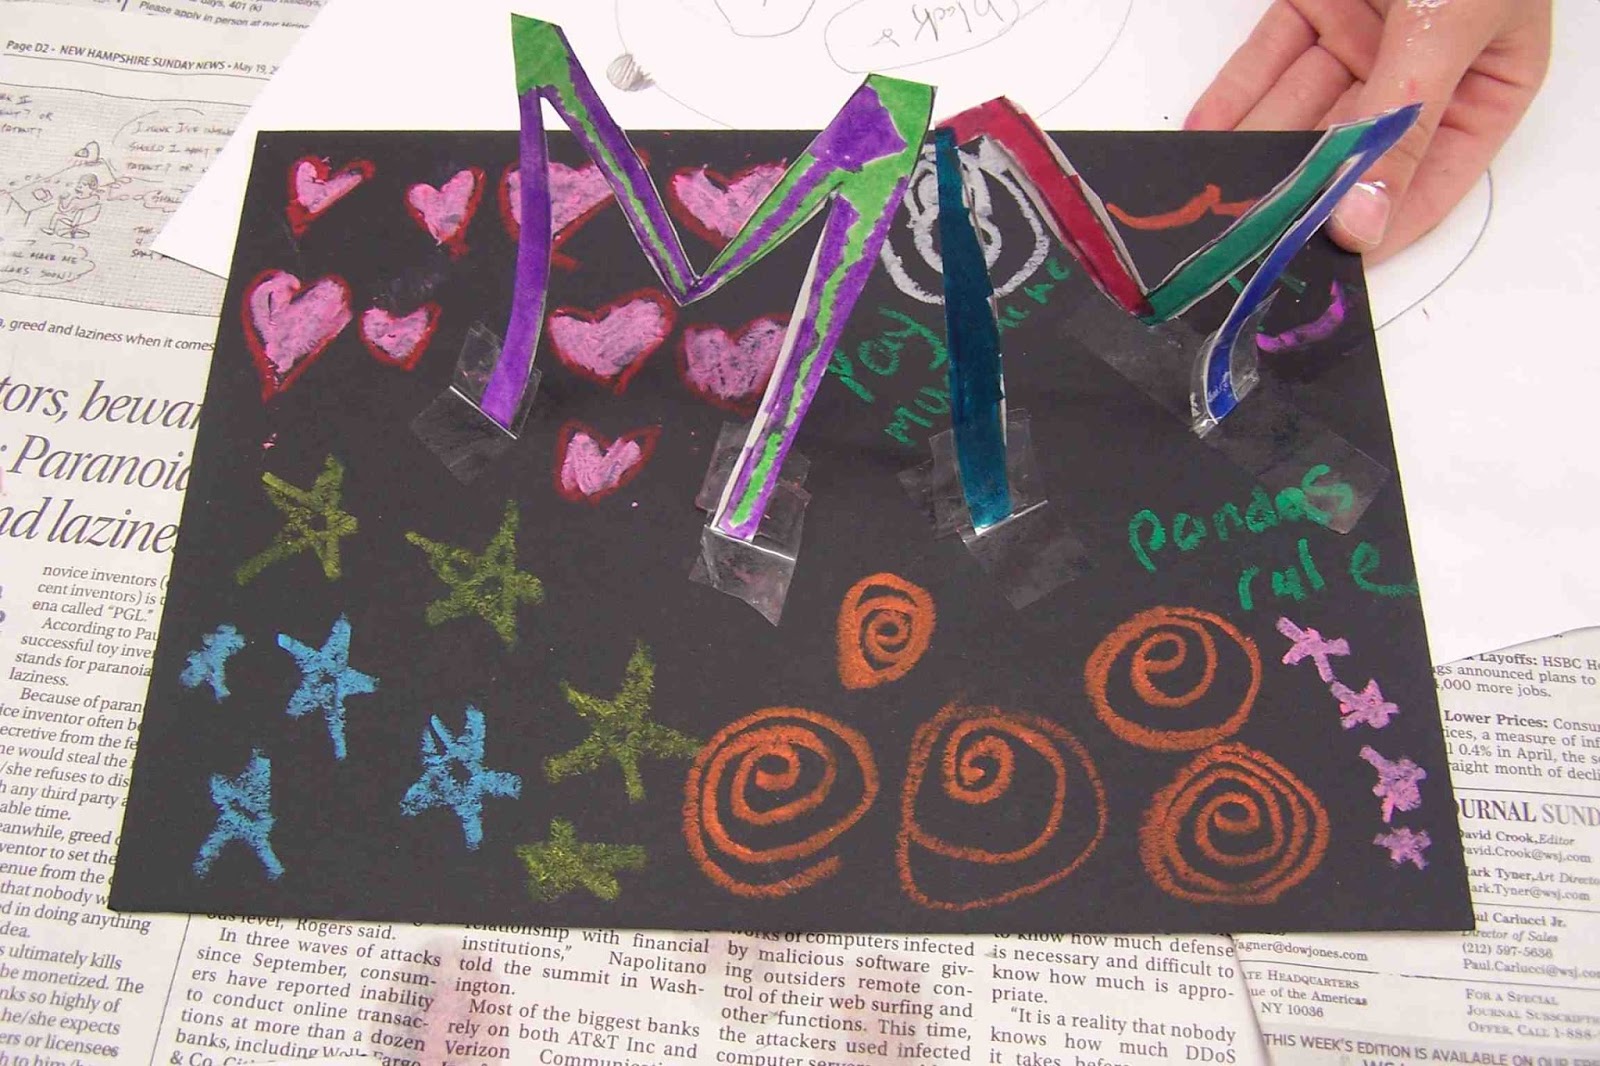
Easy Paper Name Sculpture For DAD

Yep, Father's Day is right around the corner, but don't fret if you haven't made Dear Old Dad a present yet...here's a fun and easy sculpture you can make for him that will look nice on his desk or toolbox (that's how the dads in our family roll). 


This project is based on one I saw on pinterest that had no destination or info--it was pretty much a picture on the internet. I've tried to do it justice, so here's my version. My early finisher students did this one day after painting some other sculptures. I'd say this project takes less than a half an hour to do if you choose an easy word like "dad."I'd love to have my students create multi-leveled sculptures with their entire names (more letters = a more exciting sculpture), but that's for another time!

Paper Name Sculpture For DAD

Supplies Needed:
  • 3" x 5" index cards, white on both sides (one for each letter of the name you choose)
  • Pencil
  • Scissors
  • Markers
  • Clear Tape
  • Mat Board, we used black
  • Oil Pastels
Directions:

1. Draw nice, thick letters onto the index cards making them as big as you can (touching all edges of the index card, if possible). Cut out your letters with scissors.

2. Decorate both sides of each letter with markers. Use at least two colors on each side of every letter. Try using different patterns and colors for each letter--have fun!

3. Use clear tape to attach the letters to the mat board so they stand up. Make your letters touch and lean against one another, if you'd like. The more letters you have, the more elaborate your sculpture will be. You can even make your sculpture go up vertically if you have enough letters. Think of building this sculpture like you would build a house of cards with a deck of playing cards, but you can hold the letters together with clear tape (bonus!).

4. Once all of your letters are taped where you'd like them, use the oil pastels or craypas to write a message on the base such as "I Love You!" or "Dad Rocks!" The decorate the rest of the base with the oil pastels with swirls, lines, and patterns.

Now you have a colorful sculpture for Dad! Enjoy!


Some students made sculptures with their initials instead.

And this student made a sculpture for his dog, Lulu!

Wednesday, June 6, 2012

Father's Day: Recycled Ship in a Bottle

Father's Day is on the way! This week, in my Recycled Art class, I'm having the children create a project that they can give to Dad--A Ship in a Bottle! Many of the kids had never seen a real ship in a bottle--and they had fun trying to figure out how I got the ship inside the bottle (like countless generations have done with real ships-in-bottles!). But it was simple, here goes...

Hey, how'd ya do that??
By the way, I apologize for the awful pictures, my camera is challenging me today (grrrrr....)....

Recycled Ship in a Bottle

Supplies Needed:

  • A small, clear plastic bottle (I used a bunch of bottles from juice I had bought from Cosco so they were all the same size for my students)
  • Corrugated cardboard (cheap, thick sheets work best)
  • Pencil
  • Ruler
  • Scissors
  • Tacky glue
  • Hot glue with glue sticks
  • Toothpicks
  • A pointy nail
  • Paper scraps--card stock has the best color (blue, white, brown, red, etc.)
  • Yarn or string, optional
  • Clear tape
  • 6 popsicle sticks
Directions:

1. This may take a bit of fiddling--you'll need to adjust these instructions to fit the dimensions of your bottle, but here's what we did. Cut a rectangle from the bottle of the plastic bottle. I did this for the kids because I didn't want anyone to poke themselves with the scissors. Make sure the piece you are cutting doesn't come up the side of the bottle too much, because then you'll see it when you put the bottle back together. We were fortunate since our bottles were square-shaped. You'll be reattaching this piece of plastic to the bottle, so you'll want to plan your ship so that it doesn't extend beyond this piece (or you won't be able to fit it in the hole you created in the bottom of your bottle!).

We used 10 ounce Naked juice bottles
2. Create some water for your boat to sit on. Cut a piece of blue paper for water and glue it to the rectangular piece of plastic you cut from the bottle using hot glue or tacky glue. Make sure your water doesn't extend beyond the edges of the plastic rectangle.

3. Create your ship (you only need one per bottle, unless you have a really big bottle):

To create a sailboat: Cut a boat-shape from corrugated cardboard that is pointy at one end and flat at the other end. Depending on the size of your bottle, your boat might be pretty small. Our sailboats were about 1 1/2"-1 3/4" long. Trace this shape on corrugated cardboard three more times and cut out so you have four layers of corrugated cardboard, making the hull of your boat about 1/2" tall (thick). Stack and glue the layers of your ship together.

Cut a strip of paper 1/2" tall and wrap it around the outside of your sailboat. securing with glue. This will finish off your sailboat--you can make the sailboat any color you wish.

Use the nail (or something equally "pokey") to poke a hole in the center of your sailboat. through the layers of corrugated, for the mast. Insert a toothpick into the hole and cut it down so that it fits the height of your bottle.

Cut a triangular-shaped piece of white card stock for a sail. Use the nail to poke a holes in the sail, insert the sail onto the mast and then secure to the mast with glue, if necessary. Hold the sail in place until the glue is set.

Sailboat in the background and multi-sailed ship in foreground.
To create a many-sailed ship (pirate ship, the Mayflower, etc.): Cut a boat-shape from corrugated cardboard that is pointy at both ends. Depending on the size of your bottle, your boat might be pretty small. Our many-sailed ship was about 2" long. Trace this shape on corrugated cardboard three more times and cut out so you have four layers of corrugated cardboard, making the hull of your boat about 1/2" tall (thick). Stack and glue the layers of your ship together.

Cut a strip of paper 1/2" tall and wrap it around the outside of your ship. securing with glue. This will finish off the hull of your ship--I used brown for my example to make a traditional-looking ship, but you can make your ship any color you wish.

Use the nail (or something equally "pokey" to poke two holes in the top of the hull of your boat. through the layers of corrugated, for the masts. Insert a toothpick into each of the holes and cut them down so that they fit the height of your bottle.

Cut three square-shaped pieces of white card stock for sails. Use the nail to poke a holes in the sails, insert onto the masts and then secure to the mast with glue, if necessary. Use the photos as a guide. Hold the sail in place until the glue is set.

Add a bit of string or yarn, as rigging, to your ship for detail, securing it with glue.

4. Glue the ship onto the water, and let everything dry completely. This is important since you'll be fiddling with it to get the whole thing back in the bottle--you'll want your ship to be secure!

5. Insert the boat into the ship and use the clear tape to secure the plastic rectangle base back in place. Tape all four side of the rectangle.

6. Stack and glue popsicle sticks together to make two legs to use as a display "base" for the bottle. Glue the popsicle stick legs to the bottom of the plastic bottle, covering the seams of the piece you had originally removed.

7. The finished ship in a bottle can be attached to (or inserted in to) a piece of card stock decorated with a message for Dad on his big day! 

Poster board "card" decorated and with slits cut
to accommodate the finished piece.

Anchors Away! Enjoy!!

Sunday, February 13, 2011

Valentine Solitaire Game

Well, I needed to create a craft for my son's 3rd grade class to create during his St. Valentine's Day party at school. In the past, I've sent in crafts where the kids can make bracelets and pom pom critters, but I wanted to make something that these "older" kids would like.

This summer, when my family went to The Polar Caves in upstate New Hampshire, my oldest son was facinated by the little wooden puzzles on the tables where players could jump little pegs trying to get as few pegs left as possible. The version he played was a triangle shape. I thought if I turned the puzzle upside-down,  could use a heart-shape and make a cool Valentine's craft that would appeal to these sophisticated kids in bigboy's class--both boys (who seem to hate anything with hearts on it) and girls.

They were fun to make. Relatively easy, and even though they are a little more expensive than I would normally do for a classroom craft, pretty economical. I could even see someone making a batch and handing them out as Valentine's. They would also work well for a Father's Day craft/present or a Christmas craft/present (or many, many, other holidays where a simple present is needed). The supplies for 22 of these games cost me about $30.00 without using any coupons.

Here's how to make them:

Valentine Solitaire Game

Supplies needed for one game:
  • 1-4 x 5"  rectangle of 1" thick styrofoam (I needed 20 pieces, so I bought a 12"x36" piece at Michael's for $7.99)
  • 1-4 x 5" rectangle of cereal box cardboard (FREE-used my recycling)
  • 1-8 x 13" piece of red wrapping paper (or whatever color/pattern you choose) (I bought a roll at Michael's for $3.99)
  • Heart printout which includes game board and directions (Made by me--we'll see if I can upload a pdf)
  • 14 Golf tees (I bought a large quantity at Sports Authority-250 for $14.00, but there are smaller bags there for about $5).
  • Crayons or stickers for decorating (optional)(free--I used what I had on hand)
  • Scissors, tape, glue stick
How to create it:
  1. Tape the cardboard rectangle to the styrofoam block.
  2. Wrap the cardboard/styrofoam with the wrapping paper like you are wrapping a present. Remember which side has the cardboard on it--that will be the bottom of the game (the cardboard keeps the golf tees from poking through the foam and out the other side which would ruin the game).
  3. Cut out and decorate the two hearts: the game board and the directions. You can color them with crayons, markers or colored pencils (don't block the game board or directions!).
  4. Using a glue stick, glue to game board to the side of the package that does not have the cardboard. Glue the directions onto the opposite side of the package.
  5. You can now add stickers to the piece if you'd like.
  6. Now, for the holes: gently poke the golf tees into the circles on the board game side. Poke them straight in. The cardboard inside the package will stop them from coming out the back of the game. Because there are 14 pegs and 15 holes, you'll need to poke an extra hole.
You are done! Have fun playing this game alone or with your family and friends!

Step One: Tape together cardboard and foam
Step Two: Wrapping the foam/cardboard

Step Four: Gluing on the hearts
Step Six: Poke the golf tees into the board

The finished game with 14 tees packaged in a quart size freezer bag so that the kids can take them home.


Related Posts Plugin for WordPress, Blogger...