Showing posts with label tissue. Show all posts

Friday, January 29, 2016

Laminated Snowy Day Calendar

YAY! I got a laminator! For those of you who work in a school, it may seem like no big deal, but I work a mish-mash of part-time gigs right now, so when I want to laminate something, I have to go to the office supply store.  Since I'm often pressed for time (and money), I usually use Contact paper or I slip the paper into a sheet protector.


I love the Cardinal--what a bright bit of color!
I probably would have kept doing the sheet-protector-thing, but I saw this great image online and thought it would make a lovely image for my Gifts From The Art Class that is coming up soon. I read that the artist used the ultra-thin tissue paper that shoes come wrapped in. How clever ! I loved the look of the image--I couldn't tell if it was a spring or winter picture--it seems like it could be either--perfect to go with a year-at-a-glance calendar. My challenge was to see how I could recreate the piece for my students and have it hold together to make it gift-worthy. That's when I thought of the laminator! My friend had one and she sold it to me for $1, and here I am.

Snowy Day Calendar

Supplies Needed:


  • One 8 1/2" x 11" piece of medium blue card stock (I used scrapbooking paper)
  • One 8 1/2" x 11" (or so) piece of dry wax paper (or tracing paper or thin tissue paper); dry wax paper is sold at restaurant supply places and it has less wax on it than regular wax paper--it is used to wrap sandwiches
  • White paper scraps
  • Scissors
  • White glue stick (not the purple ones)
  • A year-at-a-glance calendar trimmed to fit on the page, allowing enough space for the image, I got mine at www.believingboldly.com, she has a few free printable year-at-a-glance calendars to choose from. I printed it out at 75%
  • Tiny scrap of red card stock
  • Laminator & laminating film

Directions:

1. Draw a very faint line halfway down the blue paper, this will be a guide for the bottom edge of your tree image. Use your glue stick to make a line of glue in the ground area and make four circles of glue where each of your trees will be. Don't worry about getting the glue perfect--you are just putting the glue where you want the confetti to go.

2. Cut the white paper into strips about 1/8" wide. Then hold a couple of strips together and cut the strips into 1/8" squares, over your blue paper, so that the little confetti squares fall onto the areas that have glue on them. Shake the excess confetti off the paper.

3. Crumple the dry wax paper slightly. Rip the paper into circles, ovals, squares and/or strips and apply them to create layered areas on the ground, leaf area of the trees and for the trunks of the trees. When we got to this tissue paper part, I had my students gently dab the dry wax paper on the glue stick instead of using the glue stick on the blue paper (which moves the confetti around). You don't have to goop on the glue--you just need the dry wax paper to stay still until you've laminated the piece.

4. Once you have the leaf areas, trunks, and ground done, you can add a cardinal cut from red card stock. If you had a bit of tan card stock, you could make a female cardinal, too.

5. Use a glue stick to attach the calendar printout to the piece. Trim any excess tissue paper and have the artist sign the piece.

6. Laminate and enjoy your artwork all year long!

Monday, January 5, 2015

Calendar Design #3: Snowy Day Calendar (REPOST)

OK, this is the LAST calendar idea I'll post in the series--I promise. Well, I *think* it will be! This is a repost of an idea I used with a group of art students way back in 2012. Oh, it seems like so long ago :-)

You can read the original post here, but I got the idea for the image from Pinterest back when I was new to pinning. I just loved the image which (through the use of Google Translate) I found was made using the tissue paper the crafter received in a pair of shoes she had purchased. How creative to see potential in something most of us just throw away!

ENJOY!

Friday, December 7, 2012

To Brighten Your Day: Frank Lloyd Wright Windows

My Modern Art Class created some lovely faux stained glass windows based on the work of American architect, Frank Lloyd Wright. I've done this project with students before, and the process can be seen in this post.

This time, I tweaked my presentation a bit. I showed a large poster of Fallingwater, one of Wright's most famous houses. I talked about what an architect does, and about Wright's design philosophy. We made some observations about the building and I pointed out the horizontal, vertical & diagonal lines of the building (later on, I showed how these same lines appear in his stained glass windows).

Then we discussed how Wright was, um, a bit of a control freak when it came to his interior designs. He designed every little pillow, lamp, rug and even the dishes that would go into the house. We looked at some of his stained glass window designs. I was fortunate to have a great article that I have had FOREVER, well, since 1995 anyway, that appeared in American Patchwork & Quilting Magazine about a quilter named Jackie Robinson, who recreates Wright's stained glass windows in fabric. This is an awesome article because it shows how she constructs the quilts and really helps the children see the windows broken down into sections; leading vs. glass, and shapes such as squares, rectangles, rhombi, and triangles. I think this article really helped me simplify his work for the children.

I tried to access the article through the American Patchwork & Quilting's official site, but they didn't have it available. However, Jackie Robinson has her own site called Animas Quilts Publishing. Robinson had published an entire book of quilt designs based on Wright's stained glass windows titled, "Quilts In The Tradition of Frank Lloyd Wright." It is currrently out of print, but there are a few copies still floating around out there. There is a Frank Lloyd Wright section of her site showing examples of Wright-inspired quilts made from her book.

So, here are the beautiful results of my Frank Lloyd Wright lesson! Enjoy!


Monday, October 22, 2012

What a Relief! Monet Waterlilies

Last week my Modern Art class created pictures based on van Gogh's "Starry Night" painting. The focus was on little strokes of color and using MANY colors in each section. It seemed to me that a natural next step would be to learn about Monet. With this project, the students could, again, work from a reproduction in order to increase their awareness of the artist's technique and color choices, and build on what they learned last week.


Monet also used little dashes of color in his work. We used oil pastels to create our dashes of color. I told the children that we weren't doing to connect these dashes with watercolor paint like we did last week in our van Gogh pieces--this week they needed to cover the entire surface of their piece with dashes of color. To make this less daunting, I reduced the size of the paper. I also used a nice blue color of matte board as their "base." This way, if a bit of blue poke through between the dashes, it still looked like water.

Monet also used MANY colors in his work. We listed all the colors we saw in the reproductions in front of us and pretty much determined that we could use all of the oil pastels in our kits (they are a collection of 12 colors). I asked them to try to use every color at least once in their backgrounds. This wasn't a set rule (like my three-colors-in-each-section rule of last week), but I wanted them to try MANY colors.

We then created the lily pads and lilies separately and attached them. The children were open to working in this way since the "collage technique" was similar to the van Gogh pieces they had made the week before. The lilies are created using tissue paper "puffs" and stick out from the background. This is not 3D, since we can't completely walk around the piece and see it from all sides, but is called a relief.

I had never done a lesson like this before, but I was VERY happy with it. I love the dashes of color and the bright hues of the oil pastels!

Monet Water Lily Relief

Supplies Needed:
  • Reproduction of one of Monet's Water Lily Paintings
  • Matte Board scrap in a medium blue (or other watery color), ours were 8" x 10"
  • Ruler
  • Pencil
  • Masking tape
  • Oil pastels (ours were "Cray•pas" brand, a set of 16)
  • Scrap pieces of poster board or white card stock (for lily pads)
  • Scissors
  • Scrap bits of tissues paper in a variety of peach, pink, white, yellow colors (three colors at least)
  • Clear tape
  • Tacky glue
Directions:

1. Use the ruler to create a 1" border around the edge of your matte board--all four sides.

2. Attach pieces of masking tape to the matter board, using your pencil lines as a guide, to create a nice taped "frame" around the edge of the matte board. When you are done, you'll be removing the tape and this will leave a nice clean edge around your piece. **TIP: stick the masking tape strips to your shirt before placing them on the matte board so they loose some of their stickiness and are easier to remove later on.**

3. Begin filling in the background of your piece using the oil pastels. You will want to use little dashes of color--using the end of the oil pastel will give you a nice thick dash. You can change colors and layer dashes over one another. Make sure you aren't scribbling like you do with a crayon--dash, dash, dash...filling in the water and the plants on the edge of the water.

4. Once the background is done, draw three ovals with pencil onto the white card stock. The ovals should be about 1 1/2" wide. These are your lily pads. Fill in the lily pads using at least three colors (ha! I had to say it!). Cut the ovals out and put a little slit in each one coming from one edge into the center. Put aside.

5. Cut or rip three tissue paper squares. They should be of a couple different colors and be around 1 1/2" square. Layer them and pinch the center and give them a twist to make a little "pouf" of tissue paper. This will be your water lily. Insert the twisted tip of the water lily into the slit of the lily pad you created. Tape the point of the tip to the backside of the lily pad with clear tape to secure them together. Repeat with the other lily pads you have created.

6. Put a dab of glue on the back of each lily pad and place them onto the background. If you'd like, you can add some lily pads to the background with oil pastels. This gives the illusion of depth in your picture, but it is not necessary.


Wednesday, October 3, 2012

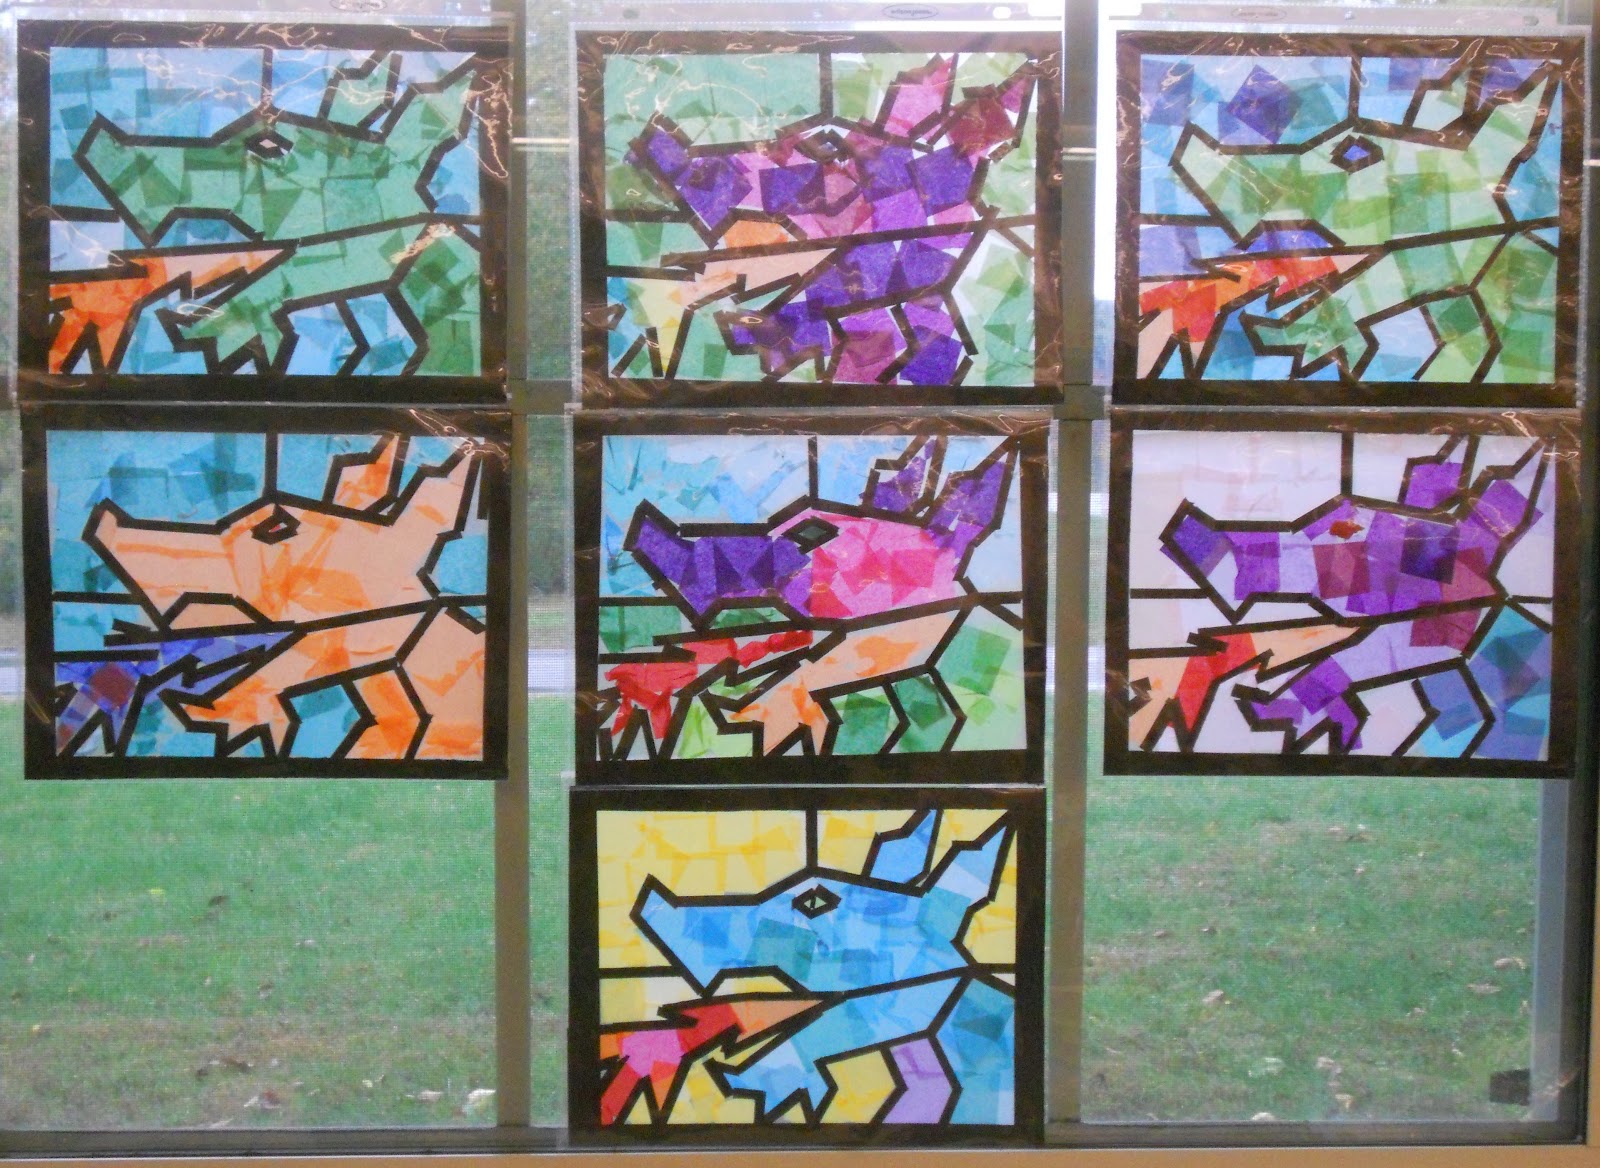
Dragon (Faux) Stained Glass

Yesterday was the first session in my after school Medieval Art Class! What a blast! I have a great group of kids and a nice mix of boys and girls!


Aren't these fabulous?!
We did a variation on a project I saw in the book, "Medieval Projects You Can Do" by Marsha Groves. The image is pretty much the one Groves uses, but I used the Contact paper technique that I've developed with my students over the last couple years.

I showed the children pictures of stained glass from medieval times, making sure that I had examples of traditional stained glass (tall and rectangular), some details showing the brushed-on enamel details, and an example of a rose window with its circular design.

I then provided them with a guide that had the dragon image on it with all of the sections labeled so the children would know what was fire, what was dragon and what was background (sometimes that gets confusing). Using a template like this is actually very traditional. In medieval times artisans would sketch the designs for windows onto wooden panels and the artisans would fabricate the windows on top of the wooden templates.

The end results of this project were gorgeous! It is funny how different the pieces can be even thought they are all the same subject.

One bit of warning, using tissue paper squares with children can be, um...tricky. This group wasn't bad at all: I had the tissue paper squares in a tray in the center of each table and I warned that crazy movements can cause the squares can fly up and get on other people's work (not cool!). Once the tissue paper is on the Contact paper, it cannot be removed, so the children need to be mindful of their neighbors' pieces and move slowly and carefully.

I do hope you try this project, it really is a cool one!

Here's the method:

Dragon (Faux) Stained Glass

Supplies Needed:
  • Template (I copied mine on 8 1/2" x 11" paper)
  • Pencils, Ruler & Sharpie to create your template
  • Piece of clear Contact paper slightly larger than your paper guide
  • Clear tape
  • Four 3/4" x 12" strips black construction paper "(for frame)
  • About four 1/4" x 12" strips black construction paper "(for leading)
  • Many 1" squares of tissue paper, assorted colors
  • Scissors
  • 1 clear sheet protector, optional
Directions:

1. Make your template: Draw a border around the copy paper that is about 1/2" wide. Use the pencil & ruler to create a simple, bold image made up of straight lines. Don't make anything too detailed! You can use the dragon image for inspiration. Once you have your design down, use the Sharpie to go over the lines. These will be the guide lines you will use when placing your construction paper leading. You may want younger children to work from a template image you've created, but older children could create their own over a period of classes.

2. Tape the template to the table using clear tape.

3. Remove the paper backing from the Contact paper and place it on top of the template sticky side up. You will be doing all of the work on the sticky side of the Contact paper. Tape the Contact paper to the table using a couple pieces of clear tape to hold it in place while you work.

4. Place the 3/4" pieces of black construction paper over the areas of the template designated as your border. Place the paper strips directly onto the sticky side of the Contact paper and press lightly. It is OK if the strips extend beyond your template--you'll be trimming the piece later.

5. Using your template as a guide, place the 1/4" strips of construction paper over the leading lines on the image you drew. Simply rip (or cut) the construction paper strips to the proper length to cover your leading lines. Cover all of the lines in your drawing.

6. Once you have the border and all of the leading lines covered in construction paper, start filling in the remaining sections with colorful pieces of tissue paper. The squares can overlap each other and can overlap the black construction paper lines a bit (you are actually working on the piece from behind). But take care to make sure the tissue paper goes where you want it to. It is almost impossible to remove the tissue paper from the Contact paper once it gets on there. 

7. Once all of the sections are filled in with color, trim the piece down to 8 1/2" x 11" and slip it into a clear sheet protector to protect it. Other options would be to use another sheet of Contact paper on the other side of the piece to seal the tissue paper and construction paper safely inside. Or you could run the piece through a laminator (maybe), I don't have one at my disposal, so I'm not sure of that, but it may work. 

Place in a sunny window and enjoy!

Working on our dragon (faux) stained glass windows.
Everything is taped down with clear tape and the tissue paper
squares are in the center of the table in cardboard trays.

Monday, April 9, 2012

Frank Lloyd Wright Faux Stained Glass

Last week my after school class created Frank Lloyd Wright-inspired stained glass windows. I showed them a variety of his stained glass designs and then let them explore line, shape and pattern to create their own stained glass designs. They looked wonderful on the windows with the bright spring sun shining through!


Frank Lloyd Wright-Inspired Stained Glass Windows

Supplies Needed:

  • 1" Grid template, optional (more info below)
  • Clear Contact paper (2 sheets 18" x 12")
  • Black construction paper strips, some 1" wide and some 1/4" wide, 18" long
  • Additional black construction paper for circles or other non-linear shapes
  • Scotch tape
  • Scissors
  • Ruler
  • Pencil and eraser
  • Tissue paper, various colors
Directions:

1. This piece is worked from the back. I created a grid template for my students to use that had 1" squares on it. I used two sheets of 8 1/2 x 11" paper taped together. This is a nice space to work on encouraging the students to use the grid for their pieces. Some disregarded it and others really utilized it for the creation of their designs. I had each student tape a template to their desk.

2. I then had the students remove the paper film from the Contact paper and lay that on the grid template sticky side up. This is the surface on which the window will be created.

3. I had the children place 1" wide black construction paper strips around the outside of the grid gently pressing them onto the Contact paper. This creates the frame for the window.

4. I then had the children create a Wright-inspired design over the grid using 1/4" wide strips of black construction paper. This is the leading of the stained glass window. I explained that the lines can be horizontal, vertical or diagonal. Also, the intersection of the lines can make shapes such as squares, rectangles, triangles and rhombi. Circles and portions of circles could also be added.

I told them that they did not need to fill the entire window with lines and shapes (look at Wright's work) . I also kept encouraging them to take their time and plan.

A look at the pieces in progress...messy but fun!

5. Once their leading was done, I took a quick look and then demonstrated how they could add color to their piece. Some of the more geometric shapes could easily be cut from tissue. They could use the grid to help: if they had a shape that was 2 squares by 3 squares on the grid, they could cut a 2" x 3" rectangle from tissue paper. For younger students or for shapes that were trickier to cut from tissue, I suggested the children tear off pieces and just fill in the section with "bits" of tissue. The tissue easily sticks to the Contact paper. I told the children it is OK if the tissue paper extends onto the black lines a bit since this is the back of their window and that won't be seen when it's done. I suggested that the children not fill the entire piece with color since Wright often left portions of his windows clear.

6. Once the children had added all the color they wanted I adhered a second piece of Contact paper over their work creating a sandwich to seal the tissue and construction paper inside. I've done a similar project to this using just one sheet of Contact paper and it doesn't hold up as well as the "sandwich" of two pieces of Contact paper).

7. The children could then use their scissors to cut the excess Contact paper from around the piece using the outer edge of the frame as a guide.

I placed these pieces on the windows immediately so we could all enjoy the bright colors and beautiful designs!


Tuesday, March 27, 2012

Origami Butterfly Wreath for Easter or Spring

My family loves origami! So when I saw the directions for an origami butterfly on Pinterest, I knew I had to create a project that used them! So, here 'tis! This is a relatively simple and VERY inexpensive project that would be suitable for children grade 2 and up (the origami may be a bit challenging for a young one and the tissue paper can be time consuming).


The butterfly origami directions are from Go Origami. Many of the gorgeous projects on this site are too advanced for me, but the butterfly is easy enough.

Enjoy making this lovely wreath and bringing a bit of Spring into your home!

Origami Butterfly Wreath for Easter or Spring

Supplies Needed:

  • One paper plate
  • Pencil
  • Scissors
  • Elmer's glue
  • Glue tray (I used the lid of a yogurt tub)
  • Tissue paper in green (I used three colors of green for interest)
  • Three pieces of origami paper (or thin colored paper), assorted colors
  • Hole punch
  • Ribbon
Directions:

1. Trace a 5" circle in the center of the paper plate. Use the scissors to poke a hole in the center circle and then cut and remove the center circle so you are left with an outer ring of a paper plate. This is the base of your wreath.

2. Cut the tissue paper into 1" squares. I can't tell you how many squares you'll need, but you'll probably end up cutting WAY more than you need.

3. Pour a bit of glue into the tray. Take a 1" square of tissue paper and CENTER it over the eraser end of the pencil, smoothing the edges of the tissue paper around the eraser and pencil. Use your fingertips to HOLD the tissue in place and then dip the covered end of the eraser into the glue. Gently touch the tissue-covered eraser to the plate, and remove the pencil. The tuft of tissue paper should remain. You'll be attaching the tufts of tissue paper to the underside of the plate--not the side you'd eat on.


4. Repeat with additional tissue paper squares until the surface of the plate ring is covered. It helps to place the tissue paper tufts next to each other as you go--this will ensure that the wreath is nice and full and doesn't have any bald spots! If you are working with a younger child, you can work with him/her on this part. Many children won't mind the help and it's a wonderful time to sit and chat quietly with your child. 

5. Once the front surface of the wreath ring is covered with tissue paper tufts, use a hole punch to make two holes about 5" apart on the top edge of the wreath. This will allow you to hang the wreath up later. Set the wreath aside to dry.

6. Trim the origami paper so that one piece is 6 inches square, another is five inches square, and the third is four inches square. Fold into butterflies. Directions can be found here.

7. Attach ribbon to the wreath. Trim if necessary.

8. Use glue to attach butterflies in a pleasing arrangement. 


You're done! Welcome Spring!

**Another option to make this much easier for little ones is to reduce the size of the plate wreath. Making the wreath ring 5-6" across will be much easier for a single child to do on his/her own. Then adjust the size of the butterflies accordingly, maybe a butterfly made from a 5" square flanked by butterflies made from 4" squares. 

Related Posts Plugin for WordPress, Blogger...