Showing posts with label class. Show all posts

Friday, June 13, 2014

Andy Goldsworthy Nature Sculptures

My Spring Art class headed outside to create some beautiful Nature Sculptures inspired by Andy Goldsworthy. Many of the children weren't familiar with his work, but really got inspired as we looked at a book I had brought called, "Hand to Earth." As we flipped through the pages, they were amazed at his work and itching to get started!


I had wanted a quick lesson where they could create outside and had intended that while they were creating their sculptures, I would work with small groups to make sun prints--a natural link, in my opinion. But alas, the weather didn't cooperate and the sun prints were a no-go due to the sun going away as soon as class started! At least it didn't rain! :-)

Unfortunately, the students can't take something him from a class like this--we even needed to destroy them before we left--that was hard for some. But, I brought the iPad and took some photos of each sculpture. Once I went home, I used PicCollage to bring all of the images from class together into a collage that could be printed as a poster--a very pretty one, I'd say! I emailed those out that afternoon to the families so the children could remember their sculptures forever.

This is a great lesson! The prep is pretty minimal, of course, but it really gets a good discussion going about the following themes:

  • Looking closely at nature
  • Being good stewards of the land
  • Working together as a team/taking turns/helping
  • Elements of art/principles of design
  • What is sculpture?
  • What is art?
  • The job of artist (How does an artist get paid for work such as this? What inspires an artist? How long will pieces like this last in nature?)
So, here's the final poster--enjoy!


Sunday, November 11, 2012

Amherst PTA Online Auction Has Begun!

YAY! The day is here! The Amherst PTA's Online Auction has begun. This is a wonderful fundraiser for our local schools and there are so many wonderful things to kick-start your Holiday Shopping. Click here to enter the auction site and browse. The auction ends promptly November 17th at 11:00pm ET.


There are categories such as:

  • Fun At School (lunch with principals and teachers, etc.)
  • We Love Sports (karate lessons, etc)
  • Eat, Drink and Be Merry (Wine, GC at Restaurants)
  • Pamper Yourself (Gift baskets, jewelry, etc.)
  • Let's Go Shopping! (More GC's, etc.)
  • More Great Stuff (Classes and items for yourself and for giving)


I donated two things to the auction: the first is the Kandinsky-inspired canvas with the learning quote "You Learn Something EVERY Day IF You Pay Attention." This is perfect for home or classroom! We can all use a reminder to pay attention, right? NOTE: If someone outside of driving distance to Amherst, NH (say, over 30 miles--but still in the continental U.S.) is the winning bidder of this piece, I'll pay to ship it to you.

The other thing I donated is full tuition for my "Gifts From The Art" Class held in Amherst at Wilkin's Elementary School in December 2012. This is a fun 2-day class where children can create art-inspired gifts for their family and friends for the holidays. It really is a blast and the children create all sorts of amazing pieces. This one you'll have to be in Amherst to attend. Right now, this class is open to 2nd-4th graders. Here's the post about last year's class.

Both of my items are in the "More Great Stuff" category.

OK, so there's my commercial--get bidding!

Wednesday, October 3, 2012

Dragon (Faux) Stained Glass

Yesterday was the first session in my after school Medieval Art Class! What a blast! I have a great group of kids and a nice mix of boys and girls!


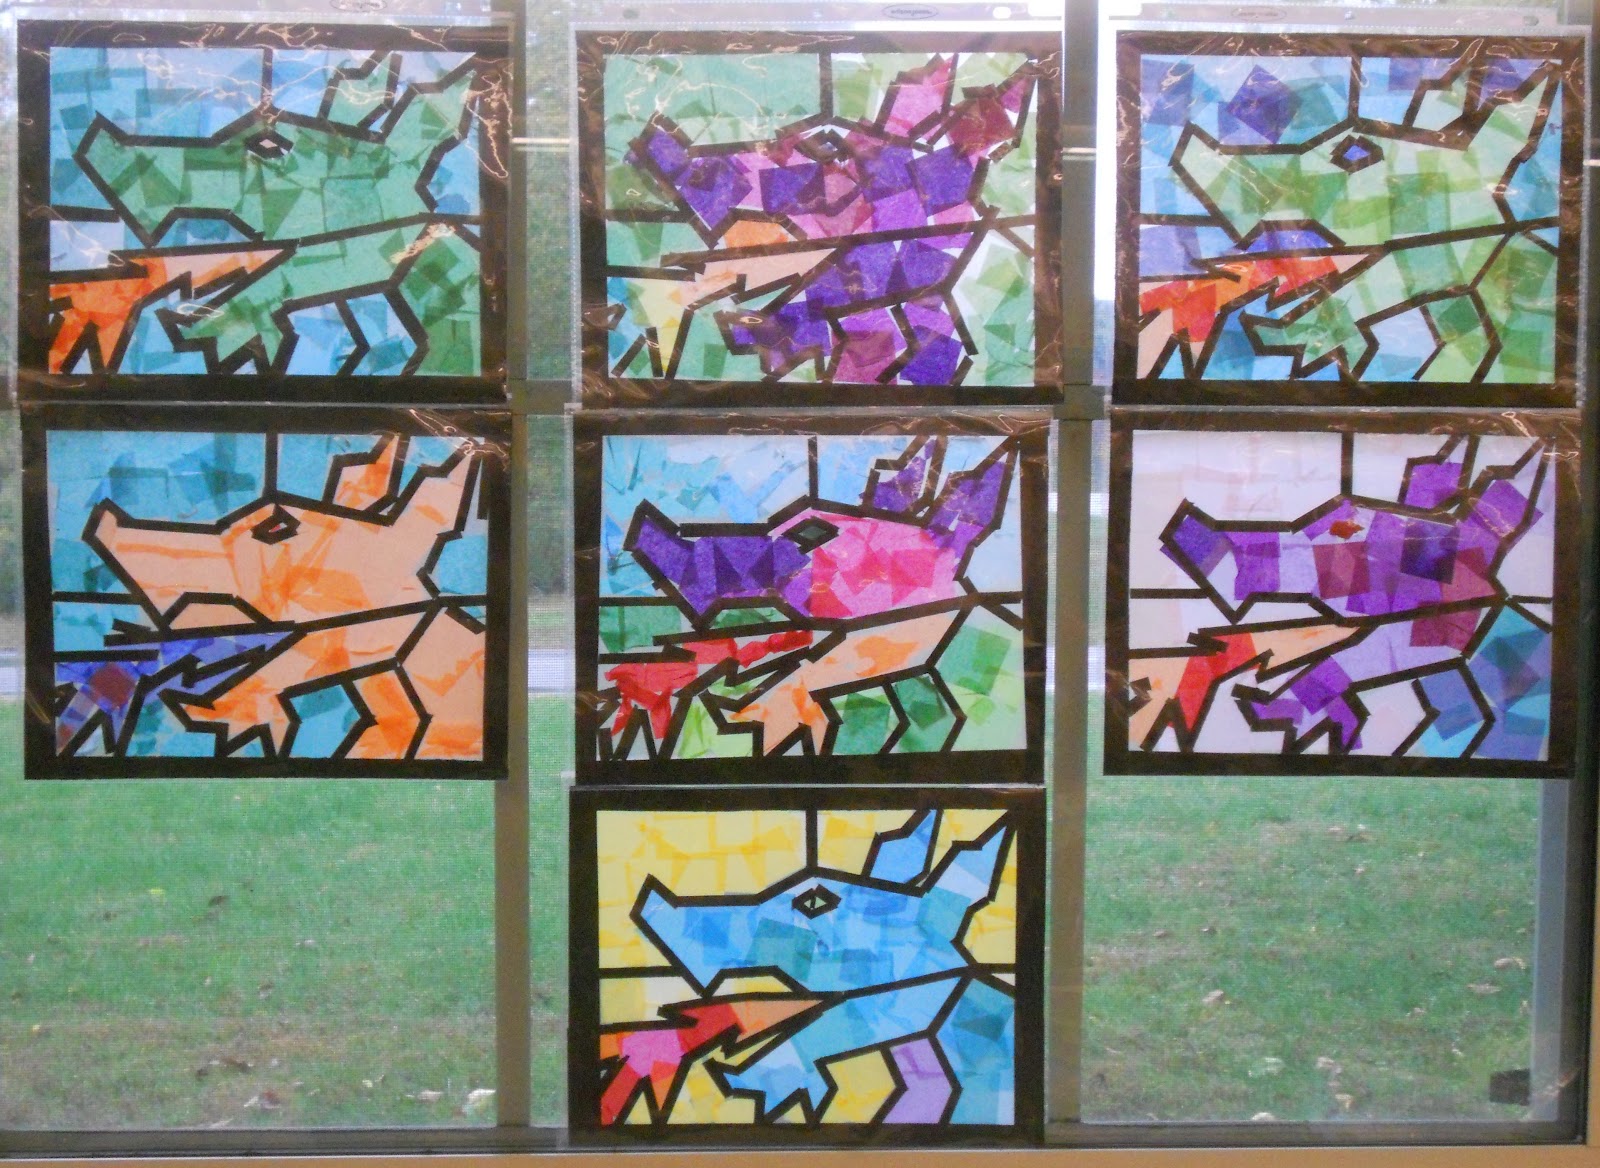
Aren't these fabulous?!
We did a variation on a project I saw in the book, "Medieval Projects You Can Do" by Marsha Groves. The image is pretty much the one Groves uses, but I used the Contact paper technique that I've developed with my students over the last couple years.

I showed the children pictures of stained glass from medieval times, making sure that I had examples of traditional stained glass (tall and rectangular), some details showing the brushed-on enamel details, and an example of a rose window with its circular design.

I then provided them with a guide that had the dragon image on it with all of the sections labeled so the children would know what was fire, what was dragon and what was background (sometimes that gets confusing). Using a template like this is actually very traditional. In medieval times artisans would sketch the designs for windows onto wooden panels and the artisans would fabricate the windows on top of the wooden templates.

The end results of this project were gorgeous! It is funny how different the pieces can be even thought they are all the same subject.

One bit of warning, using tissue paper squares with children can be, um...tricky. This group wasn't bad at all: I had the tissue paper squares in a tray in the center of each table and I warned that crazy movements can cause the squares can fly up and get on other people's work (not cool!). Once the tissue paper is on the Contact paper, it cannot be removed, so the children need to be mindful of their neighbors' pieces and move slowly and carefully.

I do hope you try this project, it really is a cool one!

Here's the method:

Dragon (Faux) Stained Glass

Supplies Needed:
  • Template (I copied mine on 8 1/2" x 11" paper)
  • Pencils, Ruler & Sharpie to create your template
  • Piece of clear Contact paper slightly larger than your paper guide
  • Clear tape
  • Four 3/4" x 12" strips black construction paper "(for frame)
  • About four 1/4" x 12" strips black construction paper "(for leading)
  • Many 1" squares of tissue paper, assorted colors
  • Scissors
  • 1 clear sheet protector, optional
Directions:

1. Make your template: Draw a border around the copy paper that is about 1/2" wide. Use the pencil & ruler to create a simple, bold image made up of straight lines. Don't make anything too detailed! You can use the dragon image for inspiration. Once you have your design down, use the Sharpie to go over the lines. These will be the guide lines you will use when placing your construction paper leading. You may want younger children to work from a template image you've created, but older children could create their own over a period of classes.

2. Tape the template to the table using clear tape.

3. Remove the paper backing from the Contact paper and place it on top of the template sticky side up. You will be doing all of the work on the sticky side of the Contact paper. Tape the Contact paper to the table using a couple pieces of clear tape to hold it in place while you work.

4. Place the 3/4" pieces of black construction paper over the areas of the template designated as your border. Place the paper strips directly onto the sticky side of the Contact paper and press lightly. It is OK if the strips extend beyond your template--you'll be trimming the piece later.

5. Using your template as a guide, place the 1/4" strips of construction paper over the leading lines on the image you drew. Simply rip (or cut) the construction paper strips to the proper length to cover your leading lines. Cover all of the lines in your drawing.

6. Once you have the border and all of the leading lines covered in construction paper, start filling in the remaining sections with colorful pieces of tissue paper. The squares can overlap each other and can overlap the black construction paper lines a bit (you are actually working on the piece from behind). But take care to make sure the tissue paper goes where you want it to. It is almost impossible to remove the tissue paper from the Contact paper once it gets on there. 

7. Once all of the sections are filled in with color, trim the piece down to 8 1/2" x 11" and slip it into a clear sheet protector to protect it. Other options would be to use another sheet of Contact paper on the other side of the piece to seal the tissue paper and construction paper safely inside. Or you could run the piece through a laminator (maybe), I don't have one at my disposal, so I'm not sure of that, but it may work. 

Place in a sunny window and enjoy!

Working on our dragon (faux) stained glass windows.
Everything is taped down with clear tape and the tissue paper
squares are in the center of the table in cardboard trays.

Thursday, June 28, 2012

Words of Wisdom From 2nd Graders...

Another project I was able to do at a local elementary school, before the end of the year, was the paper plate fish project relating to the book "Only One You." My original post is here.

"Be Artistic!" What a great idea!!
I had the teacher  share the book with the children before I arrived and get them thinking of "words of wisdom" that they could impart to others. This was a great thing to do before my arrival so they were ready to go on the art project!

I started my presentation, by sitting with them and the book and talking with them about it. I did a quick recap of the plot and then we looked at the book from an artistic point of view. This was a good discussion in realism, pattern, line and repetition.

Then we got to work! I wasn't sure if the lesson would engage all of the students since I hadn't done this project with a group before (only my "test subjects" at home). It went VERY well! The project kept the children engaged the entire time and their words of wisdom were wonderful! There are some very wise second graders in Mrs. Bevilacqua's class!

As you can see, each fish was so unique!

This one gives new meaning to "Rainbow Fish." Beautiful!
Some of these read: "Think Positively" and "Don't Lie"
"Have a Vivid Imagination," "Be Unique," and "Be Careful"

Friday, March 2, 2012

A Class For Me/Mom's Night Out

It's no surprise that, next to the grocery store, the number one place I spend time and money at, is Michael's craft store. There's one just a couple miles from my home and this week I've been there four times. OK, so it's an unusual week for me. I'm balancing a couple of creative projects right now (many of which you'll be seeing in future posts). 


My first acrylic painting in more than 13 years.
Probably not going to hang in a museum, but it makes me smile when I see it!

Anyhow, I was intrigued when I saw that Michael's is now offering acrylic painting art courses by Grumbacher where a student can paint an entire painting in two hours. I browsed the offerings and I really liked the floral painting with daisies in a stoneware pitcher. Now, I haven't picked up my acrylics since college and even then, I had a teacher who constantly dissuaded me from using them. Gosh, I didn't think I was that bad! So I learned to avoid acrylics. But I did like that painting...

Why couldn't I just paint at home, you ask? Chuckle, chuckle, snort!...I have four kids. I'll just keep finding excuses to put it off...(and I do, actually, do a good amount of art in front of them and with them, but trying something I needed to really focus on? You get the idea.)...And sometimes you just need to DO something (especially in New England in the middle of winter!).

So, I enrolled in the Michael's class which was $25 for the class fee and then I spent about $40 on supplies. I thought the class would be step-by-step and that I'd learn techniques and such through little tidbits and anecdotes the instructor would sprinkle in along the way. That wasn't quite the case. She was very relaxed and instead of demonstrating the process she handed out the instructions that Grumbacher gives to the instructors to show the process. Thankfully, I had some experience with painting so I just read the instructions and followed them. The instructor didn't paint, but walked around the room making herself available if we needed her. I asked the instructor questions from time to time if I was stumped, particularly on color mixing or to clarify the process, but otherwise I spent the time painting and gabbing with my friend, Beth, whom I roped into taking the class with me (poor girl!). It wouldn't be a night out unless I had a friend by my side!

So if you are thinking of trying a class: I think the class would be best for children over 12 and grown-ups who want to try acrylic painting in a quick way that offers a good chance for success. As with any course, the instructor could really make or break this experience. Before taking the course, ask around to see exactly how it is run. If you have limited experience, make sure the instructor is hands on and helpful.

It was a relaxing time and I had fun being the student instead of the teacher! I did learn a few things and I increased my confidence with using acrylics. And, I LOVE my new painting!

Saturday, February 25, 2012

Mosaic Snowglobe Project Results

This past week I had the pleasure of visiting Mrs. Bevilacqua's second grade class at Wilkin's Elementary School in Amherst, NH. Mrs. Bevilacqua usually does a themed unit that involves snow globes and I thought the children would also enjoy doing the snow globe mosaics from my blog.

All 17 snow globes! Beautiful!
The second graders were very enthusiastic and creative! I started with a revised worksheet and had the students use a limited color palette (10 crayons) so that they could easily match up the paper squares with the colors they chose for their pieces. It was a two-session project, but it went quickly and the children were very happy with the results (me too!).

The revised worksheet has different labels than before.
 It is a bit easier for the children to understand: S = Sky, R = Roof, G = Ground, etc.
They use this worksheet to plan before moving onto the actual gluing.
See the original post for "how-to" info.
A detailed look at one of the mosaic pieces.
This project was a great way for the children to explore math concepts relating to a grid (each child had 100 squares on his/her piece!) as well as exploring color choices and value (in order for the sections of the picture to be easily read, the student needs to vary his/her value and color choices), learn the art of mosaics and, even within the set parameters, there was a chance for choice and creative expression.

What a fun way to spend the afternoon! Thank you, again, to Mrs. Bevilacqua and her students for all of their hard work and energy!

NOTE: I used 5" x 7" canvas boards from www.dickblick.com to mount the finished pieces on (24 for $7 or so). I then added a border above and below the mosaics with navy grosgrain ribbon glued on with hot glue. When done, I attached a paper label with the child's name. I justified the expense because these are "keepsakes." 

If you had less time and a limited budget, you could enlarge the project to 10" square (each square of the grid is 1") and have students do this project on thin white paper paper using 1" construction paper squares and glue sticks. Skip the Mod Podge and mount the finished mosaic onto a piece of construction paper. Very inexpensive, but still great!


Tuesday, November 29, 2011

Kandinsky Circles Watercolors

Today, in my after school art class, I decided to do a colorful project that was relaxing and simple, but with great results! This project is from one of my favorite blogs: Art Projects For Kids and it uses my favorite medium: watercolors, and is based on the art of one of my favorite artists: Kandinsky.

Kandinsky was born in Russia and was originally a lawyer. When he was thirty he decided to leave that profession and become an artist. His paintings and color studies are gorgeous and full of life. They are a neat look at abstract art for children because the paintings allow for quite a discussion! Kandinsky LOVED color and explored the way color could make people feel and think. For example, how do you create a painting about war without using images that people normally associate with war? What about the feelings that fighting and war conjure up?
The piece we used for inspiration.

This project is based on some of his color experiments. I hope you enjoy it--we did!

Supplies Needed:
  • Watercolor paper, ours was 8 1/2" x 12 1/2," I used Arches brand, cold press
  • Masking tape
  • Foam core or heavy cardboard
  • Pencil
  • Ruler
  • Crayons, assorted colors
  • Watercolors
  • Paint brush
  • Water bucket and paper towels
Directions:

1. Cut out an 8 1/2" x 12 1/2" rectangle of watercolor paper and, using the masking tape, tape it to the foam core board. This will keep the paper from buckling as it dries.

2. Divide the paper into 4" squares. Use the pencil and ruler and make light pencil lines. We had two rows of three squares.

3. Use a crayon to go over the lines you just made. Press down firmly to make a heavy crayon line. Then take the crayon and make a series of concentric circles in each of the six boxes. We did about four rings in each section.
This picture shows the crayon circles within each of the six sections.

4. Starting with the lightest watercolor (yellow, if you are using it), fill in the rings of the circles. Don't work on one box at a time, jump around the paper and do all of the rings you want to be yellow at once. This gives the paint a chance to dry. Work with the watercolor paints in order from lightest to darkest (this minimizes the chance the colors will get all mixed up and yucky in the paint trays).

See how the child isn't just working on one set of circles within one square?
Working on the entire piece at once allows the paint to dry and minimizes
the chance that the paint will bleed between sections.

5. Keep going until all the circles are painted. Leave the piece on the board until it is completely dry. Gently peel the tape off of the piece, frame and enjoy!

I am so proud of the students in my art class! These pieces look fantastic! Good job everyone!


Monday, October 17, 2011

I LOVE a good conference!

This past Saturday I went to a WONDERFUL conference for art Educators at the NH Art Institute held by the New Hampshire Art Educators Association. It was my first conference with the NHAEA and it was absolutely great! They had many options for sessions, some were talks, but many were studio-based! It was so fun to learn and be able to create projects while we listened! I am blown away by all of the caring and friendly art educators we have in New Hampshire! Everyone was a joy to talk with and to learn from!

So, my brain is now FULL to the brim with all sorts of ideas to incorporate into my classes! My first session was entitled: The Art of Geometry given by Jaylene Bengtson, Integrated Art Specialist and Linda Otten, Math Educator. These ladies had fabulous ideas to create a piece that will really SHOW children (7th graders) all sorts of geometric concepts. You pretty much HAVE to get geometry while creating this piece. Also, the finished product is absolutely beautiful! My just-started sample is below, and doesn't do the project justice, but I'll post more on this project at a later date.


I went to a printmaking talk by Liam Sullivan that was very inspiring! I went away with many ideas on how to create some inexpensive printing materials for my students. He encouraged us to look at a variety of sources for printmaking fodder: hardware stores, recycling bins, craft & dollar stores, etc.

The lunchtime talk was given by Dr. Foad Afshar, Phy.D. entitled "The Brain, The Whole Brain And Nothing But The Brain, So Help Me Art."Dr. Afshar was entertaining while he spoke to us about how art engages the entire brain and how, as human beings, we are inherently creative--"we cannot not create." Definitely thought-provoking well beyond my art classes--I have four children so I had many thoughts on the practical application of his talk with regards to how I'm raising my children to be lifelong learners with inquisitive minds. I was very interested on his information about flourescent lighting and its effects on children with autism, causing their brains to remain in a heightened state of activity and how it effects them at school and in other places with "pumped-up" flourescent lighting (department stores in particular).

My final session was by Claire Provencher and was entitled "Art History-Based Art Lessons." It was a make and take session, so I was thrilled to be creating projects while I learned! We created seven pieces that I'm sure will be loved by my students. My samples are below. I will be writing more about them in future posts. Claire gave out a very comprehensive handout with a copy of the letter she sends to parents at the beginning of the year, her entire curriculum for K-5th for the year as well as the art assessment form that she uses with each student. I was amazed to see the level of quality art instruction that she is able to provide her 25+ classes on a very modest budget! Since I design my classes around art history her teaching methods resonated with me. Also very inspiring!
Front Left to right: (Left Upper) Roman Coins, (Left Lower) Chinese Calligraphy,  Andy Warhol Self Portraits, (Right Upper) Rose Windows, (Right Lower) Wayne Theobold "Cakes," (Far Right) Mythical Creature Machines
My day at the NHAEA Conference was great! It was nice to connect with other creative people in a personal and professional way! I really learned so much both in and outside of the sessions! I left there refreshed and renewed and with a feeling of certainty knowing that this is what I was born to do. Thank you to the NHAEA and all of the creative art educators who contributed!

Sunday, October 9, 2011

Snowman & Bird Mosaic for PTA Auction

I am so thrilled with this craft! This past Friday, I went into my oldest son's fourth grade class to help the students create a piece to be auctioned off by the Amherst PTA this fall in their online fundraiser. Since the auction will be ending November 22nd or so, we couldn't create anything that had a Halloween theme. I chose an image that would be great to display through the winter: a Snowman and Bird (this image came from a magazine, it was intended to be a pillow).


The image was divided into 24 sections and each child was responsible for one section, or 100 tiles! It sounds like a lot, but it really wasn't all that bad once we divided it up! The children were amazed that the image was made from over 2400 little paper tiles! This was a great way for the students to recharge after a long week of standardized testing and learn something new! The lesson has a bit of math thrown in and next week the students will be learning about maps, so working with the grids was a nice tie-in.

The tiles are scrap booking paper and the final piece was mounted on canvas and framed so it is ready-to-hang. I think that will make the piece more marketable-it certainly looks good to me!

Here are some pictures documenting the process. I will be posting a tutorial for a similar project as soon as I can. Thank you so much to Mrs. Nagy for letting me come in and do this craft with her students and thank you to all of the boys and girls who worked so hard on this piece. It truly came out fantastic! ENJOY!
This board shows the entire piece on the grid, how the sections are divided and the steps to create the piece.
Each student was given a 10x10 block section of the piece. Students then copied the diagram with 1/4" squares cut from scrap booking paper.


The finished colors were much more vibrant than the original diagram.

This picture shows the piece in progress. Each section is attached to the canvas using Modge Podge. It's fun to see the image magically come together!

Related Posts Plugin for WordPress, Blogger...