Showing posts with label Easter. Show all posts

Wednesday, April 4, 2012

For Easter or Anytime: Cinna-Bunnies!

I'm an artist and art educator, and I'm a mom, too. I have a five-year-old that stays home with me and he loves art and cooking. I have been trying to make a conscious effort to introduce little fun stuff every once in awhile to make staying home more special and encourage learning. Yesterday, I had an idea for us to make something with dough (biscuit dough in this case) that would be edible and celebrate Spring/Easter. Cinna-bunnies! Or Bunny Biscuits as my big boys call them...


Cinna-Bunnies

Supplies Needed:

  • 1 Tbsp. sugar
  • 1 tsp. cinnamon

  • 2 cups all purpose flour
  • 5 tsp. baking powder
  • 2 tsp. sugar
  • 1 tsp. salt
  • 1/4 tsp. cream of tartar
  • 1/2 cup shortening (or butter or palm oil)
  • 1 cup milk

  • 1 egg white, slightly beaten
  • food coloring, black and pink
  • paint brush (new)
  • bowl, measuring cups & spoons, small bowls (3), pastry blender, rolling pin, cookie sheet, 2" circle cutter, 1" circle cutter, safety knife
Directions:

1. Combine 1 Tbsp. of sugar with 1 tsp. of cinnamon in a small bowl, set aside.

2. Combine the remaining dry ingredients for the biscuits. Cut in the shortening until it resembles fine crumbs. Stir in milk until a dough forms.

3. Turn dough onto a lightly floured surface and knead for 1 minute. Add a bit of flour if it is sticking.

4. Divide dough in half. Roll half the dough to 1/2"thickness and cut 2" circles of dough (we got about six). Dip each biscuit into the cinnamon/sugar mixture and place on a greased cookie sheet (I use stoneware, so I don't grease the baking stone). These are the bellies of your bunnies.

5. Roll out the remaining dough to 1/2" thickness. Cut six 1" circles. Attach these to one side of the bunny bodies (use a finger dipped in water to attach the parts). These are the bunny heads.

6. Cut six more 1" circles and use the safety knife to cut each in half. Each circle will make two bunny ears. Attach the bunny ears to each bunny head using a bit of water.

7. Pinch off 1/2" balls of dough to make feet and hands, dip in water and attach to each bunny body.

8. Lightly beat the egg white and divide into two small bowls. Use food coloring to color the egg in one bowl pink and the remaining egg white black. Use a paint brush to paint the inner part of the bunny's ears and add eyes, a nose and whiskers.

9. Bake the Cinna-bunnies for 10-12 minutes at 425 degrees until the bunnies are lightly browned. Keep a close eye on them of you are using a metal cookie sheet--you might want to turn the oven temp down to 400 degrees. Adjust time accordingly so the bunny bottoms down's burn.

10. Let sit on cookie sheet for a couple minutes and then remove to a wire rack to cool completely. We slathered our bunnies with butter before gobbling them up. ENJOY!!

Tuesday, March 27, 2012

Origami Butterfly Wreath for Easter or Spring

My family loves origami! So when I saw the directions for an origami butterfly on Pinterest, I knew I had to create a project that used them! So, here 'tis! This is a relatively simple and VERY inexpensive project that would be suitable for children grade 2 and up (the origami may be a bit challenging for a young one and the tissue paper can be time consuming).


The butterfly origami directions are from Go Origami. Many of the gorgeous projects on this site are too advanced for me, but the butterfly is easy enough.

Enjoy making this lovely wreath and bringing a bit of Spring into your home!

Origami Butterfly Wreath for Easter or Spring

Supplies Needed:

  • One paper plate
  • Pencil
  • Scissors
  • Elmer's glue
  • Glue tray (I used the lid of a yogurt tub)
  • Tissue paper in green (I used three colors of green for interest)
  • Three pieces of origami paper (or thin colored paper), assorted colors
  • Hole punch
  • Ribbon
Directions:

1. Trace a 5" circle in the center of the paper plate. Use the scissors to poke a hole in the center circle and then cut and remove the center circle so you are left with an outer ring of a paper plate. This is the base of your wreath.

2. Cut the tissue paper into 1" squares. I can't tell you how many squares you'll need, but you'll probably end up cutting WAY more than you need.

3. Pour a bit of glue into the tray. Take a 1" square of tissue paper and CENTER it over the eraser end of the pencil, smoothing the edges of the tissue paper around the eraser and pencil. Use your fingertips to HOLD the tissue in place and then dip the covered end of the eraser into the glue. Gently touch the tissue-covered eraser to the plate, and remove the pencil. The tuft of tissue paper should remain. You'll be attaching the tufts of tissue paper to the underside of the plate--not the side you'd eat on.


4. Repeat with additional tissue paper squares until the surface of the plate ring is covered. It helps to place the tissue paper tufts next to each other as you go--this will ensure that the wreath is nice and full and doesn't have any bald spots! If you are working with a younger child, you can work with him/her on this part. Many children won't mind the help and it's a wonderful time to sit and chat quietly with your child. 

5. Once the front surface of the wreath ring is covered with tissue paper tufts, use a hole punch to make two holes about 5" apart on the top edge of the wreath. This will allow you to hang the wreath up later. Set the wreath aside to dry.

6. Trim the origami paper so that one piece is 6 inches square, another is five inches square, and the third is four inches square. Fold into butterflies. Directions can be found here.

7. Attach ribbon to the wreath. Trim if necessary.

8. Use glue to attach butterflies in a pleasing arrangement. 


You're done! Welcome Spring!

**Another option to make this much easier for little ones is to reduce the size of the plate wreath. Making the wreath ring 5-6" across will be much easier for a single child to do on his/her own. Then adjust the size of the butterflies accordingly, maybe a butterfly made from a 5" square flanked by butterflies made from 4" squares. 

Friday, April 22, 2011

Last Minute Bunny Basket & Filler Ideas

No art class for me this week--the cooperative is closed for Holy Week (Easter is this Sunday). I thought this would be a great time to write about some of my favorite artsy gifts to help out with filling those Easter baskets! Come on--one cannot live on chocolate alone!

My theory on Easter baskets and the like is to buy consumables that can be eaten (Peeps candy), used up (a suncatcher kit) or added to what we have (markers) with little impact. With four children, I have WAY too much stuff! While I'm sure you already have a list of candy for those Easter baskets, here's a list of some other stuff to make your children's Easter baskets shine!
  • Basic art supplies (crayons, markers, watercolor paints, glue sticks, glitter glue)
  • A new sketchbook (spiral bound)
  • Mini art kits (make your own picture frame, a suncatcher kit, paint your own pottery, a scratchboard kit, etc.)
  • Origami paper
  • A disposable camera and scrapbook kit or supplies
  • Beads and cord to make a necklace, bracelets, etc.
  • Dover art books--Dover makes a series of mini-books that have mazes, paper dolls, sticker books and more--these are so fun and there is one for every interest! (Buy these online or at book stores).
  • Klutz makes a line of books that foster creativity and come with the supplies needed to create the projects in the books. They have doodle books, window art, pom pom creations and so many more! These books are more pricey (about $15-$20 each), but for older children, one of these books and a couple of candies might be the Easter gift.
  • Yarn and crochet hooks or knitting needles
  • A bucket of air dry clay or play-doh (or you can make your own)
  • Stickers
  • A mini notebook, ruler, and mechanical pencils (for the future draftsperson!)
  • Pipecleaners and googly eyes to make critters
  • A big pack of construction paper
  • New scissors--either straight edge or with decorate edging
  • Sidewalk chalk for outside doodling
Have fun with the "basket" as well--it doesn't have to be traditional! You can use a pail, an art caddy or plastic tote with handle (see the post about art supplies to have on hand). A canvas totebag is also a great "basket" and the child can decorate it as a project as well. One of my girlfriends said that she saw premade baskets made from an upside down sunhat. You can often find plain colors of these and paired with a set of fabric markers, you have an easy project your child will love!

The bunny basket idea below, is a wonderful preschooler craft (or for anyone who is young at heart!). This is not original, it is just the version I improvised with my four-year-old the other day. Excuse the photos--it was difficult to take nice photos while doing the project with a four-year-old! He's very proud of it though--he shows it to everyone who walks though the door!


Spring Bunny Basket

Supplies Needed:
  • A one gallon milk jug, washed and dried
  • A sharpie or other marking pen
  • Scissors
  • 2 Googly eyes (about 3/4"-1" diameter)
  • Glue dots, tacky glue or a hot glue gun and glue sticks
  • 3 pom poms (about 3/4"-1" diameter), 1 pink and 2 white
  • 3 pipe cleaners (any color)
  • Scrap cardstock, white
  • Pencil and eraser
  • Crayons
  • Stapler
Directions:

1. You'll want to start by making a hole at the top of the bunny basket for all of those Easter treats! We left the handle of the milk jug on so that my preschooler could carry it around for an Easter egg hunt. Use the photo below as a reference. A grown-up should use scissors to carefully cut the milk jug.
The cutting line is marked with Sharpie.

2. We then used glue dots to glue on the googly eyes. I like to let the children glue them on because I love the cute expressions that are created when the kids glue the eyes on askew! So cute!

3. I then cut a set of teeth out for the bunny and had my son glue those on using glue dots.

4. I then cut a small slit (about 1/2" long) on either side of the teeth and we threaded all three pipe cleaners through the slits to create whiskers.
The pipecleaners are just fed all at once through two slits--one on either side of the bunny teeth.

5. Using the glue gun (a parent's job), I attached the pom poms to finish the bunny's face.
Awwww....look at that cute bunny face!

6. I then cut two ears out of cardstock and drew an inner ear shape inside of them. My son got busy coloring them in, and then we attached them to the back of the bunny basket with a stapler (he helped me and thought that was the best part of the entire project!).
Not perfect, but what do you expect with a 4yo breathing down my neck!

Rainbow colored ears!

This basket could be done up much more fancy then we did it. You could add a bow tie for a boy bunny and flowers and bows for a girl bunny. Don't worry if you don't have the exact supplies that we used here--using what you have on hand is a great way to teach children how to reduce, reuse and recycle. Enjoy this simple craft with your child!

And, when it's time to help the Easter bunny fill your child's Easter basket--have fun! Helping your child to "spring" into creativity can be easy!

Have a wonderful and joyous Easter! Welcome Spring!

Friday, April 15, 2011

Medieval Metalwork

This week, in my art class, I showed the children how to do a simple technique that looks like aged metal. The children created frames and crosses and then added faux gemstones for a little sparkle!

Jewel-encrusted antique metalwork frame.

This year's art classes are all about Medieval times. We've done shields with coat-of-arms, marionettes of kings and princesses, stained glass dragons, and many other projects you'll soon be seeing in this blog (one day at a time!!). This week, I decided to have the children do a project that simulates metalwork. I was thinking of those large, heavy covers of illuminated manuscripts that were pieces of wood covered with tooled sheets of gold and inlaid with real gemstones (see below). Since my budget is a bit more limited than that--I thought we could use tin foil and plastic gems from a craft store.

Background Information:

Since medieval manuscripts would take many years to create and often were the life's work of many of the artists, the covers of these books were often just as elaborate. The covers were often a plank of wood covered with gold, jewels, enamelwork, precious metals, and ivory. One such example of this type of ornate work is the cover of the Lindau Gospels entitled, "Crucifixion with Angels and Mourning Figures." This piece is from The Pierpont Morgan Library in New York.

The cover from the Lindau Gospels uses a technique called repoussé "a technique by which metal reliefs are created. Thin sheets of metal are gently hammered from the back to create a protruding image. More elaborate reliefs are created with wooden forms against which the metal sheets are pressed (Art History: Volume 1, by Marilyn Stokstad, 1995)."

The project below is very similar to this technique. Enjoy!

Supplies Needed:
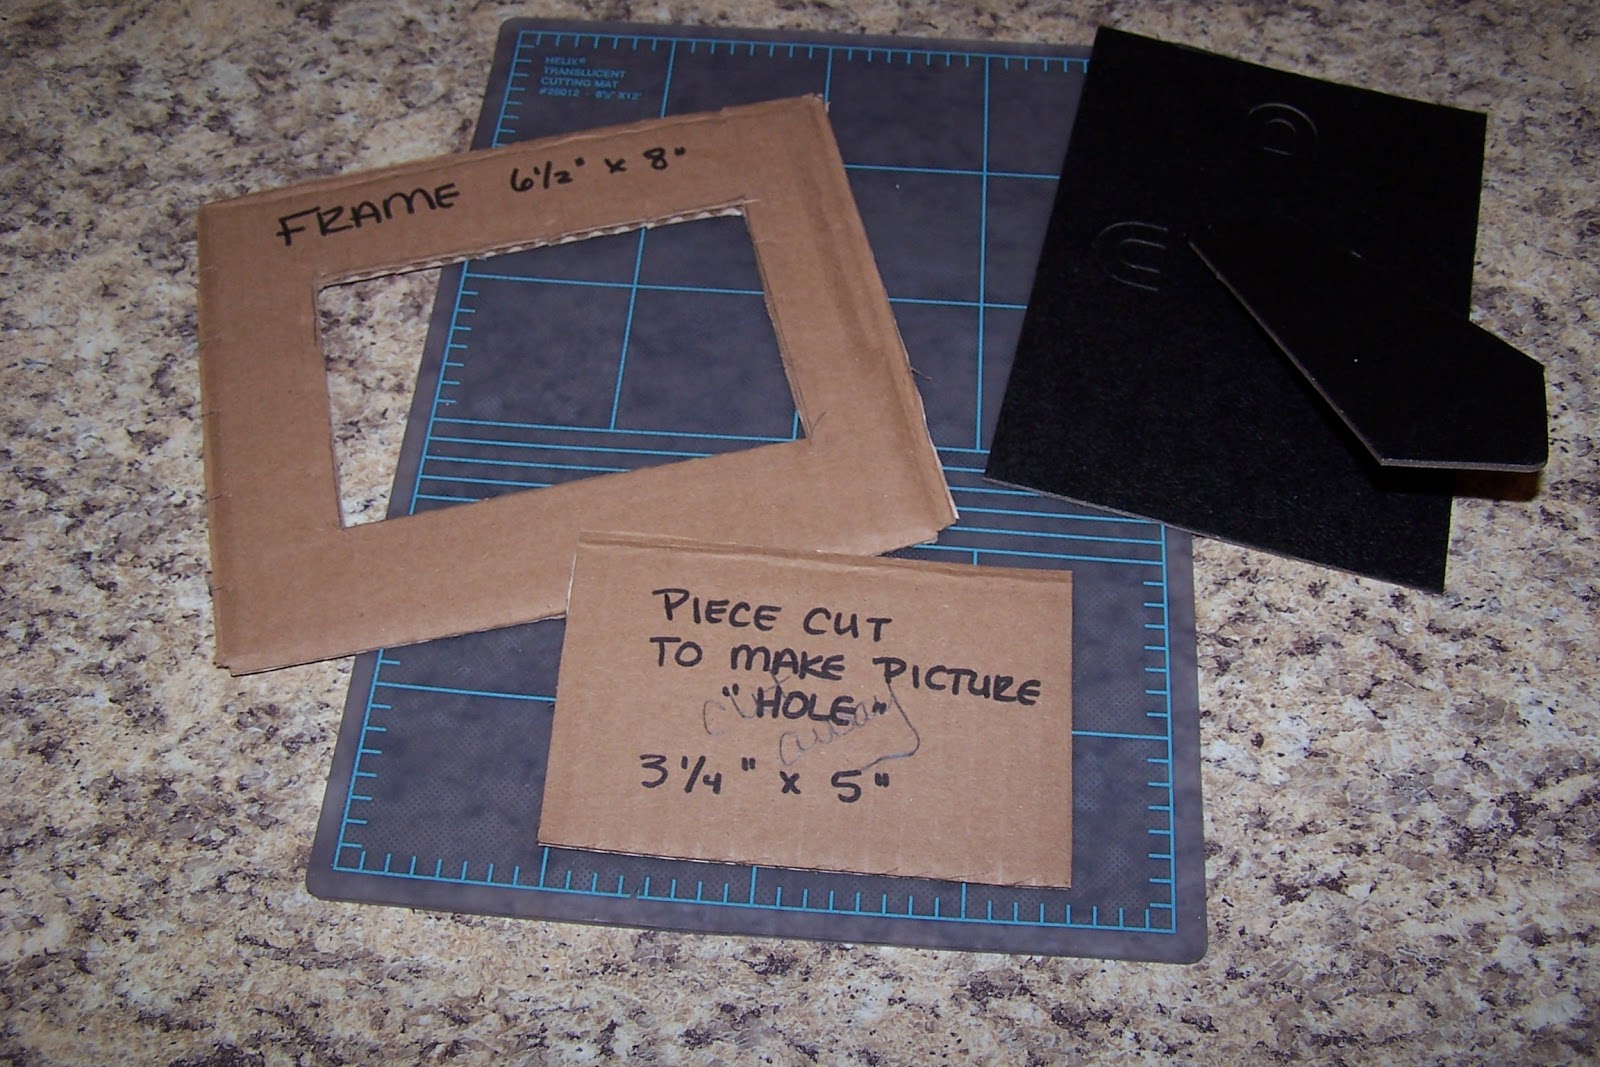
  • Corrugated cardboard cut into a frame shape (6 1/2" x 8') or a cross (a 3" x 7" piece of cardboard glued to a 3" x 11" piece of cardboard)
  • Self adhesive foam letters and shapes (optional)
  • Yarn
  • PVA glue (I use Elmer's glue)
  • Paintbrush
  • Water bowl and water
  • Scissors
  • Aluminum foil (standard household foil is fine)
  • Clear tape
  • Black tempura paint
  • Paper plate for a palette
  • Facial tissue
  • Glue gun and hot glue sticks (optional)
  • Plastic jewels (I bought mine at Michael's--they had a value pack of 1pound of "bling")
Directions:

1. If you are creating a frame, think about which way you'd like to have the picture displayed. This is important if you are doing lettering on your frame.
Here you can see the cardboard piece I'll be using for my frame as well as an easel-backed piece of cardboard from an old frame that I later glued onto the finished frame. That part is optional,

2. Create a design on the cardboard frame (or cross) using self adhesive letters and shapes. Words and phrases such as, "family," "best friends," "love," or your last name work well. You can also use yarn for the letters and shapes (and also for lines). Put a line of glue onto the cardboard and then gently press the yarn into it. Keep your design simple.


3. Once you have your design done, brush a thin coat of white glue all over frame. You can brush right over the foam shapes because the adhesive on the back of the shapes is nice and strong, but go gently over the yarn. You will want to go along the edges of the yarn you have glued down so that you don't mess up your design.
My design is done. Now I can brush white glue over the entire design.


4. Take a piece of foil that is slightly larger than your piece and gently crumple it--not too much or it will tear when you open it back up. Open the foil back up and smooth it a bit. Now lay it onto the frame over the glue on your design. Press gently all over your design, around the letter and shapes.
Gently smooth the foil over the design. Press gently around the yarn and foam shapes (if using). Be careful not to use your nails, since the foil will tear easily.


5. Flip the piece over and tape the extra foil to the back of the cardboard. If you are doing a frame, you'll need to gently cut an "x" in the foil in the center portion of the frame and fold back the foil there (and tape it to the back of the frame) so that you'll be able to see the picture in the center of your frame.


6. Now comes the messy part! Squeeze a bit of black tempera paint onto the paper plate. Dip your paintbrush into water and mix it in the paint to thin the paint a bit. Brush the thinned tempera paint over the entire front of your frame.


7. Now....wait! Leave your frame to dry for 10-15 minutes. While it is drying you can draw a picture to go in your frame. Will the picture be of your family? A pet? A medieval scene with a knight and a dragon?

8. Once the time is up and your paint is not quite dry, gently buff off the paint with a piece of facial tissue (it may take your piece a bit longer to be ready to buff--the paint should be "almost dry"). The more black you leave, the more "antique" the frame will look.


9. Use a hot glue gun, white glue, or tacky glue to attach jewels to the frame.
I live this tacky glue in a squeeze tube!

10. Attach your picture to the back--and you are ready to display your medieval work of art!

Variation: Easter is a wonderful time to do this project and create a cross! This technique makes a beautiful cross that looks unique. It is a nice project to do as a family--certainly a conversation-starter on many levels! Enjoy!
The same technique can be used to create a cross. I left a good amount of the paint on the edges to give this cross a very old feel. This picture doesn't do it justice--the jewels really shine and add sparkle. This would also be a nice gift idea.
Related Posts Plugin for WordPress, Blogger...