Showing posts with label tempera. Show all posts

Wednesday, April 6, 2016

Multi-Grade 1-Day Goodbye Project

I just finished 6 1/2 weeks as a long-term substitute art teacher at Fairgrounds Elementary School in Nashua, NH. I had a blast sharing my own art with the children (printmaking, collage, and graphic design and illustration) and creating some winter/spring- and artist-inpired projects that related to the type of art I create. It was a whirlwind, but hopefully I will be able to post more about all of those fun projects soon!

I wanted to share this wonderful goodbye project I did with my kiddos on the last day. I had multiple classes who were done their work and had one class left with me. This project was a nice one since it allowed me to prep once for 5 classes or so and all the students from Kindergarten through grade 5 were able to contribute to it. For the youngins, I read the book "The Dot" by Peter Reynolds afterwards and told them that today (and for the last 6 weeks) they've made their mark all over Fairgrounds (I'm big into collaborative art which is evident in the bulletin board displays I left up all over the school) and in my life as an art teacher.

This project idea came from Jennifer Boral over at The Art of Education (check it out over at https://www.youtube.com/watch?v=FXkqpmGZe88). Loved it and knew I had to try it. While I would have LOVED to do this project with all 500+ students, it just wasn't going to happen due to time constraints, etc. The finished piece is quirky and colorful and adds a bright pop of color as students go to music class and outside to recess.

ENJOY!


Friday, January 2, 2015

And another calendar idea! Ripped Paper Winter Landscape

It's not too late to celebrate the New Year!

Here's a quick idea for a calendar you can make with scraps of paper. It's a nice way to use up scraps and practice ripping paper. I made this project with a variety of kiddos from pre-K to 4th grade and they all enjoyed it. I think they especially enjoyed adding the splatter-paint snow at the end!


Here's a close-up of a couple of the calendars. As you can see, some of
the older students added a few details to their scenes.
These were done as part of my "Gifts from the heART" class.

Ripped Paper Winter Landscape Calendar

Supplies Needed:

  • A black or dark blue piece of paper for the night sky (ours was 4 1/2" x 8 1/2")
  • Various white and blue pieces of paper for the snow
  • Small scraps of various green paper for the trees
  • Scissors
  • Glue stick
  • Gold star stickers
  • White tempera paint
  • Stiff bristled brush
  • Paper plate palette
  • One 2015 Year-at-a-glance calendar printed on the bottom half of an 8 1/2" x 11" piece of white paper
  • Laminator and 8 1/2" x 11" laminating pouch
Directions:
1. Rip some strips of white and light blue papers and layer them together onto the black paper to create the illusion of snowy hills. When you like the arrangement you have, glue the layers onto the black background using the glue stick. This part is where younger kids may need a bit of assistance, but they usually catch on fast. :-)

2. Cut some little triangles for trees out of the green papers. Glue them onto the hills you've made. Trees in the way back of your landscape may appear smaller than the ones in the foreground of your landscape. 

3. Add sparkly star stickers to the tops of your trees or in the sky or both. Don't forget to sign your work at this time.

4. Place your completed landscape into a box to reduce splatters. Dip your stiff bristled brush into white paint and use your finger to flick the bristles to splatter paint "snow" onto your landscape. A grown-up may choose to do this, but kids do really enjoy it (yeah, it makes a little mess).  Add the desired amount of snow to your landscape and let dry.

5. Once your landscape is dry, use the glue stick to glue it to the 8 1/2" x 11" piece of paper that has the calendar printed on it. 

6. Run the entire piece through a laminator to seal it and protect it for  a year's worth of use.

ENJOY! Happy New Year!!


Friday, October 25, 2013

Fall Leaf Prints and Art Education Musings...

Around this time of year, I have a project I like to keep on hand for early finishers. I've posted about it before and it is originally from Deep Space Sparkle. When I first saw this project, I thought "WOW! How striking and different!" I love the contrast between the white leaves and the black paper. The colors in the negative space really pop!


The project is easy-to-do and once you give a quick-demo, students from first grade through fourth are good to go and can do the project themselves (my kind of early-finisher project!). Here are some of the results from my "Fall Into Art" Class....

I super-love these! They look so nice!


But...I noticed something after this last class did this project. Maybe it is because I'm going for my Master's and have been reading all sorts of articles about creativity in children and revamping arts programs and all that (that stuff will mess you up! ;-) ), but I think I may need to alter the way I present this lesson...
  • Children always ask: "Why are we painting the leaves white? They aren't white--they are beautiful colors!"
  • And I think, "Hmm. You're right, children. But trust me, the project is awesome and the white leaves look so great with the black paper....really...you can put all those beautiful colors in the background..."
  • And then a few always say, "But do we HAVE to do it this way?"
So, I did an experiment...I reversed the colors and changed the papers and tried it in a way that would seem more real to the students and allow them to observe and connect with the colors outside the window and represent that in their work...here's what I got:


So above you'll see my test of different colors of construction papers with the revised color combinations. I think the light blue works well, BUT, I *absolutely HATE* the new temperas I bought from Michael's--they no longer carry the brand I like there and these are seriously the worst (and the only choice at our local store). So, I'm sure that when you all do your versions with quality temperas you'll be much happier.

The revised version isn't as striking as the Deep Space Sparkle original, I truly do love her version more, but this version above might be one to keep in mind when working with with younger students and getting them to really look at the world around them. Just some food for thought...

BTW: The image above was marked up using Skitch, an APP for the iPad. I love it! Although this isn't the best representation of what you can do with it.

Saturday, June 15, 2013

First Place! Yippee!

One of my private art students won First Place in the Keyes Art Show in Milford, NH recently for a piece she did with me. You may remember the tints and shades landscape with charcoal I posted about here.


I am so proud of her! She's only in 3rd grade and LOVES art! I've loved hanging out with her and doing all sorts of art projects (you'll be seeing more of her projects soon, since we did a whole series on animation as well).

Congratulations!

Wednesday, February 6, 2013

Tints Landscape With Charcoal

I love working one-on-one with students! It's just the break I need in my week. I get to focus on art and one person and really enjoy both!

Today, my 3rd grade private art student finished this beauty. I am so proud of her! I had originally seen this post called "Winter White Landscape Paintings" at the blog A Faithful Attempt and loved them! The landscapes are done in tints of blues (in tempera!) and then the details added with charcoal pencils. LOVE IT! Honestly, I didn't think of temperas as a serious art paint, but I am so glad we tried this. I have completed my own piece and have another in the works--they are pretty addicting to create!


So, enjoy my student's work and hop on over to A Faithful Attempt to see how her students did it--and try one for yourself! You'll be glad you did!

With this project, my student learned:

• Color that are mixed with white are called "tints" and there can be many tints of a color!
• How to select a composition to paint (visual interest, balance, value range, etc.)
• How to use opaque water-based paint (tempera) to paint a landscape in layers and in multiple steps that require planning
• How to add details and value to a piece using charcoal pencils and the different ways of applying them as well as grades of softness
• One point perspective (fence) and direction of light and its effects on the shadows in a composition

Tuesday, April 10, 2012

Spring Forsythia Still-life

Spring is gradually coming to New England and we've been enjoying all of the flowers and trees that are starting to bloom. One of my favorite spring blossom is the forsythia--the bright yellow blooms just wake me up and get me ready for warmer days ahead!


Here's a quick project I did a couple years back with my home school kids that is easy and fun to do. Working from life, students create a mixed-media still life while learning printmaking and symmetry. This is a great opportunity to gather up some real forsythia in bloom, set it up in your classroom and then have the children work from life. I was a little late one year, so I brought in fake forsythia to display.

When using real forsythia, pass around blooms to let the children look at them close up and then look at the still life from further away. Display your forsythia in a pretty vase and show the students how the shape of a vase is symmetrical. I had my students fold a piece of construction paper in half and then cut the shape of the vase so it would be truly symmetrical (have some extra construction paper on hand just in case). Brown marker and sponge-painted X's make for an easy finish to this project. Low mess, low stress, and lots of beautiful color!

This project is from "Kids' Art Works," by Sandi Henry. This book is FULL of great art ideas for children and is a must for any art teacher. The directions are clearly written in the book and easy to follow and the results are great! All of the children enjoyed creating beautiful spring pictures full of bright yellow blossoms! Welcome Spring!


Tuesday, April 3, 2012

Claes Oldenburg Giant Food Sculptures

I just started my latest after school art class and the theme is Modern Art! I'm so excited! I love Modern Art and children usually do too. For our first class, I wanted to do something that was fun and allowed for a good amount of creativity, so I chose to have the children create giant food sculptures similar to those by Claes Oldenburg. I had a HUGE roll of medium weight paper that was given to me from a printing company and it was easy to work with and didn't get flimsy when painted with tempera paint. 
Ummmm...I think I'm gonna need a bigger plate!

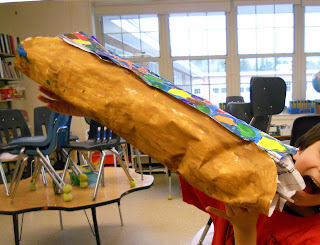
I began by showing the children some examples of Oldenburg's famous sculptures such as the huge soft sculpture chocolate cake he created. I had also created my own version of it (chocolate cake with white frosting, sprinkles and a giant birthday candle on top) that was about 3 feet tall so they could really see what I was saying about LARGE food. I brought the templates in for them to create a slice of cake (like Oldenburg's) or a slice of pizza (very simple to do), but the children had ideas of their own so I decided to go with it and let them create whatever food they wanted to. We had quite a selection: popsicles, chocolate bars, a cheese wheel, cupcakes and more!

I think next time, if I do this with a larger group, I would stick to the same food--have them ALL do a slice of cake or a slice of pizza, but it worked out and I think the children learned so much about constructing 3D forms. I could see this project also being linked cross-curriculum to math and have the children create a slice of cake and then figure out, mathmatically, what size paper they need to go around the sides of the cake slice. I'll need to explore this more....

Claes Oldenburg-Inspired Giant Pizza Slice

Supplies Needed:

  • Medium weight paper (large sheets or a roll of paper)
  • Scissors
  • Ruler
  • Newspaper or paper scraps to stuff the form
  • Stapler with staples
  • Tempera paint, assorted colors
  • Paint brushes
  • Water bucket, paper towels
  • Paper scraps, optional, for pizza toppings, etc.
  • Glue sticks and Elmer's glue, optional
Directions:

1. Cut two triangles from paper for the top and the bottom of the pizza slice. They should be the same size. Our triangles measured 24" x 24" x 18" but that is approximate.

2. Layer the two triangles on top of one another and staple along the two 24" edges, through both layers. Leave the 18" edge open, creating a pocket.

3. Crumple up newspaper, lightly, and stuff the pizza slightly, to give the pizza slice some dimension. Leave about 4" unstuffed at the end (you'll be making the pizza crust with it).

4. Roll the 18" edge of the pizza slice inward a couple inches to create the pizza crust and secure with a couple of staples. You now have a giant slice of pizza!

5. Use tempera paints to paint the crust, sauce and cheese on your slice of pizza. While it dries, you can use paper scraps to create toppings.

6. When the paint is dry, attach the toppings to your pizza slice with glue OR just paint toppings on with additional paint.

YUM! Let's eat!

Giant Wheel of Cheese

Super-Giant Chocolate Bar

Yummy Cupcake
(This size looks like a regular serving for me!)

Giant Taco! Olé!

Related Posts Plugin for WordPress, Blogger...