 |
| Magic Picture: A great lesson in Optical Illusion! |
Class talk:
I began by defining the term "optical illusion." Optical meaning "eyes" or "sight" and illusions are "something that appears to exist, but does not." Magic tricks are a great example of optical illusions. I had a couple of magic books on hand to illustrate this point. I explained that one could read a book on magic and learn how to make something disappear. A child isn't learning "magic," but how to fool the viewer's eye. Optical illusions are like magic for your eyes.
I then showed a few examples of optical illusions from the Childcraft: The How and Why Library, Volume 12, "Look and Learn," by Worldbook (c. 1988). I found it helpful to have a ruler on hand since some of the children had never seen these particular illusions and wanted to measure the lines to verify they were the same length, etc.
Some other examples of everyday optical illusions that also appear in the Childcraft Book were camouflage and movie pictures (animation). I was able to "show" the children examples of those from the same book.
I also brought in a book from my own library entitled, "Masterpieces in 3-D: MC Escher and the Art of Illusion," by Catherine Gleason. This book has 40 images by Escher with built in spectacles so that viewers can see the works in 3-D. It also has brief descriptions of each of the pieces. While the 3-D element of the book is great, many standard examples of Escher's images will work for illustrating the concept of optical illusion.
So, in this class, we decided to create two pictures and put them together in a special way to create an optical illusion. While not technically a medieval-themed project, I explained that we could use medieval-inspired imagery such as a knights, castles, princesses, or shields. We thought that if we created optical illusions like this back in medieval times, people would have thought our art was truly magical!
(NOTE: Once a child learns this technique, s/he can use it to explore many different ideas such as opposites, seasons, transformations, etc. The pictures should be very different for the illusion to be dramatic and should fill the space).
Supplies Needed:
• Templates (while not necessary, I found it easier to have these templates on hand), One copy of all three for each child:
- Template One: Image Page (this has two 4"x8 1/2" rectangles printed on an 8 1/2"x11" piece of white paper. Each rectangle should have guides to help the child divide the drawing into four 1" segments. On one rectangle, label the sections 1, 2, 3 & 4, on the other rectangle, label the sections A, B, C & D. See image below.)
- Templete Two: Accordian Page (this is a 8 1/2"x9" rectangle with fold lines spaced every 1" across vertically and 1/2" tabs at either end. See image below.)
- Template Three: Backing Page (this has a 7"x8 1/2" rectangle printed in the center of an 8 1/2"x11" piece of white paper. See image below.)
 |
| Template 1: Image Page |
 |
| Template 2: Accordian Fold Page |
 |
| Template 3: Backing Page |
(Supplies, cont'd.)
• Construction paper for frame
• Stapler
• Pencils/erasers
• Black marker
• Crayons
• Ruler
• Scissors
• Glue stick
Directions:
1. Using pencil, draw two very different pictures on the Image Page, one in each rectangle. The rectangles should be held vertically. Make to fill up the space in each box and use images that are nice and big--little details will get lost in this kind of project.
 |
| Step 1: Draw two pictures |
2. Once the the images are planned out, outline the pencil drawings with marker and color in with crayon.
 |
| Step 2: Color pictures in |
 |
| Step 3: Cut pictures into 1" strips |
 |
| Step 4: Prepare Accordian Fold Page |
5. Following the letter and numbers written on the Accordian Page, glue the strips of the two pictures you created onto the Accordian Page with a glue stick. Take your time and do a nice, neat job. Once you are done gluing all of the strips to the Accordian Page and you are sure the illusion is works, you can cut off the excess portions of the image strips (the parts labeled with the letters and numbers).
 |
| Step 5: Glue strips onto Accordian Page in alternating order |
 |
| When done, it looks kind of confusing! |
6. Staple the Accordian Page onto the Backing Page. Staple through the 1/2" tabs on the left and right side of your project. This will hold your project in the way that you need for the illusion to work.
 |
| Step 6: Staple project to Backing Page |
7. Test your illusion out! Tilt your drawing one way and then the other--does your illusion work?
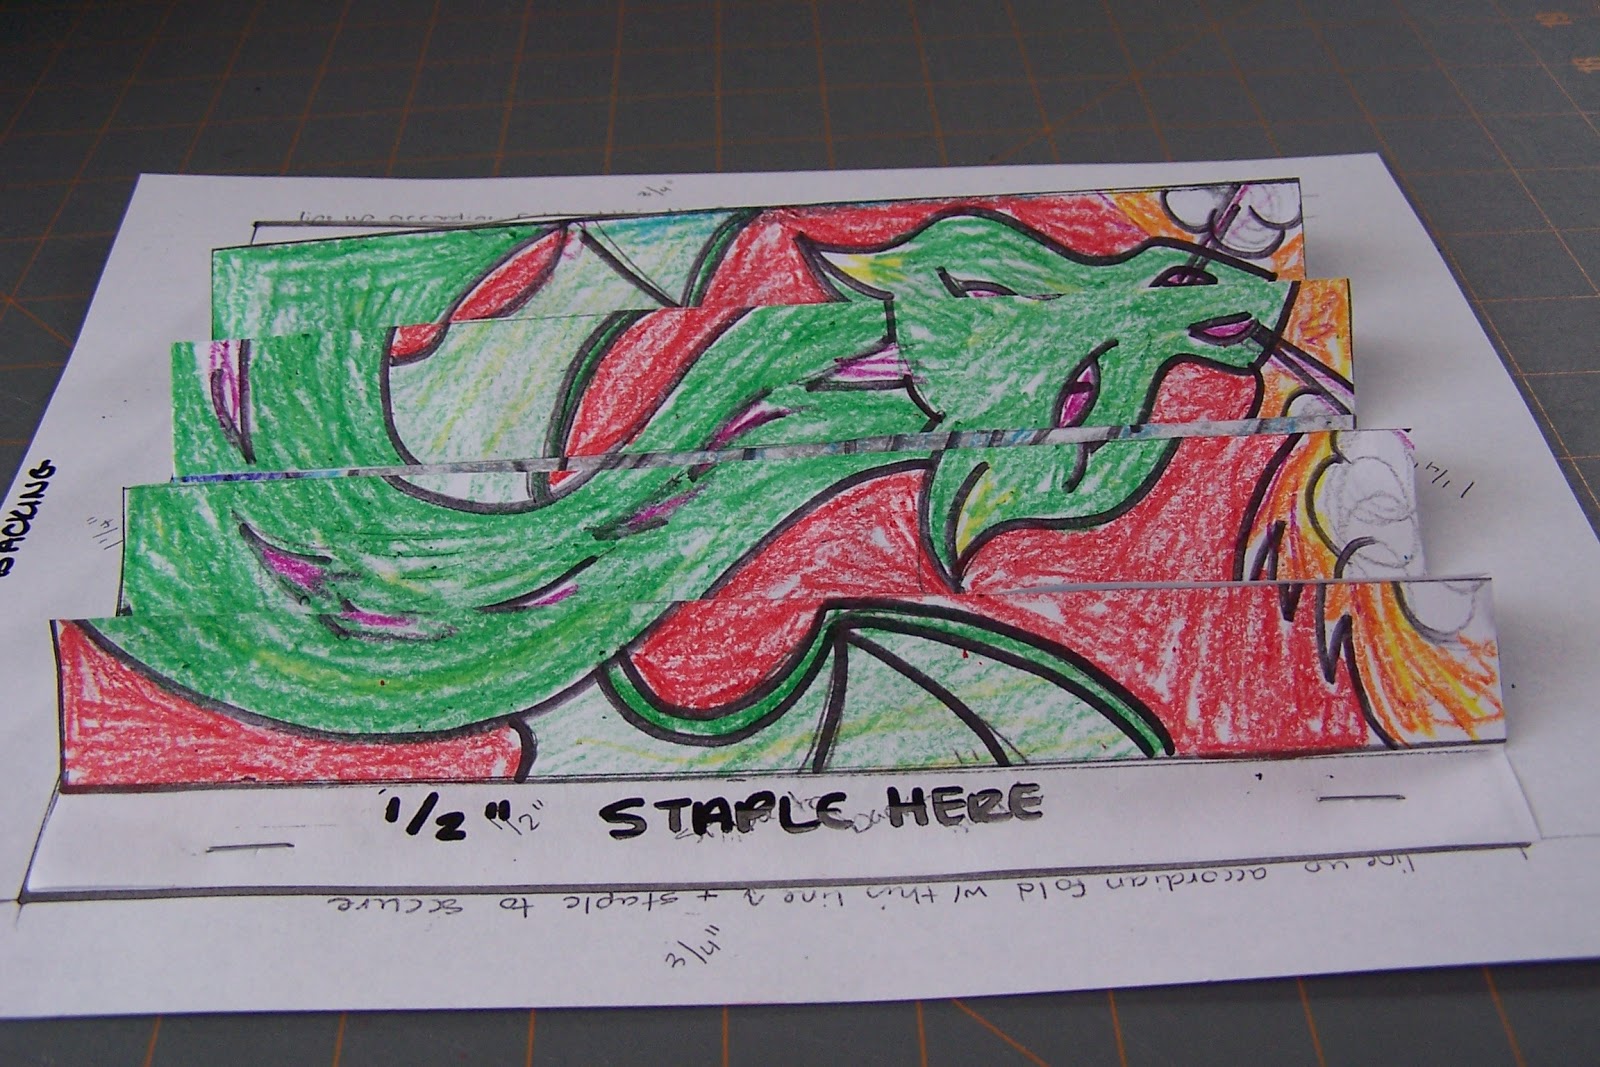 |
| From the left: Fire-breathing Dragon! |
 |
| From the right: A brave knight! |
Is it not working? Try these tips:
• Refold the accordian page so that it looks like the one in the photos, if the folds are going the wrong way, the illusion won't work.
• Did you glue the pieces on in the wrong order? Or upside down? That happened to some of the kids in my class. You could try to peel off the strip that is positioned incorrectly, but glue sticks hold pretty strongly--you may need to cut the strips and reposition them onto another Accordian Page.
8. Once your optical illusion is done, you can create a frame for you Magic Picture. Fold a piece of construction paper in half lengthwise. Draw a 3"x8 1/2" square on the fold. Cut away the rectangle with scissors. Open up your frame. It should be the proper size for your Magic Picture. Glue it to the backing page with a glue stick. You can decorate it with crayons and markers if you'd like.
 |
| Step 8: Create a frame |
Amaze your friends and family with your Magic Picture!
Hi! I haven't read every word yet, but Claire already wants to do this!!! Great work!
ReplyDeleteAwesome idea Mrs. P. :-D
ReplyDeleteReally great for young kids (because it's plain fun!) but even older kids could use the idea for science projects like lenticular printing and 3D techniques http://en.wikipedia.org/wiki/Lenticular_printing
Great Article!
Thank you so much for this amazing tutorial! It is so helpful and detailed! You are great! :)
ReplyDeleteGreat tutorial thank you. Is there any way that you could make the templates downloadable?
ReplyDeleteHi Daniel-I did this project awhile back and I don't have the templates digitized…but I can look. Also, check out my newer post on lenticular animation that is easier, I think…
Deletehttp://createartwithme.blogspot.com/2014/03/lenticular-animation-tutorial.html
Thanks for stopping by! Mrs. P
Hi, this page is amazing, i love the ideas and creativity! I also have my own blog and portfolio! It would help me out a lot if you would take a look! thank you! Rhoar. My portfolio Or my blog:
ReplyDelete