Showing posts with label weaving. Show all posts

Thursday, December 22, 2011

Gifts From the "Art" Class

Last week I finished a mini course with students in 2nd through 4th grade where they create eight art-inspired gifts for giving. The course was fun to prepare for--I had to choose projects the children would love to make that resulted in gifts they would be proud to give! I think the class was very successful. 

The projects we created were:

Stained Glass Plate: based on rose windows of Gothic cathedrals, this project is pretty much a black snowflake-like shape decoupaged onto a clear glass plate with tissue paper squares added for color. These are striking displayed on a plate rack where light can shine from behind. We used Mod Podge to attach both the "snowflakes" and the tissue paper squares to the back of clear glass plates.
Faux stained glass plate

Watercolor coasters: The children used crayons and watercolors to create four pieces of art (Christmas images and the four seasons were popular). These paintings were then cropped and inserted into a glass coaster set.
One student's set of coasters with a holiday theme.

Mexican Folk Art-Inspired Ornaments: The original post for this can be found here.

Pillow Pals: The children drew an animal, doll or critter onto white cotton using permanent marker and crayon. The image was heat set and stuffed with fiberfil. The result was a unique stuffed animal for a younger sibling.
Coloring in a turtle Pillow Pal. We used black Sharpies to outline and regular Crayola crayons to color in the images. When done, heat set using a warm, dry iron and a pressing cloth.


Framed Silhouette: I took the children's profile pictures in the first class, printed them out, cut them out with scissors and then painted the shapes. The children mounted these on white paper for contrast and then on a larger piece of colored card stock and framed the piece. Mom is sure to love those! I'll have a more detailed post about this in the future.

Mosaic candles: We used the technique from the snowglobe mosaics post to create little mosaics (7x7 squares). The children could do a holiday image such as a tree or snowflake, or the initial of the gift recipient. The resulting mosaic was decoupaged onto a ready-made glass candle using Mod Podge.

Peg game: We used the process from an earlier post for a Valentine's Day peg game, but I changed the image to a tree. Dad will love that game!

Hand woven fleece scarf: We used a technique similar to one that I saw in Family Fun magazine, but substituted different types of yarn for a more artistic look and feel. The resulting scarf is sophisticated, and a great intro to weaving. Plus it used up some of the yarn I had in my stash!

Lots of great projects! I have had wonderful feedback from the parents and students! I think this course increased the students' confidence in being able to create a quality finished art piece as well as showing them that the best gifts really do come from the heart. Have a wonderful New Year!

Wednesday, November 16, 2011

Burlap Weavings (Class #2)

My homeschool art class also did burlap weavings this week (just like my after school class, see the original post here). 

The project was slightly different since the class is shorter (only an hour) and my class is made up of students in 2nd through 5th grade. I brought out my samples from my original post, but did not have the paint element this time. The burlap was also cut into smaller pieces and I did not mount them to mat board, but affixed a layer of masking tape on the back of the top edge so the piece didn't unravel while the children were working in it.

Done this way, the project makes for an inexpensive project for a group. Many of the children were able to complete their pieces in this session, but two sessions could be used. This really got the children thinking and working with their hands in a new way!

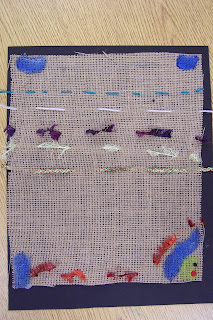
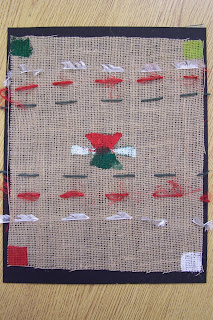
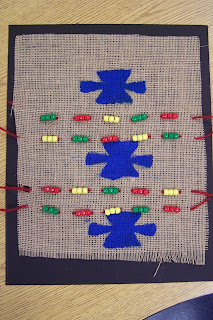
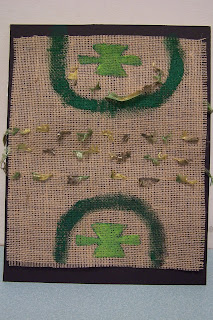
Here are some examples of the finished pieces:

Beadwork and straight stitches to create an image.

Exploring color, texture and stitching.

Love that variegated yarn!

Beautiful! Great Job Everyone!

Tuesday, November 15, 2011

Burlap Weavings

This week I wanted to introduce my after school students to the art of weaving. Weaving many times makes people think of the Native Americans, but I pointed out to the children that almost every culture has some form of weaving: Africa, Mexico, South America, China, and Japan as well as Europe in the Middle Ages.

I gave each student a piece of burlap that had been hot-glued to a piece of mat board. Burlap is great because it has a nice open weave, so it is easy to see the WARP (threads that run vertically) and WEFT (threads that run right to weft, er, I mean LEFT).

The students can weave yarn into the spaces of the fabric or can gently pull on the weft threads of the burlap and remove them to create spaces where the exposed warp threads can be tied together or larger ribbons can be woven in.

I created an example board for the students to view during my discussion. It shows the following:

First Example:

1. Yellow thread: Single strand woven in one row.

2. Purple threads: Single strand woven into three rows (multiple rows).

3. Multi-colored Fuzzy Yarn: Single strand using large "stitches" so that the fuzzies can be easily seen.

4. Dark Purple Eyelash Yarn: Single Row, large stitches.

5. Burgundy Yarn: Single row with beads and a fuzzy yarn stitched along with it. Stitched in an open area of the burlap where the weft threads have been removed.

6. Burgundy Yarn (2):  Single row stitched into the plain burlap

7. Pale green: Single strand woven in a pattern. You could also do X's or other patterns.

Burlap Weaving: First Example

Second Example:


8. Ribbon woven into a section where the weft threads have been removed. Ends are tacked down with hot glue on the back of the piece.

9. Section where weft threads were removed and remaining warp threads were gathered and tied. Some with yarn and one with yarn with bead added.

10. Stamping with acrylic paints. Diamonds, squares, etc.

11. Fringe: Fringe created using yarn and an example of fringe created by removing the last few weft rows.
Burlap Weaving: Second Example

The possibilities are endless with this. I also provided some acrylic paints and stamps with Navajo motifs that the children could add to their pieces. Here are the step-by-step directions:

Supplies Needed:
  • Burlap (I bought ours at a fabric store)
  • Mat Board, optional (I glue to top edge of the burlap to the board to keep the whole thing from fraying apart as the children work. The final piece looks more finished this way)
  • Hot glue gun & glue sticks
  • Assorted yarn and ribbon 
  • Beads (I used plastic pony beads)
  • Scissors
  • Plastic needle (easy to thread the yarn through and won't poke little fingers)
  • Acrylic Paints, brushes, craft foam, optional
Directions: 

1. Cut the burlap to size: ours was 10"x13." The students I have are 3rd and 4th graders and we have an hour and 15 minutes to work, so that size seemed appropriate. Younger students and less time would require a smaller piece of burlap to work with. When cutting burlap, wear eye protection since the fibers may scratch your cornea.

2. Cut a piece of mat board slightly larger than the burlap square: ours was 11"x14."

3. Hot glue the burlap to the mat board along the top edge of the burlap (leave the bottom edge unattached so that the child can work with it).

Stamps Include a starburst-like shape, diamonds and squares.
4. If you would like to use the paints to stamp Navajo motifs, do so now. I cut a motif from craft foam and had the children apply paint to the shape with a brush and stamp it onto the burlap. 

5. While the acrylic is drying, plan the rest of your design. Choose a few different types of yarn and ribbon to complete your design. Weave the yarn into the fabric using the plastic needle, adding beads if you'd like. If you would like to use ribbon, remove a few of the weft threads first to create an open section. Instead of the plastic needle, we used a safety pin to weave the ribbon into the fabric. You can also sew around the stamped designs, if you'd like.

6. Create fringe at the bottom of your piece by removing the last few weft rows and/or using yarn knotted into the fabric.

This piece is very open to the student's individual creativity. Have fun and encourage self-expression. Here are a few of the examples from today's class. ENJOY!

The student said this is an "Elvis-inspired" weaving!

The student said this is a Christmas-inspired weaving.
Lovely Beading!

Painting and eyelash yarn create a nice symmetrical image. 


Related Posts Plugin for WordPress, Blogger...