Showing posts with label apple. Show all posts

Friday, January 29, 2016

Happy Birthday, Paul Cezanne! (On January 19th)

In honor of Cezanne's birthday, I thought I would REPOST a popular lesson from 2013 that is fun and easy and is appropriate for a wide range of students. The painting below is my youngest son's and was featured in the book "500 Kids Art Ideas" by Gavin Andrews published by Quarry Books. While this is a nice fall-inspired still life, you could change it to pears or lemons/limes for a more winter or spring theme. Either way, the results are fabulous and the lesson is chock-full of active learning.

-------------------------------

We are all into fall over here and I thought this week would be a nice time to do a still life with apples with my after school art class. This is the first time we've met this school year, and the group has 1st-4th graders in it. I had an idea of what I wanted to do, it's actually a combination of two lessons I saw out there:
My 1st grader's example with Cezanne's reproduction.
I can't show you the still life--he ate it!
(UPDATE: He's now in 3rd grade, but still eats still eats everything in sight!)

"Still Life With Oil Pastels and Baby Oil" (2 posts) from Fine Lines
http://kids-finelines.blogspot.com/2012/04/still-life-with-oil-pastels-and-baby.html
http://kids-finelines.blogspot.com/2012/04/oil-pastels-and-baby-oil-part-2.html

That was pretty much the lesson I used, but I modified my talk in the beginning to be about Paul Cezanne's work showing them "Still Life With Apples."

I then used the talk I found on That Artist Women: "Open vs. Closed Composition"
http://www.thatartistwoman.org/2011/09/open-vs-closed-composition.html

I really like how she shows real art examples in her post. I showed those to my kiddos as well.

Then I gave them time to experiment with arranging the apples (and one girl's donated pear) into closed and open compositions. There were three students to a table and the table needed to agree on a composition they liked best.

And then we were off! I walked them through drawing, demoed how to use the oil pastels and baby oil, and gave a quick watercolor demo.

These are their creations! Beautiful! They are so proud (me too!).

Enjoy!


Saturday, October 12, 2013

Cezanne's Apples and Composition

We are all into fall over here and I thought this week would be a nice time to do a still life with apples with my after school art class. This is the first time we've met this school year, and the group has 1st-4th graders in it. I had an idea of what I wanted to do, it's actually a combination of two lessons I saw out there:
My 1st grader's example with Cezanne's reproduction.
I can't show you the still life--he ate it!

"Still Life With Oil Pastels and Baby Oil" (2 posts) from Fine Lines
http://kids-finelines.blogspot.com/2012/04/still-life-with-oil-pastels-and-baby.html
http://kids-finelines.blogspot.com/2012/04/oil-pastels-and-baby-oil-part-2.html

That was pretty much the lesson I used, but I modified my talk in the beginning to be about Paul Cezanne's work showing them "Still Life With Apples."

I then used the talk I found on That Artist Women: "Open vs. Closed Composition"
http://www.thatartistwoman.org/2011/09/open-vs-closed-composition.html

I really like how she shows real art examples in her post. I showed those to my kiddos as well.

Then I gave them time to experiment with arranging the apples (and one girl's donated pear) into closed and open compositions. There were three students to a table and the table needed to agree on a composition they liked best.

And then we were off! I walked them through drawing, demoed how to use the oil pastels and baby oil, and gave a quick watercolor demo.

These are their creations! Beautiful! They are so proud (me too!).

Enjoy!


Saturday, September 22, 2012

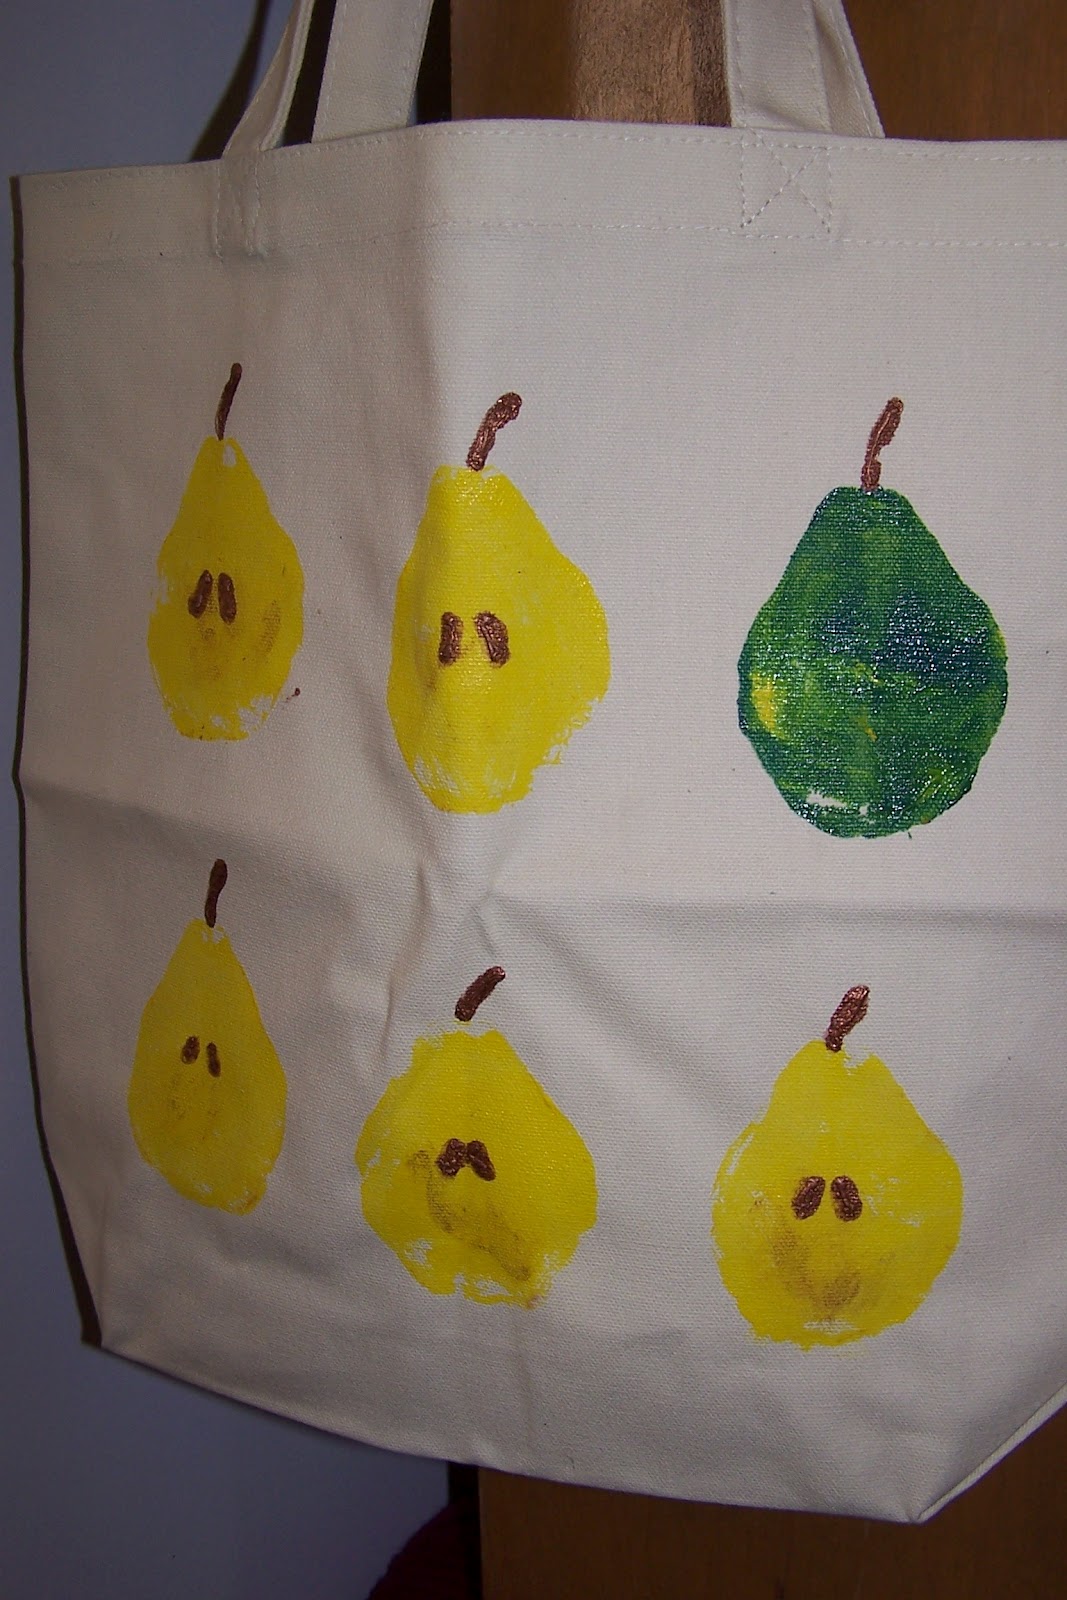
Focal Point Fruit Print Tote

Fall is in the air! And for those of us in New England it's apple picking time! I took the kiddos out and we picked a HUGE bag of Cortlands, Macouns and (my favorite) Honey Crisp apples. YUM! This is also a wonderful time to do an art project that is a lesson in basic printmaking techniques, using fruit to make prints.


One of these things is not like the other...

Variations of this lesson abound, but with this one, you can use apples or pears to make a fall-inspired tote bag to carry all of those library books around! If you don't want to go through the expense of printing on canvas totes, just use tempera paints on heavy-weight paper.

In her book "Teaching Art With Books Kids Love," author Darcie Clark Frohardt has a similar lesson. She uses fruit prints to illustrate the concepts of focal point and dominance to students. She suggests using the book "Saint George and the Dragon" by Margaret Hodges--which has gorgeous illustrations, by the way, to show the concept of focal point and then stamp the fruit onto the surface with one of them being a different color. That different colored fruit becomes the focal point of the piece.

No matter how you choose to do this project, it is fun way to explore printmaking!

Focal Point Fruit Print Tote

Supplies Needed:
  • Canvas tote (or heavyweight paper)
  • Fabric Paints in two colors for the fruit (red and green or green and yellow, etc.)
  • Brown or black fabric paint for seeds and stems (or you could use a Sharpie marker if you are doing this on paper)
  • Fruit such as a pear or apple (or experiment with whatever fruits and veggies you have on hand)
  • Knife (to cut fruit, a grown-up's job)
  • Paper plate palette
  • Newspaper to cover work surfaces
Directions:

1. Cut your fruit in half using a sharp knife (a grown-up's job).

2. Place some fabric paint on a paper plate. Dip the fruit into the fabric paint and try a test print (or two) on paper. Once you've got the technique down, you can stamp the fruit in rows across the tote. To make the focal point, use an alternate color of paint to stamp one of your fruit a different color than the rest.

3. Use brown or black fabric paint with a fine tip to add details like seeds and stems to the fruit. I didn't add seeds to the focal point fruit because I thought that made it look like it wasn't cut open but the rest were.

4. Let dry for at least 24 hours (or whatever the fabric paint manufacturer suggests).

A variation of this would be to use any of the books by Saxton Freymann and Joost Elffers such as "How Are You Peeling: Foods With Moods" and after your initial fruit prints are dry, add faces to them expressing different feelings and moods. FUN!


Related Posts Plugin for WordPress, Blogger...