Thursday, October 11, 2012

Monster Sketchbooks

Last fall, my (then) four-year-old son and I came up with these cute Monster Sketchbooks. He was able to make a few of them and then he happily drew and wrote his name in them while I worked next to him on some other projects.


These would be great for giveaways in lieu of candy (if you want to be "that house"-hee hee!) or a neat party or classroom craft. The matchbook case-style notebook is easy and quick to do. You don't have to do a monster-theme. This would also be a nice notebook to create before heading out on a hike. Bring your notebook with you and do leaf rubbings and draw from nature!

Monster Sketchbooks

Materials Needed:
  • 1 piece of colored construction paper (9x12") for the cover (you could use orange for a pumpkin, green for a monster, purple for a vampire, white for a ghost or mummy, etc.)
  • 3 sheets of white construction paper (9x12") for the drawing paper inside
  • Scissors
  • A ruler and pencil
  • Stapler
  • Markers and crayons
Directions:

1. Cut the piece of construction paper you'll be using for the cover in half lengthwise. You will have two pieces, each 4 1/2"x 12." You only need one per booklet, so put one aside for another use.

2. Cut each sheet of white construction paper into three 4"x9" pieces. Stack all nine pieces together and fold them in half. This will make the bundle of drawing paper inside your notebook.

3. Mark the cover and begin folding: Using the picture, above, as a guide, divide the cover rectangle into three sections: the first should be 1" wide. The next section should be 5 3/4" wide, and the last should be 5 1/4" wide.

4. Fold the cover at the 1" tab. Insert the folded edge of the stack of white paper into the cover at the 1" tab and staple. You can then close the cover and tuck it into this flap--like an oversize matchbook.

5. Use construction paper scraps and/or markers to decorate the covers of the sketchbooks like your favorite monster!

Happy Halloween!

Wednesday, October 10, 2012

More Illuminated Names

My after school art class is focusing on Medieval Art and this week we learned about illuminated manuscripts and hand lettering. The original post on my blog appears here. This was a nice way for the children to get to know one another and create a personalized keepsake. This project really is easy and requires very few supplies.

Here are some of the results:

Katie enjoyed using the gold pen.

Paige said that the critter the makes up the letter "e" in her name
is meant to show that she likes weird, scary, animals.

Love the cactus!

Alex likes money, math, candy, and super heros. Oh, and that
is a Ninja peeking out from behind the "A."

Tuesday, October 9, 2012

Fall Trees With Cork-Stamped Leaves

I had the best time today with about 60 kindergardeners! I was asked to do an art project with them as part of a Fall-themed day their teachers had created for them. It was wonderful--the children were so happy and they were able to explore outside, do some fun movement activities (I joined in too!) and they also did leaf rubbings and this stamping project with me. Thank you so much to the Kindergarten teachers at Clark Elementary School for allowing me to come in for the afternoon.


This picture has a flurry of fall leaves
flying wildly all over--and note the piles on the ground.
I'm so glad I'm not raking all of those leaves up!

I shared a nice little book called "Leaf Jumpers," by Carole Gerber with the children. This book was different than I expected--it's a fiction book. It described the sound, shapes and colors of leaves and identifies eight different kinds of leaf shapes within its pages. This would be a great book to read before going on a leaf hunt! It got us thinking about the colors and shapes of leaves. It also had some very poetic ways of describing the colors of the leaves: "...flame bright and vivid like a match." The back of the book has a little page on the science of leaves and why they change color.

I had the children listen carefully since this project had tracing, cutting, gluing and stamping. We need to listen when doing so much stuff with our art.  I then gave them a quick demo on how to stamp using the corks: dip in paint then stamp gently on paper--no smooshing the cork around! We aren't painting with a brush. It's up and down only.

Next we went over to our tables and began to work. What a great time and a lovely lesson on color and printmaking. Enjoy!

Fall Cork-stamped Trees

Supplies Needed:
  • One 12" x 18" piece of construction paper for background (light blue or whatever color you'd like)
  • One 9" x 12" piece of brown construction paper for tree trunk and branches
  • Pencil
  • Scissors
  • Glue stick
  • Wine Corks
  • Paper plates for paint palettes
  • Red, Orange, Yellow, and Brown Tempera Paint
  • Newspapers to cover work surface
Directions:

1. Trace the child's hand and part of his/her forearm onto the brown paper. This will be the trunk and branches of the tree. Cut the tracing out (most of the children were fine with this--we only lost a couple paper fingers, er, I mean, branches. Glue the trunk and branches to the background paper, making sure the base of your tree trunk is at the bottom of the page.

2. Dip the cork into the paint and stamp leaves all over the paper, filling your tree with beautiful colored leaves!  It's important to have the children fill the ENTIRE top of the tree with leaves--not just a couple along the edges of the branches! No naked trees--this isn't winter. Make sure you get all four colors of paint on your tree.

That's it! A beautiful fall keepsake!

Fall Leaf Rubbings:

When the children were done, they could move over to a couple tables where I had long sheets of newsprint from a roll, taped down. Under the paper, I had placed different types of leaves. They then could use flat-sided crayons to do rubbings and discover the different leaves I had "hidden" under the paper. This was a nice project to keep little hands busy for the last five minutes of class.

Wednesday, October 3, 2012

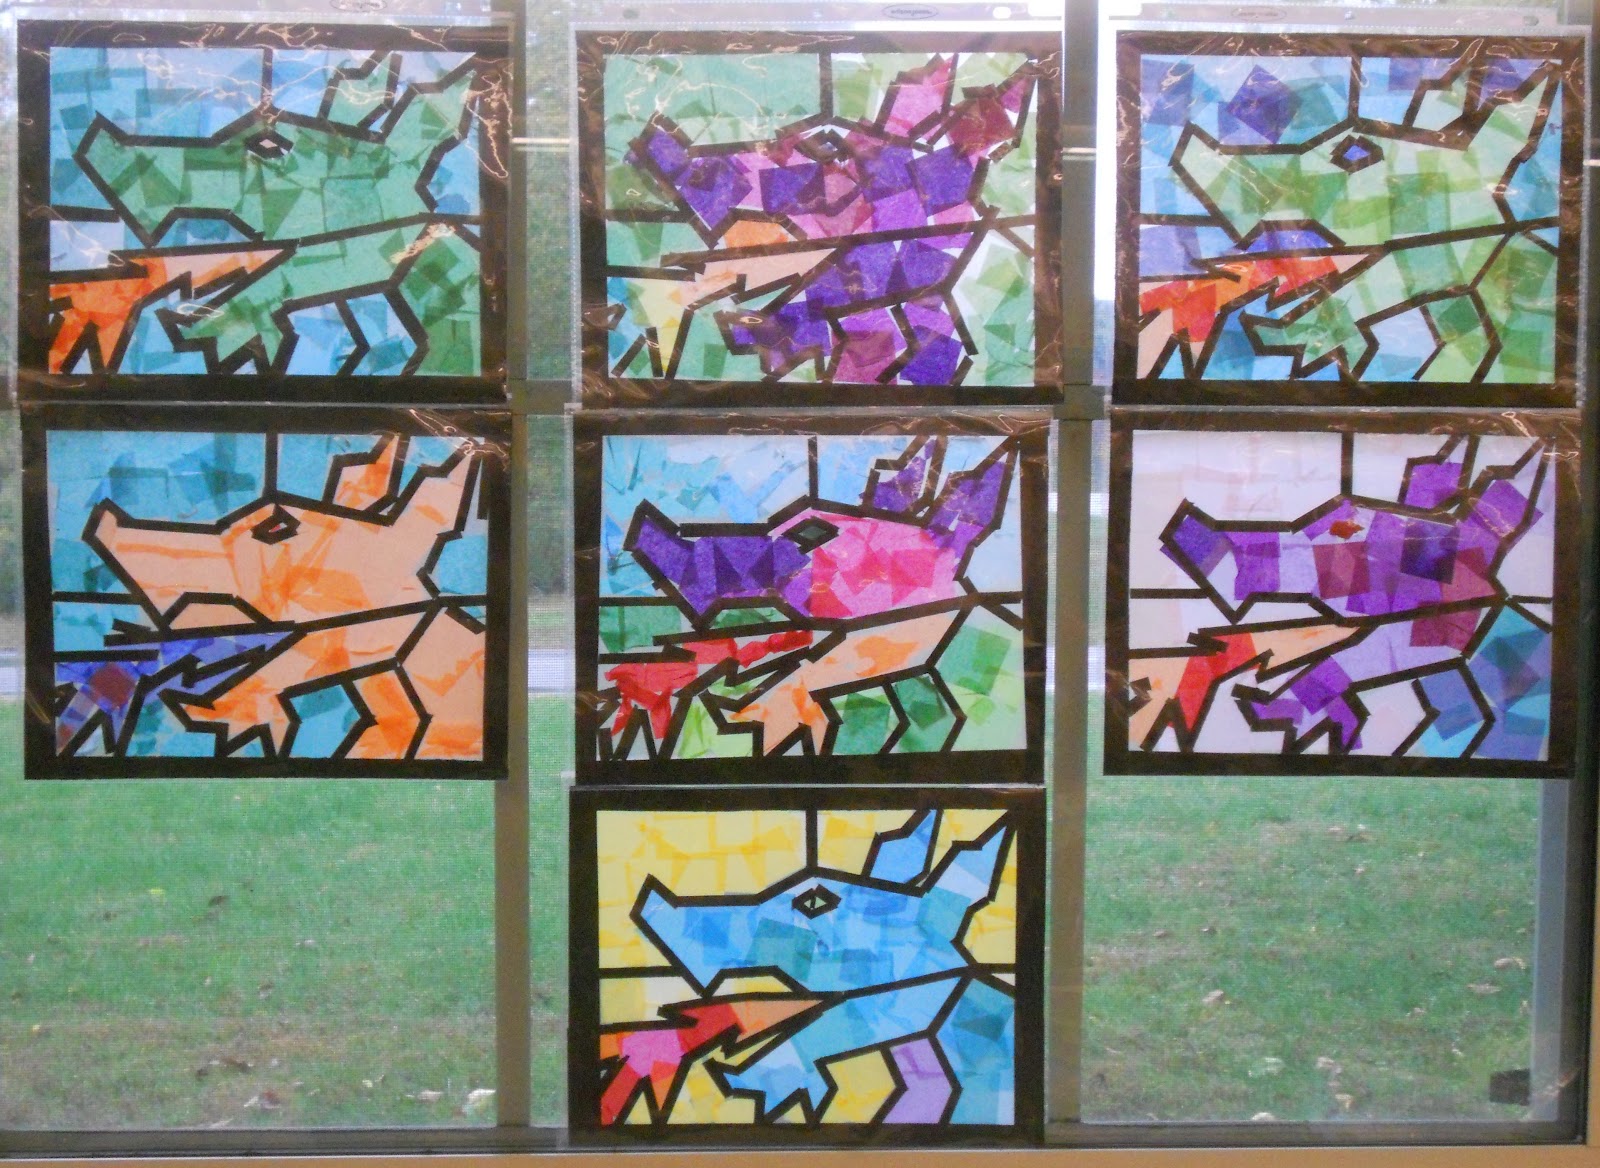
Dragon (Faux) Stained Glass

Yesterday was the first session in my after school Medieval Art Class! What a blast! I have a great group of kids and a nice mix of boys and girls!


Aren't these fabulous?!
We did a variation on a project I saw in the book, "Medieval Projects You Can Do" by Marsha Groves. The image is pretty much the one Groves uses, but I used the Contact paper technique that I've developed with my students over the last couple years.

I showed the children pictures of stained glass from medieval times, making sure that I had examples of traditional stained glass (tall and rectangular), some details showing the brushed-on enamel details, and an example of a rose window with its circular design.

I then provided them with a guide that had the dragon image on it with all of the sections labeled so the children would know what was fire, what was dragon and what was background (sometimes that gets confusing). Using a template like this is actually very traditional. In medieval times artisans would sketch the designs for windows onto wooden panels and the artisans would fabricate the windows on top of the wooden templates.

The end results of this project were gorgeous! It is funny how different the pieces can be even thought they are all the same subject.

One bit of warning, using tissue paper squares with children can be, um...tricky. This group wasn't bad at all: I had the tissue paper squares in a tray in the center of each table and I warned that crazy movements can cause the squares can fly up and get on other people's work (not cool!). Once the tissue paper is on the Contact paper, it cannot be removed, so the children need to be mindful of their neighbors' pieces and move slowly and carefully.

I do hope you try this project, it really is a cool one!

Here's the method:

Dragon (Faux) Stained Glass

Supplies Needed:
  • Template (I copied mine on 8 1/2" x 11" paper)
  • Pencils, Ruler & Sharpie to create your template
  • Piece of clear Contact paper slightly larger than your paper guide
  • Clear tape
  • Four 3/4" x 12" strips black construction paper "(for frame)
  • About four 1/4" x 12" strips black construction paper "(for leading)
  • Many 1" squares of tissue paper, assorted colors
  • Scissors
  • 1 clear sheet protector, optional
Directions:

1. Make your template: Draw a border around the copy paper that is about 1/2" wide. Use the pencil & ruler to create a simple, bold image made up of straight lines. Don't make anything too detailed! You can use the dragon image for inspiration. Once you have your design down, use the Sharpie to go over the lines. These will be the guide lines you will use when placing your construction paper leading. You may want younger children to work from a template image you've created, but older children could create their own over a period of classes.

2. Tape the template to the table using clear tape.

3. Remove the paper backing from the Contact paper and place it on top of the template sticky side up. You will be doing all of the work on the sticky side of the Contact paper. Tape the Contact paper to the table using a couple pieces of clear tape to hold it in place while you work.

4. Place the 3/4" pieces of black construction paper over the areas of the template designated as your border. Place the paper strips directly onto the sticky side of the Contact paper and press lightly. It is OK if the strips extend beyond your template--you'll be trimming the piece later.

5. Using your template as a guide, place the 1/4" strips of construction paper over the leading lines on the image you drew. Simply rip (or cut) the construction paper strips to the proper length to cover your leading lines. Cover all of the lines in your drawing.

6. Once you have the border and all of the leading lines covered in construction paper, start filling in the remaining sections with colorful pieces of tissue paper. The squares can overlap each other and can overlap the black construction paper lines a bit (you are actually working on the piece from behind). But take care to make sure the tissue paper goes where you want it to. It is almost impossible to remove the tissue paper from the Contact paper once it gets on there. 

7. Once all of the sections are filled in with color, trim the piece down to 8 1/2" x 11" and slip it into a clear sheet protector to protect it. Other options would be to use another sheet of Contact paper on the other side of the piece to seal the tissue paper and construction paper safely inside. Or you could run the piece through a laminator (maybe), I don't have one at my disposal, so I'm not sure of that, but it may work. 

Place in a sunny window and enjoy!

Working on our dragon (faux) stained glass windows.
Everything is taped down with clear tape and the tissue paper
squares are in the center of the table in cardboard trays.

Related Posts Plugin for WordPress, Blogger...