Pages

Saturday, December 31, 2011

Easy Silhouettes

I love the look of silhouettes! They can go with just about any decor: traditional, modern, eclectic--you name it! They are a great way of preserving your child's image at a certain point in time, and they are also a great example of positive and negative space. 


A silhouette of my oldest guy--so handsome!


Positive space is the space an object occupies (in this case, the head of the person whose silhouette is being done). Negative space is the area around the object. I chose white paper to highlight the negative space around my silhouettes. Although this craft is simple, it may be best for older children or a grownup to do the actual cutting of the silhouette so that facial features stay intact. This is an inexpensive craft that would be perfect for a gift (think grandparents).

Supplies Needed:

  • Camera
  • Ultra fine point marker
  • Small, sharp scissors (I used embroidery scissors)
  • Black acrylic paint (I used flat paint in "lamp black")
  • Paint brush
  • 3 1/2" x 5" rectangle white paper (I used scrap booking card stock)
  • 5" x 7" rectangle colored paper, your choice of color (I used scrap booking card stock)
  • Black 5" x 7" frame (I bought mine at the dollar store)
  • Glue stick

Directions:

1. Take a profile picture of the person whose silhouette you will be creating. Make sure they are looking straight ahead and that their hair is neat (girls with long hair can pull it to the side or have it fall down their backs).

2. Print out the picture onto plain white paper. Use the fine point marker to outline the features of the subject. Add a gradually sloping neckline. You may need to draw in the bottom edge of their hair if it went beyond the picture. I try to keep the bottom edge of the silhouette simple and neat, but I do have a little fun when I'm drawing in the ends of the hair. Just don't go too crazy--remember, you'll have to cut it all out!

3. Use a small, sharp pair of scissors to cut out the image.

4. Paint the cutout with a coat of black acrylic paint and let it dry for several hours or overnight. 

5. Glue the cutout to the white paper. Glue the white paper to the larger, colored, piece of card stock. Insert into the frame and you are done! These are so fast you may find that you'll want to do a whole series of silhouettes! ENJOY!

Thursday, December 22, 2011

Gifts From the "Art" Class

Last week I finished a mini course with students in 2nd through 4th grade where they create eight art-inspired gifts for giving. The course was fun to prepare for--I had to choose projects the children would love to make that resulted in gifts they would be proud to give! I think the class was very successful. 

The projects we created were:

Stained Glass Plate: based on rose windows of Gothic cathedrals, this project is pretty much a black snowflake-like shape decoupaged onto a clear glass plate with tissue paper squares added for color. These are striking displayed on a plate rack where light can shine from behind. We used Mod Podge to attach both the "snowflakes" and the tissue paper squares to the back of clear glass plates.
Faux stained glass plate

Watercolor coasters: The children used crayons and watercolors to create four pieces of art (Christmas images and the four seasons were popular). These paintings were then cropped and inserted into a glass coaster set.
One student's set of coasters with a holiday theme.

Mexican Folk Art-Inspired Ornaments: The original post for this can be found here.

Pillow Pals: The children drew an animal, doll or critter onto white cotton using permanent marker and crayon. The image was heat set and stuffed with fiberfil. The result was a unique stuffed animal for a younger sibling.
Coloring in a turtle Pillow Pal. We used black Sharpies to outline and regular Crayola crayons to color in the images. When done, heat set using a warm, dry iron and a pressing cloth.


Framed Silhouette: I took the children's profile pictures in the first class, printed them out, cut them out with scissors and then painted the shapes. The children mounted these on white paper for contrast and then on a larger piece of colored card stock and framed the piece. Mom is sure to love those! I'll have a more detailed post about this in the future.

Mosaic candles: We used the technique from the snowglobe mosaics post to create little mosaics (7x7 squares). The children could do a holiday image such as a tree or snowflake, or the initial of the gift recipient. The resulting mosaic was decoupaged onto a ready-made glass candle using Mod Podge.

Peg game: We used the process from an earlier post for a Valentine's Day peg game, but I changed the image to a tree. Dad will love that game!

Hand woven fleece scarf: We used a technique similar to one that I saw in Family Fun magazine, but substituted different types of yarn for a more artistic look and feel. The resulting scarf is sophisticated, and a great intro to weaving. Plus it used up some of the yarn I had in my stash!

Lots of great projects! I have had wonderful feedback from the parents and students! I think this course increased the students' confidence in being able to create a quality finished art piece as well as showing them that the best gifts really do come from the heart. Have a wonderful New Year!

Thursday, December 15, 2011

Mexican Folk Art Ornaments

Ooooh, I have a special treat for you today! Tooled metal ornaments inspired by Mexican folk art! They are so bright and shiny, the children just loved making them!
Mexican Folk Art Ornament

When I am looking for inspiration for art projects, I look pretty much everywhere: my Art History books, gift catalogs, and magazines to name a few of my sources. My grandmother loves to bring me magazines that she's done with. No matter how old the magazine is, I love to look through them for techniques and inspiration. This craft was originally published in "Crafts" magazine in 1984. I loved the look of these ornaments and thought my art kids would love to make them. I was right! They LOVED making these. I had them make little cards to put them in so they could give them to a loved one as a gift.

The tooling aluminum needed to be ordered online from www.dickblick.com, but it was so worth it! I ordered a roll for just under $6 and combined with a couple of other things, shipping was only $7. I know that seems like a bit much, but I did have a few things in my order and the tooling aluminum is a roll of 15' or so, enough for plenty of ornaments! Plus, it is a medium that is unusual for the children to work in. I highly recommend it! So, let's get started!

Supplies Needed:

  • Tooling aluminum, available from www.dickblick.com
  • Newspaper
  • Dull pencil or blunt stick for tooling the design
  • Sharpie markers or other permanent felt tipped markers in a variety of colors (I had an eight color assortment available, but so many beautiful colors are available!)
  • Hole punch
  • 8" piece of ribbon for hanging
If you would like to make this as part of a card, see the end of this post.

Directions:

1. Choose a design for your ornament, we used the full size ornament patterns that were published in "Crafts" magazine, but I also had a few blank ornament shapes available for children to design their own. I encouraged the children to design bold designs with clear, large shapes. I also told them to fill up the entire ornament shape and add some details to their design (tons of little details may get lost, but I didn't want them to just draw one little shape in the middle of the ornament and say they were done). Just to be sure they created designs that would work, I had them show me their drawings "for approval" before they started tooling.

2. Using scissors, cut a piece of the aluminum roughly the size of your ornament. We used 4 1/2" x 6" rectangles. Tape the paper with your ornament design to the aluminum to hold it in place while you work.

3. Place the aluminum onto a pad of newspaper. This will create a soft surface for the metal. Using a dull pencil and firm pressure, trace over all of the lines of your design.

4. Once your design is done, use scissors to cut out the shape of the ornament. I found that younger children had trouble with this part and sometimes the ornament would get all bent up or the outer shape would become distorted. So if you are working with younger children, you may want to cut the ornaments out yourself.

5. Flip the ornament over and gently color the raised surfaces with permanent markers. The children can create large areas of color and then add details with a darker color on top. Encourage doing one's best work, taking one's time and adding details and pattern.

6. Once done, have the child add his/her name and date to the back.

7. Use a hole punch to create a hole for hanging and add ribbon to hang the ornament.

8. Attach to a card if desired. See my card directions, below. Feliz Navidad (Merry Christmas)!

Some of the ornaments done my my students

----------------------------


To make this project into a card:

Additional Supplies Needed: you'll need construction paper for the card, an envelope, tape to adhere the ornament to the card and the optional information for inside the card (see the info later on in the post).

Cut a piece of construction paper so that it fits inside the envelope you have. Inside the card, glue the greeting and the information about the project. Have the child sign the card.

The greeting I used was:

Feliz Navidad, próspero año y felicidad!

(Merry Christmas, a prosperous year and happiness)

 May the Spirit of the season bring you joy and peace.


I also included this information on the card: 

Tooled Metal Ornaments


Congratulations! You are the proud recipient of a hand-tooled and hand-colored metal ornament. These ornaments are done in the style of Mexican folk art with markers standing in for the traditional paint. The children used tooling aluminum from www.dickblick.com, pressing their designs into the metal with a dull pencil, then added color with permanent Sharpie markers.

Care of your ornament: the tin is bendable, so care should be taken to keep it from being crushed. It should also be hung up away from little ones since the marker could come off if the ornament is chewed on and the edges are a bit sharp for delicate fingers.


Use tape to attach the ornament to the front of the card and draw a "frame" around the ornament with a felt tip marker to fancy up the front of the card. Done!

Note: if you are going to write a name on the front of the envelope, do so before you put the ornament in the envelope or you will ruin the ornament. Also, take care not to fold or bend the ornament--the metal is pretty thin and will crush and/or bend easily. If you want to mail this card, you'll have to put it in a crush- and bend- proof package.

Thursday, December 8, 2011

Inuit Soap Carvings

I have been wanting to try this project for a long time! In my "Art Around the World" class we have a little extra time, so I thought it would be the perfect class to try an introduction to carving using soap and simple tools. I originally saw this project in the book "A Survival Kit for the Elementary/Middle School Art Teacher, " by Helen Hume. This is a wonderful book that has a number of great projects. I like how her projects have a "Teacher Page" with background info and alternative lesson plans as well as a "Student Page" that you could photocopy and hand to students to refer to as they work their way through the project.
Polar Bear, looking up.

I started class by flipping through the book "The Inuit: Ivory Carvers of the Far North," by Rachel A. Koestler-Grack. This book is full of great information and images that aided in my giving a brief background on the Inuit people and their beautiful carvings.

I then gave each student a copy of the Inuit Bear Carving Lesson plan from Dick Blick Art Supplies. That lesson is intended to be done by carving a foam block, but the diagrams easily translate to a bar of soap. The handout shows, step-by-step, how the child should carve the block to create a lovely 3D representation of a bear.

I really do encourage you to try this project with your child. It's wonderful to see them working and planning as they carve the soap away! Enjoy!

Supplies Needed:

  • Bar of soap (I used plain Ivory)
  • Newspaper (for working on and collecting soap chips)
  • Skewer or toothpick
  • Potato peeler, plastic knife and spoon
  • Plastic kitchen scrubber
  • Handout from www.dickblick.com (optional, but helpful)
Directions:

If you are creating a polar bear, you can follow the handout from Dick Blick. Some of my students decided to create turtles since I had brought in a carving of a turtle. I had them work from the figure and I walked them through carving the piece. 

I think older students could design their own carvings, but younger students or first-timers may have more success if they work from a plan. Or, if your student is comfortable "winging it," let them go for it and see what animal emerges from their carving!

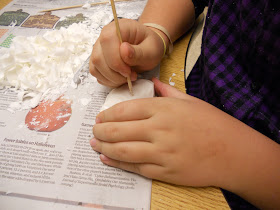
Carving the rough shape of the turtle with a vegetable peeler.

Adding the final details with the point of a skewer.


Another Polar Bear!

And a cute little turtle!

Thursday, December 1, 2011

Story Totem Poles

The last time I taught an art class about totem poles I had the children create family totem poles. They could bring in pictures of their family members or draw them. They came out great and the children were very happy with them. While looking online for totem pole images, I came across an idea that got me thinking a bit: Story Totem Poles from Art Smarts 4 Kids. She used a simple story, Goldilocks and the Three Bears, and had the children illustrate the characters and plot on a totem pole.

In this piece, the student shows the Old Man with his cloak, and then attached the Old Man and Rock with the same fastener so that he could show 1. the rock on top of the fallen Old Man and 2. the rock cracking in two. The Night Hawk is on a tab so that it moves down the Totem pole and can touch the rock (and crack it in two) as in the story.
So clever!

I decided to have the children illustrate a Native American tale and I found a few great ones at Apples 4 The Teacher. I chose "Why The Night Hawk Has Beautiful Wings." Besides having a couple of moral lessons, it is also a funny story and has great visuals for the children to explore. Here's the tale.


Supplies Needed:

  • Paper towel roll
  • Construction paper (I used green, brown and white)
  • Markers/Colored Pencils/Crayons
  • Scissors
  • Glue stick
  • Clear tape
  • Wing template, optional
  • Brass fasteners, optional
  • Images of totem pole figures and a picture of a Night Hawk for reference, optional
Directions:

1. Read the story to the students. Once I was finished, we discussed characters and plot. I then gave a brief discussion on totem pole art, highlighting some of the features they may want to include in their totem pole designs (3D wings, etc).

2. I gave each student a 6 1/2" x 12" piece of construction paper (green) to use as a base for their artwork. The children then divided it into about 5 horizontal sections (change this based on how many characters and plot points you want to show). I instructed the students to work directly on or attach their work on this piece of paper--flat on the table--and then when it was done, they could glue it to the tube.

The children could draw right on the background paper, or could illustrate their characters on a half sheet of white construction paper, cut them out and glue them to the background paper. I also gave them a half sheet of brown to use for the Night Hawk and/or the stone from the story, if they wanted. 

I also showed them how they could add motion to their totem poles (not really traditional, but fun!), by attaching characters to the background paper with brass fasteners (you know, the ones that allow things to spin. See the pictures for reference). I showed them how they could attach a picture of a stone with a brass fastener to make it roll, a key point in the "Night Hawk" story. They loved that idea and many of them took the mechanical aspect of the project even further (see photos).

3. Once the characters and images of plot points are completely colored in, cut them out and attach them to the background paper with glue. Work the story from the bottom of the totem pole up (that is more traditional). Attach any pieces that require the brass fasteners to the background NOW (before you glue the paper to the background). Wings and other 3D elements are added later, in step 5.

4. Once all of the pieces are on the background, turn the entire thing over and spread glue on the back (we used a glue stick, but white school glue would work). Roll it around the paper towel roll and secure with a couple pieces of clear tape, if needed.

5. Add any 3D elements such as wings or a beak using the glue stick.

Done! Enjoy watching your child retell the story using his or her Story Totem Pole!


Tuesday, November 29, 2011

Kandinsky Circles Watercolors

Today, in my after school art class, I decided to do a colorful project that was relaxing and simple, but with great results! This project is from one of my favorite blogs: Art Projects For Kids and it uses my favorite medium: watercolors, and is based on the art of one of my favorite artists: Kandinsky.

Kandinsky was born in Russia and was originally a lawyer. When he was thirty he decided to leave that profession and become an artist. His paintings and color studies are gorgeous and full of life. They are a neat look at abstract art for children because the paintings allow for quite a discussion! Kandinsky LOVED color and explored the way color could make people feel and think. For example, how do you create a painting about war without using images that people normally associate with war? What about the feelings that fighting and war conjure up?
The piece we used for inspiration.

This project is based on some of his color experiments. I hope you enjoy it--we did!

Supplies Needed:
  • Watercolor paper, ours was 8 1/2" x 12 1/2," I used Arches brand, cold press
  • Masking tape
  • Foam core or heavy cardboard
  • Pencil
  • Ruler
  • Crayons, assorted colors
  • Watercolors
  • Paint brush
  • Water bucket and paper towels
Directions:

1. Cut out an 8 1/2" x 12 1/2" rectangle of watercolor paper and, using the masking tape, tape it to the foam core board. This will keep the paper from buckling as it dries.

2. Divide the paper into 4" squares. Use the pencil and ruler and make light pencil lines. We had two rows of three squares.

3. Use a crayon to go over the lines you just made. Press down firmly to make a heavy crayon line. Then take the crayon and make a series of concentric circles in each of the six boxes. We did about four rings in each section.
This picture shows the crayon circles within each of the six sections.

4. Starting with the lightest watercolor (yellow, if you are using it), fill in the rings of the circles. Don't work on one box at a time, jump around the paper and do all of the rings you want to be yellow at once. This gives the paint a chance to dry. Work with the watercolor paints in order from lightest to darkest (this minimizes the chance the colors will get all mixed up and yucky in the paint trays).

See how the child isn't just working on one set of circles within one square?
Working on the entire piece at once allows the paint to dry and minimizes
the chance that the paint will bleed between sections.

5. Keep going until all the circles are painted. Leave the piece on the board until it is completely dry. Gently peel the tape off of the piece, frame and enjoy!

I am so proud of the students in my art class! These pieces look fantastic! Good job everyone!


Wednesday, November 23, 2011

Mosaic Snowglobes

So, using paper to make mosaics is not new, but using a grid with my students has really helped them "get" the idea of mosaics. This week, I had my after school art class create plaques with a mosaic snow globe scene inspired by a quilt I saw. This project has enough direction so that the children could understand the concept of mosaics and create a piece that they could be proud of in a short amount of time. It also allowed for creativity: the children could choose the colors they wanted and if it was night or day, etc. The projects came out great and were very gift-worthy!

 Supplies Needed:

  • Pattern on graph paper (see below)
  • Tracing paper
  • Tape
  • Glue stick
  • Small amounts of scrapbook paper cut into 1/2" squares. Use whatever colors will work for your piece. I had the following colors available for the students:
    • Pale Blue (for a daytime sky)
    • Royal Blue (for a nighttime sky)
    • White
    • Brown
    • Orange
    • Yellow
    • Red
    • Teal Green
    • Lime Green
    • Pine Green
  • Glue stick
  • Scissors
  • Modge Podge
  • Brushes/water bucket
  • Wooden plaque large enough for your design to fit on (I bought mine at the dollar store)
  • Hole punches (I had 1/8" circle, 1/4" circle, 1/4" heart and 1/4" star on hand for the children to use).
  • Newspapers
  • Ribbon to hang the piece with (ours came with ribbon attached)
Directions:


1. Using graph paper and a pencil, design your image. Darken the grid and image with Sharpie markers to make it easier to see. For this project, I used 1/2" squares of paper so I divided the graph paper into 1/2" squares (rather than the 1/4" squares that are standard). I used a fine tip Sharpie to mark the grid and a fatter-tipped Sharpie to outline the image of the house and snow globe. I also labeled each of the cells with a letter and had a key on hand in case the children got confused ("A" is the Background behind the snow globe, etc.). This helps the children be able to place the paper squares easily.
My original design was 5" square. This is a basic design for younger children or first-time mosaic artists.

Add I modified the design for my after-school art class since the plaques I bought were oval.


2. Once your image has been designed, decide on the colors of paper you will need and cut them into 1/2" squares. I needed lots of squares so I used a combination of Xacto knife and mini paper cutter to cut my squares quickly. If you are doing just one piece, you can use scissors to cut your squares. Don't worry if they aren't perfect!

3. You are ready to go! Tape a piece of tracing paper over the image on the graph paper. Using the glue stick, glue to squares onto the tracing paper using your image as a guide. You don't need much glue, so go easy! Don't worry about the snow or stars right now, we'll put those on later.
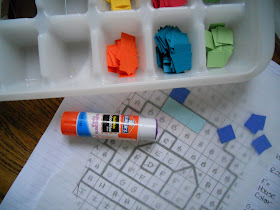
 I keep the little paper tiles in an ice cube tray or muffin tins.

Gluing the paper mosaic pieces to the tracing paper.
4. Once you've glued all of your paper pieces onto the tracing paper, trim off the excess tracing paper from around your piece. Go right up along the edges of your paper mosaic tiles.

5. Brush a nice coat of Modge Podge onto your wooden plaque. While it is still wet, place your mosaic (glued to the tracing paper) onto the plaque. Press down gently and then brush a nice coat of Modge Podge over the entire piece. These two coats of Modge Podge will secure the piece to the plaque. While the piece is wet, you can add the details to your design: stars if it is nighttime in your snow globe, snow,  details to the door, etc. We used hole punches to make these details. Just sprinkle them on or gently place them into the wet Modge Podge for now. Let the piece dry.

6. Brush the entire piece with another generous coat of Modge Podge. This will further protect the piece as well as secure the snow and/or stars you added. Let the piece dry.
7. It's done! Attach any hardware or ribbon to the back of the plaque if you'd like to hang the piece on the wall. The piece should be displayed away from direct sunlight and if you need to clean it, use a damp cloth (getting the piece wet will ruin it). 

I hope you try this project! It is fun for the kiddos (and grownups too!) and comes out so beautifully! ENJOY!
Another version of the project. Instead of a snow globe, make a winter scene.

Wednesday, November 16, 2011

Burlap Weavings (Class #2)

My homeschool art class also did burlap weavings this week (just like my after school class, see the original post here). 

The project was slightly different since the class is shorter (only an hour) and my class is made up of students in 2nd through 5th grade. I brought out my samples from my original post, but did not have the paint element this time. The burlap was also cut into smaller pieces and I did not mount them to mat board, but affixed a layer of masking tape on the back of the top edge so the piece didn't unravel while the children were working in it.

Done this way, the project makes for an inexpensive project for a group. Many of the children were able to complete their pieces in this session, but two sessions could be used. This really got the children thinking and working with their hands in a new way!

Here are some examples of the finished pieces:

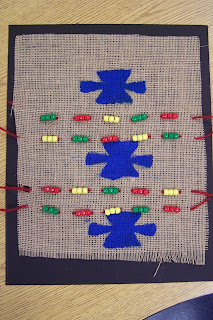
Beadwork and straight stitches to create an image.

Exploring color, texture and stitching.

Love that variegated yarn!

Beautiful! Great Job Everyone!

Tuesday, November 15, 2011

Burlap Weavings

This week I wanted to introduce my after school students to the art of weaving. Weaving many times makes people think of the Native Americans, but I pointed out to the children that almost every culture has some form of weaving: Africa, Mexico, South America, China, and Japan as well as Europe in the Middle Ages.

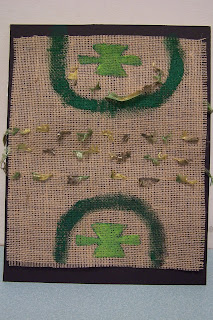
I gave each student a piece of burlap that had been hot-glued to a piece of mat board. Burlap is great because it has a nice open weave, so it is easy to see the WARP (threads that run vertically) and WEFT (threads that run right to weft, er, I mean LEFT).

The students can weave yarn into the spaces of the fabric or can gently pull on the weft threads of the burlap and remove them to create spaces where the exposed warp threads can be tied together or larger ribbons can be woven in.

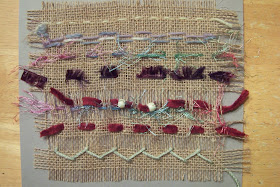
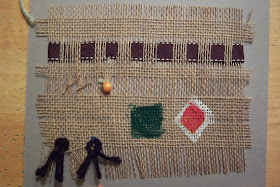
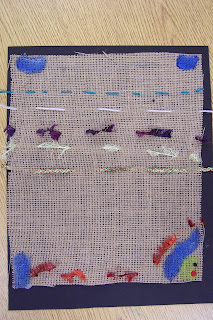
I created an example board for the students to view during my discussion. It shows the following:

First Example:

1. Yellow thread: Single strand woven in one row.

2. Purple threads: Single strand woven into three rows (multiple rows).

3. Multi-colored Fuzzy Yarn: Single strand using large "stitches" so that the fuzzies can be easily seen.

4. Dark Purple Eyelash Yarn: Single Row, large stitches.

5. Burgundy Yarn: Single row with beads and a fuzzy yarn stitched along with it. Stitched in an open area of the burlap where the weft threads have been removed.

6. Burgundy Yarn (2):  Single row stitched into the plain burlap

7. Pale green: Single strand woven in a pattern. You could also do X's or other patterns.

Burlap Weaving: First Example

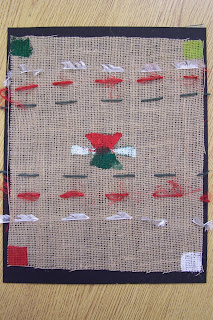
Second Example:


8. Ribbon woven into a section where the weft threads have been removed. Ends are tacked down with hot glue on the back of the piece.

9. Section where weft threads were removed and remaining warp threads were gathered and tied. Some with yarn and one with yarn with bead added.

10. Stamping with acrylic paints. Diamonds, squares, etc.

11. Fringe: Fringe created using yarn and an example of fringe created by removing the last few weft rows.
Burlap Weaving: Second Example

The possibilities are endless with this. I also provided some acrylic paints and stamps with Navajo motifs that the children could add to their pieces. Here are the step-by-step directions:

Supplies Needed:
  • Burlap (I bought ours at a fabric store)
  • Mat Board, optional (I glue to top edge of the burlap to the board to keep the whole thing from fraying apart as the children work. The final piece looks more finished this way)
  • Hot glue gun & glue sticks
  • Assorted yarn and ribbon 
  • Beads (I used plastic pony beads)
  • Scissors
  • Plastic needle (easy to thread the yarn through and won't poke little fingers)
  • Acrylic Paints, brushes, craft foam, optional
Directions: 

1. Cut the burlap to size: ours was 10"x13." The students I have are 3rd and 4th graders and we have an hour and 15 minutes to work, so that size seemed appropriate. Younger students and less time would require a smaller piece of burlap to work with. When cutting burlap, wear eye protection since the fibers may scratch your cornea.

2. Cut a piece of mat board slightly larger than the burlap square: ours was 11"x14."

3. Hot glue the burlap to the mat board along the top edge of the burlap (leave the bottom edge unattached so that the child can work with it).

Stamps Include a starburst-like shape, diamonds and squares.
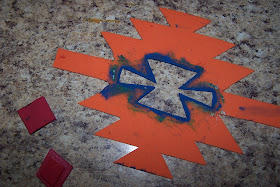
4. If you would like to use the paints to stamp Navajo motifs, do so now. I cut a motif from craft foam and had the children apply paint to the shape with a brush and stamp it onto the burlap. 

5. While the acrylic is drying, plan the rest of your design. Choose a few different types of yarn and ribbon to complete your design. Weave the yarn into the fabric using the plastic needle, adding beads if you'd like. If you would like to use ribbon, remove a few of the weft threads first to create an open section. Instead of the plastic needle, we used a safety pin to weave the ribbon into the fabric. You can also sew around the stamped designs, if you'd like.

6. Create fringe at the bottom of your piece by removing the last few weft rows and/or using yarn knotted into the fabric.

This piece is very open to the student's individual creativity. Have fun and encourage self-expression. Here are a few of the examples from today's class. ENJOY!

The student said this is an "Elvis-inspired" weaving!

The student said this is a Christmas-inspired weaving.
Lovely Beading!

Painting and eyelash yarn create a nice symmetrical image. 


Friday, November 11, 2011

Fall-inspired Shoji Screens

The art from the 1500's-1700's is so wonderful and we really do begin to see the art of so many cultures starting to emerge since many nations were exploring the globe. I wanted to introduce my students to panel paintings and altarpieces this week. A couple of years ago I had my students create multi-paneled images of the saints and we used gold tissue paper to "gild" the images. The pieces were fantastic! But I felt that that was more of an advent-type of lesson, so I was hesitant to re-do that lesson (even though we had snow about 10 days ago!).
Is it a triptych? Is it a Shoji screen? Wait, it's both! And pretty, if I may say so!
This time, I wanted to get the concept of altarpieces across, but I wanted to do something a bit more Fall-inspired. I had a bucket of tissue paper squares I've been using for the past few years (I swear those pieces multiply in there by themselves!). So I thought about having students create a fall landscape, sort of like stained glass. I usually use Contact paper for my stained glass projects with the children, but didn't have any & experimented with waxed paper instead. The result was a muted Japanese-screen-looking creation. So, I was able to introduce the children to that art form as well.

This craft is inexpensive and little ones can do it with help from a grown-up and older students can customize the piece in their own way. I hope you try this craft with your family. Enjoy!

Fall Shoji Screens


Supplies Needed:

  • Black Construction Paper (Ours was 12"x18")
  • Pencils
  • Ruler
  • Scissors
  • Glue stick
  • Construction paper for trees (we used 9"x12" pieces in black, brown and white)
  • Crayons and/or colored pencils
  • 2 12"x18" pieces of waxed paper
  • Tissue paper squares (1" squares in whatever colors you wish)
  • Iron & Pressing cloth
Directions:

1. Create the frame for your triptych (3 paneled piece of artwork). Mine took up the entire 12'x18" piece of paper and had a 1" frame all around it.

2. Use the scissors to remove the "window" portions of the triptych, taking care to leave the frame intact.

3. Create your "trees." Rip black, brown and white construction paper into 1/2" strips. If you are having trouble ripping the paper, try ripping it in the other direction. Flip your frame over and use the glue sticks to attach the trees to the back of the frame. I suggested the children put a couple of trees in each of the three "windows." We used black for trees that were far away and then brown for pine trees and white for birch trees.

4. Once you are done glueing on the "trees," flip the frame over and add details to the front of your trees with the crayons and/or colored pencils. We discussed how tree bark can be bumpy or smooth and have knots on them, etc. I also reminded the students that tree trunks have shadows on them and explained that the shadows would be on the same side of all the trees.

5. Flip the frame over, so the back of the piece is facing up. Apply glue to the back of the frame and trees. Press a 12"x18" sheet of waxed paper onto the frame.

6. Working in one section at a time, apply a few lines of glue stick to the waxed paper and attach the tissue paper squares. You don't need to use a lot of glue, once you iron the waxed paper together, the tissue paper will be fused in place. Cover all of the spaces between your "trees" with the tissue paper squares.

7. Once all of your tissue paper squares are in place, place a piece of waxed paper on top of them. Using an iron set to the "polyester" setting (medium heat) and using a pressing cloth to protect your iron, gently press the piece so that the two pieces of waxed paper fuse together with the tissue paper squares in between them.

8. Use scissors to trim the excess waxed paper from around the frame. This piece looks nice in a window or with a battery-operated candle behind it. Keep it out of direct light so that the piece stays intact longer and the colors don't fade. ENJOY your fall scene!

Saturday, November 5, 2011

Creative Delays

Well, it's been a couple of weeks since my last post. No, I haven't been lounging on the sofa eating bon bons...I've been tackling a viral pneumonia, stomach virus (both which hit all six of us in our family) and a 5-day power outage after a freak October snow storm. Really. I have never seen such aggressive viruses in my limited years as a mom. But, we're all done (at least I've decided I'm done with sickness and will ignore any further germs that decide to come my way). Halloween was postponed a week in our area since the snowstorm left 300,000+ people without power. I'll post a few Halloween-inspired crafts we've been doing this week for my friends who are on delayed-Halloween time. The rest of you can file them away for next year! Enjoy and stay healthy!!

Wednesday, October 19, 2011

Fall Frescos

Plaster of Paris scares me a bit. It's one of those materials I hear that people use, but I've never used myself. Well, I've decided that if I'm serious about this "art teacher thing" I'd better start moving outside my comfort zone and trying some media I've been shying away from. So, I bought a big 'ol bucket of Plaster of Paris at the craft store and created a project!
A Scarecrow with a Sunset Sky!

Frescos are paintings done on wet plaster. I showed my students a couple examples of Giotto's work from the late 1200's. He was considered quite good at using color to model his figures and create the illusion of form. When we look at his work today, we may think what he was doing is pretty obvious, but it was innovative at the time when paintings lacked perspective and figures were more "flat."

I also showed them an example of Leonardo da Vinci's Last Supper, also an example of a fresco. Although this piece is considered one of da Vinci's masterpieces, it was also a major mess-up of his as well. He was experimenting with paint and plaster techniques and before the piece was completed it was falling apart. The piece has been restored many times throughout the years, but it is a wonderful way to show the students that sometimes when they are trying something new, they may make a mistake. It's OK. We discussed ways that they could work their mistake into their piece. I was able to share with them my mistake that I made the week before when trying this project out at home: I had mixed some egg yolks with some dried paint pigments someone had given me and tried to paint on plaster--I had been trying to simulate egg tempura, but it was pretty disappointing. I tried to salvage the technique to no avail, and ended up switching to watercolor on plaster instead. SIGH.  Sometimes that happens.

Well, on to the fresco project! Worth the try and embraced by my students! ENJOY!

Supplies Needed:

  • Plaster of Paris (quantity will vary depending on the size of your mold)
  • Plastic plate for mold (I used a plate that was 1/2" deep and was 5" across the bottom)
  • Paper clip for hanger
  • Stirring stick and disposable pan to mix the plaster in
  • Cold water
  • Paper plate
  • Pencil
  • Piece of paper the size of your cast to plan your drawing on (ours was a 5" circle)
  • Hole punch, optional
  • Bit of crushed charcoal and cotton balls tied in a muslin cloth, optional
  • Watercolors and brush
  • Water container
  • Paper towel
Directions:

1. Following the manufacturer's directions, mix up some Plaster of Paris and pour into your mold. Insert a paper clip if you'd like the piece to be able to hang on the wall.

2. Let the mold set up for about 1/2 hour or so. While you are waiting, plan what you are going to paint on your fresco. Use the pencil to draw the picture on a piece of paper the size of your mold. Fill up the entire area of the paper with big, bold shapes. You'll want to add detail to make the piece interesting, but not so much that everything becomes a jumble--you are painting with a paintbrush so tiny details will become lost. This drawing that the fresco is planned from is called a cartoon.

3. Once the plaster has set up enough that you can pop it out of the mold, do so gently and place it onto a paper plate. You can transfer your drawing onto the paster in one of two ways. Either, 1. place the drawing onto the plaster and retrace your image with pencil pressing down so a fine impression is left in the wet plaster OR, 2. punch holes around your image using a hole punch. Then place the paper onto the plaster and tap the charcoal-filled bag over the holes in the image. Remove the paper and "connect the dots" using a pencil and the original image as a guide (option 2 is more historically accurate). Go easy on the charcoal if you go with step #2, it will make your image gray and dirty-looking if you put too much.

4. Paint your image using watercolors. You'll need to get your brush loaded with paint and water since the plaster soaks up the liquid. Also, start with the lightest colors you want to paint, say, yellow, and work your way down the line towards black. You can always go darker, but you can't lighten up watercolors on plaster.

5. Make sure you add details and a ground and sky, if applicable. I encouraged the students to paint right off the edge of their pieces (on the 1/2" side of the plaster piece). I thought it made the piece look more finished that way. Let the piece dry for a few days before hanging. Hang out of direct sunlight and away from moist areas. ENJOY!
This flower has some beautiful brushwork in the background.

A beautiful fall pumpkin!

Monday, October 17, 2011

I LOVE a good conference!

This past Saturday I went to a WONDERFUL conference for art Educators at the NH Art Institute held by the New Hampshire Art Educators Association. It was my first conference with the NHAEA and it was absolutely great! They had many options for sessions, some were talks, but many were studio-based! It was so fun to learn and be able to create projects while we listened! I am blown away by all of the caring and friendly art educators we have in New Hampshire! Everyone was a joy to talk with and to learn from!

So, my brain is now FULL to the brim with all sorts of ideas to incorporate into my classes! My first session was entitled: The Art of Geometry given by Jaylene Bengtson, Integrated Art Specialist and Linda Otten, Math Educator. These ladies had fabulous ideas to create a piece that will really SHOW children (7th graders) all sorts of geometric concepts. You pretty much HAVE to get geometry while creating this piece. Also, the finished product is absolutely beautiful! My just-started sample is below, and doesn't do the project justice, but I'll post more on this project at a later date.


I went to a printmaking talk by Liam Sullivan that was very inspiring! I went away with many ideas on how to create some inexpensive printing materials for my students. He encouraged us to look at a variety of sources for printmaking fodder: hardware stores, recycling bins, craft & dollar stores, etc.

The lunchtime talk was given by Dr. Foad Afshar, Phy.D. entitled "The Brain, The Whole Brain And Nothing But The Brain, So Help Me Art."Dr. Afshar was entertaining while he spoke to us about how art engages the entire brain and how, as human beings, we are inherently creative--"we cannot not create." Definitely thought-provoking well beyond my art classes--I have four children so I had many thoughts on the practical application of his talk with regards to how I'm raising my children to be lifelong learners with inquisitive minds. I was very interested on his information about flourescent lighting and its effects on children with autism, causing their brains to remain in a heightened state of activity and how it effects them at school and in other places with "pumped-up" flourescent lighting (department stores in particular).

My final session was by Claire Provencher and was entitled "Art History-Based Art Lessons." It was a make and take session, so I was thrilled to be creating projects while I learned! We created seven pieces that I'm sure will be loved by my students. My samples are below. I will be writing more about them in future posts. Claire gave out a very comprehensive handout with a copy of the letter she sends to parents at the beginning of the year, her entire curriculum for K-5th for the year as well as the art assessment form that she uses with each student. I was amazed to see the level of quality art instruction that she is able to provide her 25+ classes on a very modest budget! Since I design my classes around art history her teaching methods resonated with me. Also very inspiring!
Front Left to right: (Left Upper) Roman Coins, (Left Lower) Chinese Calligraphy,  Andy Warhol Self Portraits, (Right Upper) Rose Windows, (Right Lower) Wayne Theobold "Cakes," (Far Right) Mythical Creature Machines
My day at the NHAEA Conference was great! It was nice to connect with other creative people in a personal and professional way! I really learned so much both in and outside of the sessions! I left there refreshed and renewed and with a feeling of certainty knowing that this is what I was born to do. Thank you to the NHAEA and all of the creative art educators who contributed!

Wednesday, October 12, 2011

Dancing Skeletons

This project is one of those "I can't believe I never thought of that!" type of projects. I was brainstorming during a play date this week about some ideas I had for a quick craft to make relating to Fall/Halloween. My girlfriend, who used to be a teacher, shared the idea for this craft with me. Thanks Jill! It is super easy and super inexpensive--I bought the chalk & dog bones at the dollar store. The dancing skeletons are cute and remind me of an old Disney cartoon I used to watch when I was a girl! Have fun making a whole conga line of dancing skeletons!


Supplies Needed:

  • Dog bones (the hard crunchy kind, the ones I used are "medium" and are about 2" long)
  • White tempera paint
  • White chalk
  • Black construction paper (you can use 9x12" or a larger sheet if you want to create a background)
  • Paintbrush
  • Paint tray
  • Water & paper towels


Directions:

1. Using chalk, draw the skeleton's head (skull) onto the paper. This should be somewhere at the top and be about 2" tall. I like to make my skeletons happy and smiling--they are dancing after all!

2. Place some white tempera paint onto the paint tray. Dip the dog bone into the paint, getting a nice coat on the dog bone's flattest side. Place the dog bone, paint side down, onto the black paper and slightly rock the dog bone a bit to make a nice print. You may want to practice your technique before you start your piece. I stamped one bone shape for the body and two each for the legs and arms.

3. Use the chalk to draw the fingers and toes on your skeleton. You can also draw a background if you'd like, but you may want to keep it simple. I drew a couple of gravestones, some stars and a moon.

You are done! Enjoy your happy, dancing skeletons!

**This project doesn't have to be for Halloween. It is a good activity for a younger child to do when learning about the body and the skeleton inside him/her. I know it isn't anatomically correct, but it gets a dialogue going and if fun to create.

Tuesday, October 11, 2011

Cave Drawings

On our first stop on "Art Around the World," we looked at the cave paintings from Lascaux, France. We saw how detailed and beautiful the drawings are while being so simple. I showed the students a great double-page spread from the book, "Art and Civilization: Prehistory," that shows the tools the ancient artists used and also shows a depiction of the scaffolding that they must have used in order to create the drawing so high up on the cave walls. I also had a series of posters of the Lascaux caves that I bought from Dick Blick Art Supply.


We then experimented with charcoals and pastels to create drawings of our own. The children could incorporate ancient or modern animals, symbols, weapons, etc. They were also encouraged to add their handprints as their "signatures." Once they had filled up their large paper, they could choose a portion, make a frame from twigs and lace their masterpiece to the frame. The finished piece has a tribal or even Native American feel to it.

Supplies Needed:

  • A large paper bag, crumpled, rinsed with water & then ironed until dry and flat (the wrinkles will make the bag look like a cave wall or an animal hide).
  • Charcoals, pastels, conté crayons, or vine charcoal
  • Packing tape
  • Hole Punch
  • Suede lacing (or brown yarn)
  • Four twigs for frame
  • Hot glue gun & glue sticks
Directions:

1. Spread out the brown paper bag and using the pastels, draw animals, figures, symbols and trace your hands onto the page. You can make the animals all sorts of sizes and make sure to show the detail of their coats. Are they striped, spotted, or have shaggy fur? Make sure you "sign" your work by tracing your hand.

2. Once you are done drawing, select a portion to frame. You can either rip the paper gently or cut it with scissors to crop the piece to size.

3. Flip the cropped section over and reinforce the edges of the back with packing tape (this will make edges more sturdy when you lace them later). Use the hole punch to create some holes around the edge of your piece about 2-3" apart.

4. Create a frame with four twigs. Hot glue the corners where the twigs overlap--this will help the frame be a bit more sturdy. Then take a 6" section of the cord and tie the corners of the twigs where they overlap. This will cover the hot glue and make the piece look more authentic.

5. Cut a piece of cording about as long as you are tall. Tie a knot in one and and thread it through the holes of the artwork and around the twig frame to secure. Keep sewing through the holes of the artwork and around the twig frame until done. Enjoy!

*Be aware that the piece is still sort of messy since it uses charcoal. You can spray the finished piece with a coat of hairspray to fix the dust.

Here are some other pictures of the project to enjoy:

"Take a picture of my hand!"


Another finished piece.

Sunday, October 9, 2011

Snowman & Bird Mosaic for PTA Auction

I am so thrilled with this craft! This past Friday, I went into my oldest son's fourth grade class to help the students create a piece to be auctioned off by the Amherst PTA this fall in their online fundraiser. Since the auction will be ending November 22nd or so, we couldn't create anything that had a Halloween theme. I chose an image that would be great to display through the winter: a Snowman and Bird (this image came from a magazine, it was intended to be a pillow).


The image was divided into 24 sections and each child was responsible for one section, or 100 tiles! It sounds like a lot, but it really wasn't all that bad once we divided it up! The children were amazed that the image was made from over 2400 little paper tiles! This was a great way for the students to recharge after a long week of standardized testing and learn something new! The lesson has a bit of math thrown in and next week the students will be learning about maps, so working with the grids was a nice tie-in.

The tiles are scrap booking paper and the final piece was mounted on canvas and framed so it is ready-to-hang. I think that will make the piece more marketable-it certainly looks good to me!

Here are some pictures documenting the process. I will be posting a tutorial for a similar project as soon as I can. Thank you so much to Mrs. Nagy for letting me come in and do this craft with her students and thank you to all of the boys and girls who worked so hard on this piece. It truly came out fantastic! ENJOY!
This board shows the entire piece on the grid, how the sections are divided and the steps to create the piece.
Each student was given a 10x10 block section of the piece. Students then copied the diagram with 1/4" squares cut from scrap booking paper.


The finished colors were much more vibrant than the original diagram.

This picture shows the piece in progress. Each section is attached to the canvas using Modge Podge. It's fun to see the image magically come together!