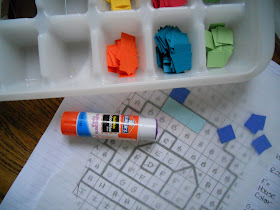
Supplies Needed:
- Pattern on graph paper (see below)
- Tracing paper
- Tape
- Glue stick
- Small amounts of scrapbook paper cut into 1/2" squares. Use whatever colors will work for your piece. I had the following colors available for the students:
- Pale Blue (for a daytime sky)
- Royal Blue (for a nighttime sky)
- White
- Brown
- Orange
- Yellow
- Red
- Teal Green
- Lime Green
- Pine Green
- Glue stick
- Scissors
- Modge Podge
- Brushes/water bucket
- Wooden plaque large enough for your design to fit on (I bought mine at the dollar store)
- Hole punches (I had 1/8" circle, 1/4" circle, 1/4" heart and 1/4" star on hand for the children to use).
- Newspapers
- Ribbon to hang the piece with (ours came with ribbon attached)

Directions:
 |
| My original design was 5" square. This is a basic design for younger children or first-time mosaic artists. |
 |
| Add I modified the design for my after-school art class since the plaques I bought were oval. |
2. Once your image has been designed, decide on the colors of paper you will need and cut them into 1/2" squares. I needed lots of squares so I used a combination of Xacto knife and mini paper cutter to cut my squares quickly. If you are doing just one piece, you can use scissors to cut your squares. Don't worry if they aren't perfect!
3. You are ready to go! Tape a piece of tracing paper over the image on the graph paper. Using the glue stick, glue to squares onto the tracing paper using your image as a guide. You don't need much glue, so go easy! Don't worry about the snow or stars right now, we'll put those on later.
 |
| I keep the little paper tiles in an ice cube tray or muffin tins. |
4. Once you've glued all of your paper pieces onto the tracing paper, trim off the excess tracing paper from around your piece. Go right up along the edges of your paper mosaic tiles.
5. Brush a nice coat of Modge Podge onto your wooden plaque. While it is still wet, place your mosaic (glued to the tracing paper) onto the plaque. Press down gently and then brush a nice coat of Modge Podge over the entire piece. These two coats of Modge Podge will secure the piece to the plaque. While the piece is wet, you can add the details to your design: stars if it is nighttime in your snow globe, snow, details to the door, etc. We used hole punches to make these details. Just sprinkle them on or gently place them into the wet Modge Podge for now. Let the piece dry.
6. Brush the entire piece with another generous coat of Modge Podge. This will further protect the piece as well as secure the snow and/or stars you added. Let the piece dry.
7. It's done! Attach any hardware or ribbon to the back of the plaque if you'd like to hang the piece on the wall. The piece should be displayed away from direct sunlight and if you need to clean it, use a damp cloth (getting the piece wet will ruin it).


I think the things you covered through the post are quiet impressive, good job and great efforts. I found it very interesting and enjoyed reading all of it...keep it up, lovely job..mosaic art supplies
ReplyDeletenice!!!! I appreciate you beautiful art.The mosaic south africa art work is famous in the whole world and mosaic art supplies in every country.This is a great post.Keep posting
ReplyDelete