Wednesday, December 19, 2012

Poinsettia Mosaic Collage

The other day I set out the supplies for my son to make this great poinsettia craft. He's in Kindergarten, so I wanted to give him some tracing, cutting and other fine motor control practice--oh, and he made this nice little piece for the art wall in our dining room. A win/win, I'd say!


I first saw a version of this project this fall, I think, on the blog Panther's Palette written by Pam Speaker. Her version was colorful and I was instantly drawn to it--as was my son who was looking over my shoulder and said, "I want to make THAT!" As he was adding the tissue paper poofs to his original piece, I thought how we could change the colors of the project to make it look like a daffodil for spring. The more I thought about it, I thought it could also make a great daisy or black-eyed susan for the summer, and poinsettia for winter. I'd love to make four of these depicting the four seasons! I'll put it on the neverending to-do list! For now, here's the winter version:

Poinsettia Mosaic Collage

Supplies Needed:

  • 1 9x12" piece of off-white construction paper
  • Red, green, white and yellow construction paper scraps
  • Scrap of card stock, optional
  • Yellow tissue paper, cut into 1" squares
  • Pencil
  • Scissors
  • Glue stick
  • Elmer's glue
  • Little cup for glue
Directions:

1. Glue a strip of green paper onto the page for a stem. Add a circle of yellow in the center of the page for the center of the flower.

2. Create a petal shape on card stock. Trace the petal shape onto the red paper and cut out 6 petals or so. I showed my son how to fold the paper a couple of times, then trace the shape and cut through the entire stack to create multiple petals in one shot. Glue the petals on around the flower's center.

3. Cut some 1/2" strips from red, green and white paper. Staple the strips together at one end. Use the scissors to cut through all of the strips at the same time to make a bunch of little 1/2" squares. Glue these down in a pattern around the outside edge of the piece.

4. Pour a bit of Elmer's glue in a small bowl or tray. Take one of the tissue paper squares and wrap it over the eraser end of the pencil. Dip the tissue paper in the glue and then touch ot to the paper in the center of the flower. Release the tissue paper and it should create a 3D "poof" with the tissue. Repeat as desired. I thought my son would use the tissue paper just in the center of the flower, but he put them on the petals too. Whatever you like...

You can also look up the story, The Legend of the Poinsettia online if you wanted to add a literature/moral/spiritual aspect to this project. Enjoy!

Tuesday, December 18, 2012

Artsonia Ornament Picture How-To

I saw this project on Artsonia and thought my students would love to make this, and guess what? I did too! I made this along side one of my private art students and it was fun and easy and I love the contrast and graphic look of the piece.


Ornaments and Evergreen Picture

Supplies Needed:

  • Scraps of watercolor paper 
  • A circular object to trace--I used a glass (our circles are about 2 1/2" in diameter)
  • Pencil
  • Watercolor paints and brushes
  • White watercolor pencil or crayon
  • Water bucket and paper towels
  • Black mat board
  • Oil Pastels
  • Tacky glue
  • Gold and silver Prismacolor colored pencils
Directions:

1. Use the pencil to trace the circular object onto your watercolor paper about four to five times. Trace lightly. It is better to have a couple more circles than you'll use, just in case.

2. Use the watercolor crayon to add the highlights to each of the ornaments.

3. Wet the entire circle of an ornament. Use the watercolors to create juicy, saturated colors on the ornaments, letting the water blend the colors (wet on wet technique). Use your brush to blend the colors into the highlight a bit to soften the edges. Try to use three colors per ornament--choosing colors that are next to each other on the color wheel (analogous) so that they blend nicely. Repeat with all of the ornaments. Let dry.

4. Use the oil pastels to create the branches of the evergreens. I had my student start with the brown part of the branches. Use a chocolate brown first and rough in the branch. Then go over the branch with a lighter brown (like a yellow ochre) for the highlights. 

5. Use the oil pastels to create the needles of the evergreen. Start with a dark emerald green and rough in some of the needles. Then layer on the medium kelly green color for the bulk of the needles. Finally, use a light moss green for the highlights. Remember to make the needles start at the branch and curve toward the tip of the branch, the way real evergreen needles do.

6. Glue the ornaments onto the background. you may need to place a book on top of them to keep them from curling.

7. Use the gold colored pencil to add the top of the ornament (the finial?) and the hook. Use the silver to create a bit of highlight on the gold.

Merry Christmas!

Friday, December 14, 2012

Matching Mittens and Printmaking Snowflakes

This week, I had the great opportunity to spend time with the PM Kinders at Clark School. They were so great and really excited to be creating some winter-themed art! 


Matching patterns and lots of different snowflakes using
a variety of found materials.

We began by talking about how cold winter is and how we need to dress warmly. We talked about the different things that we should wear when going outside to play during winter , including hats, boots, warm socks, and mittens! I told them that we were going to create mittens that matched, or that were a pair.

How were we going to do this? Collage. That's where we take bits of paper and make a picture with it. Some famous illustrators who do this are Lois Elhert and Eric Carle. I had a couple of books on hand to show: "Feathers For Lunch" and "A Pair of Socks," all illustrated by Elhert were perfect. I even mentioned the fine artist Henri Matisse and how his collage pictures are famous and sell for millions. WOW!

We went to the tables and crafted our mittens, making sure that both of our mittens matched (both in pattern and color choices). This is a great way for children to learn some math concepts and critical thinking skills. Creating a unique pattern and then matching it is quite an accomplishment!

Then they could move over to the "Snow Table" and experiment with different items I had brought in to stamp and make snow. This was a fun lesson in basic printmaking, and the children enjoyed experimenting with the different "stamps."


Patterned Mittens

Supplies Needed:
  • 1 12x18" piece of black paper
  • 1  6x9" piece of construction paper, whatever color you chose for mittens
  • Paper scraps, various colors (I had multiple colors available in 1/2" strips, 1" strips, and little 2"x3" pieces they could cut shapes from
  • Pencil
  • Glue stick
  • Scissors
  • Paint tray
  • White tempera paint
  • Assorted stamps, see below
Directions:

1. Create your stamps. You don't need anything fancy for this part. I had some plain wine corks, some pom poms hot glued to corks, and some sprigs of evergreen tree branches. I also made some fancier stamps with some foam snowflakes I found at Michael's hot glued to corks.

2. Fold the 6x9" piece of construction paper in half (the hamburger fold) and trace the child's hand onto the paper. Go around all of the fingers at once, like a mitten. Cut along the tracing line, through both thicknesses of the paper, to make two mittens that are alike.

3. Use the scraps of paper and the paper lines to create a pattern on your mittens. You can use lines and shapes such as squares, rectangles, circles, and triangles. Make sure that whatever design you do on one mitten is done on the other mitten.

4.  When your mittens are done, glue them to the black background paper.

5. Dip the stamps in the white tempera paint and add snow all over the background. Try out different stamps. The sprigs of evergreen looked great if the students stamped the tips onto the page, but some tried stamping the sprigs sideways, and that looked really neat, too. Pom poms gave a lovely, fuzzy snowflake, and some of the children were purists and used the stamps that had the foam snowflake shapes glued to them. 

They turned out great! I was also thinking of adding hats next time and/or a little string of yarn going from one mitten to the other. That would look so cute! I had a lovely time hanging out with these kiddos!

ENJOY!


Sunday, December 9, 2012

(Plastic) Chestnuts Roasting On An Open Fire....

OK, so this is an art blog, but I had to show you all this very cool LEGO fireplace my oldest son and I built last night! Hey, it could be considered a sculpture!


We found the directions online to build a fireplace "frame" from Legos and then you insert your iPod (or other such device) into the side with the "Eternal Flame" app playing on it. There's even the sound of the crackling fire!

When we were done, our whole family gathered around our new fireplace and enjoyed the view. My son then took the mini fireplace up to his room and fell asleep to the crackling fire! How cute!

Now, to make some Lego stocking to hang on the mantel...

Friday, December 7, 2012

To Brighten Your Day: Frank Lloyd Wright Windows

My Modern Art Class created some lovely faux stained glass windows based on the work of American architect, Frank Lloyd Wright. I've done this project with students before, and the process can be seen in this post.

This time, I tweaked my presentation a bit. I showed a large poster of Fallingwater, one of Wright's most famous houses. I talked about what an architect does, and about Wright's design philosophy. We made some observations about the building and I pointed out the horizontal, vertical & diagonal lines of the building (later on, I showed how these same lines appear in his stained glass windows).

Then we discussed how Wright was, um, a bit of a control freak when it came to his interior designs. He designed every little pillow, lamp, rug and even the dishes that would go into the house. We looked at some of his stained glass window designs. I was fortunate to have a great article that I have had FOREVER, well, since 1995 anyway, that appeared in American Patchwork & Quilting Magazine about a quilter named Jackie Robinson, who recreates Wright's stained glass windows in fabric. This is an awesome article because it shows how she constructs the quilts and really helps the children see the windows broken down into sections; leading vs. glass, and shapes such as squares, rectangles, rhombi, and triangles. I think this article really helped me simplify his work for the children.

I tried to access the article through the American Patchwork & Quilting's official site, but they didn't have it available. However, Jackie Robinson has her own site called Animas Quilts Publishing. Robinson had published an entire book of quilt designs based on Wright's stained glass windows titled, "Quilts In The Tradition of Frank Lloyd Wright." It is currrently out of print, but there are a few copies still floating around out there. There is a Frank Lloyd Wright section of her site showing examples of Wright-inspired quilts made from her book.

So, here are the beautiful results of my Frank Lloyd Wright lesson! Enjoy!


Thursday, December 6, 2012

Pinterest Party 2012!

My friends are too busy to get together over the holidays. They work, they have children, they have large families with lots of commitments. Me too, but sometimes going without seeing or talking to my friends for two months, or so, is too long! Friends are what help me get through all of that everyday stuff and offer me a bit of comic relief--and I certainly need that when I'm up to my eyeballs in "to do's" and tinsel!
Look at this LOOT!
I mean, look at all of these presents I was able to make...
I could have had a cookie swap, but I didn't want the stale cookies or calories. I could have had a gift swap, but that didn't seem right either. So, I had a Pinterest Party. Here's how it worked:

How It Works:
I invited 7 of my crafty friends. I asked that they choose an easy, gift-worthy craft from Pinterest, make a sample of it and bring the supplies needed to make 7 more. Making a sample beforehand let us know what we'd be making and allows the person to work all of the kinks out beforehand. I asked that they only spend $20-$25 total for all of the supplies necessary to make their craft. Then, the plan was for us to all get together, eat, drink and craft and go home with one of seven different crafty gifts.

I also asked that they bring a snack, drink or dessert from Pinterest to share.

What I Did To Prepare:
Along with making my own craft, I made sure I had a few tables on hand for us to craft on (instead of my one little dining room table). It's great to have some basic supplies like a hot glue gun, scissors, glue sticks, extra ribbon in various sizes and colors (I just grabbed my ribbon bin) and tape. Having a cleaning spray, paper towels and dustpan and broom easily accessible will also help when you need to tidy between projects.

I think next year I will have a gift bag station for wrapping the gifts and a dedicated place for people to put their gifts as they finish them (maybe a large gift bag or grocery bag with handles).

I also set up a group board on Pinterest and invited all of my guests to pin their craft and food item so that, after the party, we'd have access to the directions and recipes, if needed. Our Board is here.

The Projects:
Wow! I was so thrilled at the diversity of the projects! Here's what we made:

  • Alcohol Ink Coasters (set of 4)
  • Birdseed Wreaths
  • Mason Jar Soy Candles
  • Terrariums in a Glass Ornament
  • Desktop Dry Erase Board
  • No-Sew Lanyards
  • Washer Necklaces

We took turns having the person who brought a specific project lead the rest of us through it in a mini tutorial. We learned so much about so many different types of crafts and we were able to try things that we might otherwise have never done.

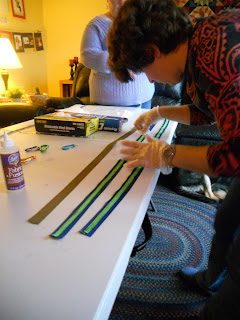
Working on the No-Sew Lanyards
The Food:
YUM! Too many good things and WAY too much food! But I enjoyed working my way through the buffet! I had coffee and tea on hand as well as juice spritzers. One of my good friends brought eggnog from a local dairy. These are some of the recipes from Pinterest that were there (Check out the Pin Board for the links/recipes):

  • Pumpkin Whoopie Pies
  • Candy Cane Dip With Apples & Oreos for dipping
  • Asian Slaw With Ginger-Peanut Dressing
  • Buffalo Chicken Enchilada Roll-ups
  • Goat Cheese Stuffed Bacon Wrapped Dates
  • Seven Layer Bars
  • Hummus & Salsa with veggies and chips, etc.

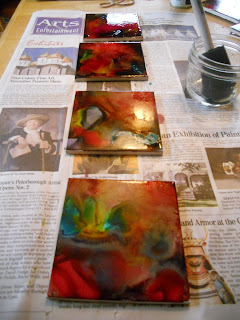
Some of the coasters drying--these really brighten up
after they are sprayed with the sealant.
Some Thoughts:
If you think you'd enjoy a Pinny Party, do it! It was fun and it's great to come away with lots of little gifts for giving. It does take some advance planning since you have to give your guests time to come up with an idea, try it at home, and shop for the supplies to create enough for your guests.

We had allowed three hours for the party (from 1:00-4:00 on a Sunday afternoon). That really wasn't enough time. Have your guests think of how they can prep some of their supplies ahead of time to save time and try to keep each project to about 1/2 hour. Limiting the guest list to 4-6 can help with time, but who wants to limit the guest list too much! Maybe if the party is held a bit earlier in the year (mid-November?) and there are two evenings of crafting (3-4 projects and evening) then that would allow for more time and more fun. But I wouldn't try to hold a party with two sessions in December--much too crazy!

But I LOVE the projects we made and I'm worried I won't be able to part with them! I'm so thrilled I was able to spend time with my friends and have some crafting therapy! I may not be entirely ready to face the holidays, but when things get stressful, I'll try to remember the good time I had with my friends this weekend.

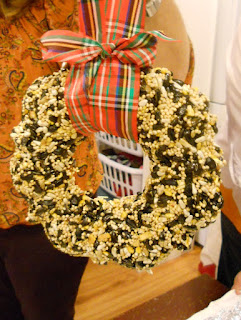
And a present for our feathered friends, too!

Monday, December 3, 2012

Story-Telling Animal Pelts

For week three of my Tribal Art of North America after school art class, I thought we'd do a project I saw over at Sleepyhead Design Studio. This is similar to my cave painting project, but easier to do with a larger group (no lacing the piece to a twig frame) and A LOT LESS MESSY! Yee haw!


We followed Sleepyhead's project instructions and prepped our pelts (crumpling and rubbing the paper bag to create a fuzzy, wrinkled texture) and then the children used Sharpies to cover the pelts with symbols (I had printed out some symbol sheets for them to refer to). They were encouraged to create their own symbols, too--I just had them add their symbols to the sheet and label their symbols with the meaning.

When doing a test run at home, my children just placed random symbols all over their pelts, but my students chose to use the symbols to tell a story or talk about the things they like (animals, nature, nice weather, etc.). If I were to create one of these, I think I would talk about when my family and I went camping this summer since many of the symbols on the "Picture Dictionary" sheet could be transferred to a story of a camping trip.

Once the children were done creating the symbols on their pelts, I had them use acrylic craft paints and tiny paintbrushes to add color to their pieces. We used a limited color palette: black, brown, ochre, white and turquoise. My art students argued that green and red could also be made from natural ingredients, so I let them have those too. Sleepyhead used oil pastels to add color in her project--that works well, too (I tried both in my samples). Then we mounted the pelts to a 12" x 18" piece of construction paper using a few staples (probably not authentic) and glued the "Picture Dictionary" page of symbols onto the back of the piece using a glue stick. This way, the children wouldn't have to worry if they forgot the meaning for some of the symbols.

I did this project with children in Kindergarten through grade 4 and they all enjoyed it. It's a keeper!

Soap Carving and a Collaborative Totem Pole

In my Tribal Art of North America class, we were able to do a fun technique that the students always enjoy: soap carving. I've done soap carving with my students before when I taught Inuit carvings (see my original  post here). This time, I thought the children could carve the soap and work together to make a totem pole.


The completed Totem Pole--each of the students
created a section (one animal). I placed them on
a background that looked like sky just to snap the picture.

I found a great handout online about totem poles. It gave some background information as well as great images of some typical animals that appear on totem poles along with a description about the symbolism of each animal. The children chose one of the animals to replicate in soap and began carving with their tools: a vegetable peeler, plastic spoon and a toothpick. Features such as beaks, tongues and wings that protruded far away from the main carving were added later using craft foam. I had a sheet of white craft foam on hand for these "extras," but encouraged the children to do most of their carving in the soap.

Detail of the BEAR (symbol of power on the earth).
The tongue is made with a bit of craft foam.

Once the children were done carving their individual totem animals, we put them together into one totem pole and I snapped a picture. The children took their individual pieces of the totem pole home, but before they left, they had enough time to create a second carving of their choosing that was more like the Inuit. We had a great discussion of how different their two sculptures were: the totem was more of a shallow carving meant to be viewed from a very limited radius, but the Inuit-inspired carving was meant to be held and seen from all angles. The carving was much more intense on the Inuit piece in that they had to think about removing the excess and accurately carving their animal on a variety of planes.

And here's one of the Inuit carvings: a polar bear.
These soap carvings are hard to take pictures of
with my camera--sorry they are blurry!
The children did a great job! ENJOY!


Related Posts Plugin for WordPress, Blogger...