Pages

Friday, April 27, 2012

Movement With Lines

June 2020--PLEASE NOTE--this project has been updated for distance learning to now include a HOW TO VIDEO! The updated post is here.


And the new video can be viewed below OR on youtube. ENJOY!


------------------------------------------------------------------------------

This is a great project that uses only a couple of supplies (and a bit of patience) to create a piece that transforms from "ho-hum" into "WOW!" This is a great way to illustrate how various lines can show movement. 


Horizontal lines are sleepy and calm. Vertical lines are strong and stand still, but diagonal lines seem to slide and move, bringing our eye from one side of the page to the other and then "whoosh!" off the page! We start off this exercise by using the ruler to create a series of diagonal lines and color them in with markers. Then, we cut the piece up and fan the strips out and create another type of line...a swirly, curving line that also shows movement! This is also a nice op-art activity. You can use complementary colors for your diagonal lines or a full rainbow of color. Experiment and enjoy the process!

Movement With Lines

Supplies Needed:
  • One sheet of white construction paper, 9"x12"
  • One sheet of black construction paper, 12"x18"
  • Ruler
  • Pencil and eraser
  • Markers, assorted colors
  • Glue sticks
Directions:

1. Draw a series of diagonal lines on the white construction paper. You can draw three smaller lines going across the page or fill the space with lines. Both look great, in my opinion.

2. Color in the diagonal lines using markers.

This is the "Before" Photo

3. Flip the page over and divide the page into twenty-four 1/2" wide strips. Use your ruler for this and try to be as precise as possible. BEFORE you cut the strips apart, number them on the back from 1-24 at one end (the same end of the strips for all numbers).

This photo is kind of hard to see, but it shows all of the strips
numbered on the back at the same end.
Now, this is where it gets a little bit tricky. I'm sure you can do this many ways, but I made three of these and I finally landed on this way of doing it.

4. Cut out the strip marked #12. Put glue on the back and glue it on your black construction paper background in the middle, like this:

Strip # 12 glued on in the center
of the black paper (hold the black
construction paper vertically)

5. Now you can cut strip #11 out and put glue on the back of it. Overlap the left edge of the strip over the left edge of the previous strip (in this case, strip #12), fanning the right edge out slightly (about 1/2"). Repeat with strips 10-1 (working away from you) until you get through strip #1, forming a nice curve with the strips. Use the photo as a guide.


7. Once you have finished gluing down strip #1. Place glue on the back of strip #13 and overlap the right edge of the strip over the right edge of strip #12, fanning the left edge down slightly (about 1/2").

8. Repeat with strips 14-24 until you get through all the strips, forming a nice curve in the opposite direction with the strips. Use the picture as a guide.


It is OK if the ends of the strips continue off the edge of the page. You can leave them that way or trim them to the edge of the black construction paper.

This project is good for the older child since they may be more tolerant of cuting up their artwork and transforming it into something else. Also, they are more capable of handling the precise measuring and cutting this project needs in order to be successful. It took me three times to get all the strips to fit on the black construction paper properly. But I really liked all of the other attempts I made too. It's an experiment, so don't get too stressed!

Enjoy!

Friday, April 20, 2012

Alexander Calder Kinetic Sculptures

There are just too many good ideas out there! I am constantly seeing great projects and thinking "Yep, I'm gonna do THAT with my students!" Sometimes an idea inspires me to invent a project and other times I keep it "as is." In this case, I had a few different ideas for projects inspired by the mobiles and sculptures of Alexander Calder, but I decided to go with this one from Princess Artypants.


The prep was easy and the supply list basic. I made a very simple poster about Calder and then showed my students a brief video of one of Calder's outdoor sculptures moving in the breeze. We were able to discuss  what makes a piece of artwork a sculpture (3D) and the types of shapes we were seeing in Calder's work (organic versus geometric). We also talked about how the pieces were designed to move, or be kinetic. I had the students select a limited color palette (four colors) and then they started working.

The images are from the web
and cut from some old Art History books I had.

Another element I introduced came from Salamander Art. They suggested using a shape code as published in "The Calder Game," a mystery book by Blue Balliett for children grades 5-8. The code assigns a different Calder-inspired shape to every letter in the alphabet. The older children were fascinated by the code and quickly went to work spelling their name in code on their mobiles. Next time, I might create templates for the shapes in the code...I don't know. I need to think about that further. But the children did love it, so I think my lesson will evolve that way next time!

I have to hand it to Princess Artypants whose photos are nice and clear, these mobiles were hard to photograph. They really did come out nice though--so try the project (or whatever version of Calder mobiles or sculptures you come across!). ENJOY!


Friday, April 13, 2012

Kandinsky Media Study

For my after school Modern Art class I wanted to try something a bit different. I usually do a Kandinsky project inspired by Art Projects For Kids using watercolor and crayon resist, but I thought I'd mix it up a bit and try not only experimenting with color, but also with media. I had each child create two 3" squares using the following media:

  • watercolor and crayon resist
  • collage
  • colored pencils
  • collage (using magazine pages)
This piece was created by a 13-year-old student I teach private lessons to.
Feel free to vary the amount of squares depending on the
age and ability of your students. This project looks great with
four, six, eight, nine, twelve squares, or more!

The lesson is perfect as an introductory project when getting to know students or as an assessment project. Originally, Kandinsky created his circle compositions as color studies, so we can too!

I set up four stations in the room, explained how to use the media at each station properly and then let them go. I timed about 10-15 minutes per station (they created 2 squares at each station). About two-thirds of the students were able to create the necessary squares in the allotted time. I think I would break this into two class sessions in the future and have them do watercolor and marker the first week and collage and colored pencil the next. Or, maybe have students just do one square each (for a total of 4 squares).

The finished pieces were glued to black construction paper. Lovely color and media studies! Thanks, Mr. Kandinsky!

Kandinsky Media Study

This project is designed to be worked in four stations. I'll describe each individually...

Station 1: Markers

Supplies Needed:
  • 3" squares of marker paper (marker doesn't bleed)
  • Pencil with eraser
  • Markers (We used Sharpies)
  • Newspaper to protect workspace
Directions:

1. Use pencil to write your name on the back of two squares. 

2. Draw concentric circles on the paper using pencil. The circle can stay within the box or go beyond the box slightly.

3. Color the rings in with various colors of markers. 

Marker Example (Using Sharpies)


Station 2: Colored Pencils

Supplies Needed:
  • 3" squares of drawing paper
  • Pencil with eraser
  • Colored Pencils
Directions:

1. Use pencil to write your name on the back of two squares. 

2. Draw concentric circles on the paper using pencil. The circle can stay within the box or go beyond the box slightly.

3. Color the rings in with various colors of colored pencils. You can use light or heavy pressure to vary the intensity of the colors.

Colored Pencil Example

Station 3: Collage

Supplies Needed:
  • 3" squares of drawing paper
  • Pencil with eraser
  • Ruler
  • Scissors
  • Glue stick
  • Magazines or paper scraps
Directions:

1. Use pencil to write your name on the back of two squares. 

2. Cut a 3" square from a solid-color section of a magazine picture. Adhere to the 3" square of drawing paper.

3. Cut rings of various colors of magazine paper and glue to your squares.

Collage Example
(Using Magazine Paper)


Station 4: Watercolor Resist

Supplies Needed:
  • 4" squares of watercolor paper (note the larger size)
  • Masking tape
  • Piece of cardboard
  • Pencil with eraser
  • Crayons
  • Watercolor paints & brush
  • Water bucket, paper towels
Directions:

1. Use pencil to write your name on the back of two squares. 

2. Tape the two squares to the cardboard or to the table. Tape a 1/4" border all around the squares--this will keep the paper from buckling as it dries.

3. Draw concentric circles on the paper using pencil. The circle can stay within the box or go beyond the box slightly.

4. Using a crayon, trace the pencil lines, pressing hard enough to leave a nice, thick pencil line.

5. Color the rings in with various colors of paint. You may not want to paint the rings in order since painting two sections that touch could cause the paint to bleed.

6. Let dry thoroughly. Trim squares to 3 inches.

Watercolor Example


To finish:

Mount all squares, touching, in a pleasing arrangement, onto black construction paper. Most squares will adhere nicely using a glue stick, but the watercolor paper may need tacky glue to stay glued down properly. Enjoy!


Tuesday, April 10, 2012

Spring Forsythia Still-life

Spring is gradually coming to New England and we've been enjoying all of the flowers and trees that are starting to bloom. One of my favorite spring blossom is the forsythia--the bright yellow blooms just wake me up and get me ready for warmer days ahead!


Here's a quick project I did a couple years back with my home school kids that is easy and fun to do. Working from life, students create a mixed-media still life while learning printmaking and symmetry. This is a great opportunity to gather up some real forsythia in bloom, set it up in your classroom and then have the children work from life. I was a little late one year, so I brought in fake forsythia to display.

When using real forsythia, pass around blooms to let the children look at them close up and then look at the still life from further away. Display your forsythia in a pretty vase and show the students how the shape of a vase is symmetrical. I had my students fold a piece of construction paper in half and then cut the shape of the vase so it would be truly symmetrical (have some extra construction paper on hand just in case). Brown marker and sponge-painted X's make for an easy finish to this project. Low mess, low stress, and lots of beautiful color!

This project is from "Kids' Art Works," by Sandi Henry. This book is FULL of great art ideas for children and is a must for any art teacher. The directions are clearly written in the book and easy to follow and the results are great! All of the children enjoyed creating beautiful spring pictures full of bright yellow blossoms! Welcome Spring!


Monday, April 9, 2012

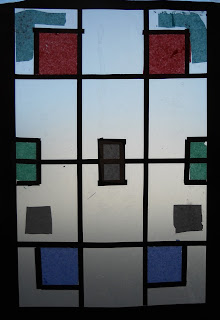
Frank Lloyd Wright Faux Stained Glass

Last week my after school class created Frank Lloyd Wright-inspired stained glass windows. I showed them a variety of his stained glass designs and then let them explore line, shape and pattern to create their own stained glass designs. They looked wonderful on the windows with the bright spring sun shining through!


Frank Lloyd Wright-Inspired Stained Glass Windows

Supplies Needed:

  • 1" Grid template, optional (more info below)
  • Clear Contact paper (2 sheets 18" x 12")
  • Black construction paper strips, some 1" wide and some 1/4" wide, 18" long
  • Additional black construction paper for circles or other non-linear shapes
  • Scotch tape
  • Scissors
  • Ruler
  • Pencil and eraser
  • Tissue paper, various colors
Directions:

1. This piece is worked from the back. I created a grid template for my students to use that had 1" squares on it. I used two sheets of 8 1/2 x 11" paper taped together. This is a nice space to work on encouraging the students to use the grid for their pieces. Some disregarded it and others really utilized it for the creation of their designs. I had each student tape a template to their desk.

2. I then had the students remove the paper film from the Contact paper and lay that on the grid template sticky side up. This is the surface on which the window will be created.

3. I had the children place 1" wide black construction paper strips around the outside of the grid gently pressing them onto the Contact paper. This creates the frame for the window.

4. I then had the children create a Wright-inspired design over the grid using 1/4" wide strips of black construction paper. This is the leading of the stained glass window. I explained that the lines can be horizontal, vertical or diagonal. Also, the intersection of the lines can make shapes such as squares, rectangles, triangles and rhombi. Circles and portions of circles could also be added.

I told them that they did not need to fill the entire window with lines and shapes (look at Wright's work) . I also kept encouraging them to take their time and plan.

A look at the pieces in progress...messy but fun!

5. Once their leading was done, I took a quick look and then demonstrated how they could add color to their piece. Some of the more geometric shapes could easily be cut from tissue. They could use the grid to help: if they had a shape that was 2 squares by 3 squares on the grid, they could cut a 2" x 3" rectangle from tissue paper. For younger students or for shapes that were trickier to cut from tissue, I suggested the children tear off pieces and just fill in the section with "bits" of tissue. The tissue easily sticks to the Contact paper. I told the children it is OK if the tissue paper extends onto the black lines a bit since this is the back of their window and that won't be seen when it's done. I suggested that the children not fill the entire piece with color since Wright often left portions of his windows clear.

6. Once the children had added all the color they wanted I adhered a second piece of Contact paper over their work creating a sandwich to seal the tissue and construction paper inside. I've done a similar project to this using just one sheet of Contact paper and it doesn't hold up as well as the "sandwich" of two pieces of Contact paper).

7. The children could then use their scissors to cut the excess Contact paper from around the piece using the outer edge of the frame as a guide.

I placed these pieces on the windows immediately so we could all enjoy the bright colors and beautiful designs!


Wednesday, April 4, 2012

For Easter or Anytime: Cinna-Bunnies!

I'm an artist and art educator, and I'm a mom, too. I have a five-year-old that stays home with me and he loves art and cooking. I have been trying to make a conscious effort to introduce little fun stuff every once in awhile to make staying home more special and encourage learning. Yesterday, I had an idea for us to make something with dough (biscuit dough in this case) that would be edible and celebrate Spring/Easter. Cinna-bunnies! Or Bunny Biscuits as my big boys call them...


Cinna-Bunnies

Supplies Needed:

  • 1 Tbsp. sugar
  • 1 tsp. cinnamon

  • 2 cups all purpose flour
  • 5 tsp. baking powder
  • 2 tsp. sugar
  • 1 tsp. salt
  • 1/4 tsp. cream of tartar
  • 1/2 cup shortening (or butter or palm oil)
  • 1 cup milk

  • 1 egg white, slightly beaten
  • food coloring, black and pink
  • paint brush (new)
  • bowl, measuring cups & spoons, small bowls (3), pastry blender, rolling pin, cookie sheet, 2" circle cutter, 1" circle cutter, safety knife
Directions:

1. Combine 1 Tbsp. of sugar with 1 tsp. of cinnamon in a small bowl, set aside.

2. Combine the remaining dry ingredients for the biscuits. Cut in the shortening until it resembles fine crumbs. Stir in milk until a dough forms.

3. Turn dough onto a lightly floured surface and knead for 1 minute. Add a bit of flour if it is sticking.

4. Divide dough in half. Roll half the dough to 1/2"thickness and cut 2" circles of dough (we got about six). Dip each biscuit into the cinnamon/sugar mixture and place on a greased cookie sheet (I use stoneware, so I don't grease the baking stone). These are the bellies of your bunnies.

5. Roll out the remaining dough to 1/2" thickness. Cut six 1" circles. Attach these to one side of the bunny bodies (use a finger dipped in water to attach the parts). These are the bunny heads.

6. Cut six more 1" circles and use the safety knife to cut each in half. Each circle will make two bunny ears. Attach the bunny ears to each bunny head using a bit of water.

7. Pinch off 1/2" balls of dough to make feet and hands, dip in water and attach to each bunny body.

8. Lightly beat the egg white and divide into two small bowls. Use food coloring to color the egg in one bowl pink and the remaining egg white black. Use a paint brush to paint the inner part of the bunny's ears and add eyes, a nose and whiskers.

9. Bake the Cinna-bunnies for 10-12 minutes at 425 degrees until the bunnies are lightly browned. Keep a close eye on them of you are using a metal cookie sheet--you might want to turn the oven temp down to 400 degrees. Adjust time accordingly so the bunny bottoms down's burn.

10. Let sit on cookie sheet for a couple minutes and then remove to a wire rack to cool completely. We slathered our bunnies with butter before gobbling them up. ENJOY!!

Tuesday, April 3, 2012

Claes Oldenburg Giant Food Sculptures

I just started my latest after school art class and the theme is Modern Art! I'm so excited! I love Modern Art and children usually do too. For our first class, I wanted to do something that was fun and allowed for a good amount of creativity, so I chose to have the children create giant food sculptures similar to those by Claes Oldenburg. I had a HUGE roll of medium weight paper that was given to me from a printing company and it was easy to work with and didn't get flimsy when painted with tempera paint. 
Ummmm...I think I'm gonna need a bigger plate!

I began by showing the children some examples of Oldenburg's famous sculptures such as the huge soft sculpture chocolate cake he created. I had also created my own version of it (chocolate cake with white frosting, sprinkles and a giant birthday candle on top) that was about 3 feet tall so they could really see what I was saying about LARGE food. I brought the templates in for them to create a slice of cake (like Oldenburg's) or a slice of pizza (very simple to do), but the children had ideas of their own so I decided to go with it and let them create whatever food they wanted to. We had quite a selection: popsicles, chocolate bars, a cheese wheel, cupcakes and more!

I think next time, if I do this with a larger group, I would stick to the same food--have them ALL do a slice of cake or a slice of pizza, but it worked out and I think the children learned so much about constructing 3D forms. I could see this project also being linked cross-curriculum to math and have the children create a slice of cake and then figure out, mathmatically, what size paper they need to go around the sides of the cake slice. I'll need to explore this more....

Claes Oldenburg-Inspired Giant Pizza Slice

Supplies Needed:

  • Medium weight paper (large sheets or a roll of paper)
  • Scissors
  • Ruler
  • Newspaper or paper scraps to stuff the form
  • Stapler with staples
  • Tempera paint, assorted colors
  • Paint brushes
  • Water bucket, paper towels
  • Paper scraps, optional, for pizza toppings, etc.
  • Glue sticks and Elmer's glue, optional
Directions:

1. Cut two triangles from paper for the top and the bottom of the pizza slice. They should be the same size. Our triangles measured 24" x 24" x 18" but that is approximate.

2. Layer the two triangles on top of one another and staple along the two 24" edges, through both layers. Leave the 18" edge open, creating a pocket.

3. Crumple up newspaper, lightly, and stuff the pizza slightly, to give the pizza slice some dimension. Leave about 4" unstuffed at the end (you'll be making the pizza crust with it).

4. Roll the 18" edge of the pizza slice inward a couple inches to create the pizza crust and secure with a couple of staples. You now have a giant slice of pizza!

5. Use tempera paints to paint the crust, sauce and cheese on your slice of pizza. While it dries, you can use paper scraps to create toppings.

6. When the paint is dry, attach the toppings to your pizza slice with glue OR just paint toppings on with additional paint.

YUM! Let's eat!

Giant Wheel of Cheese

Super-Giant Chocolate Bar

Yummy Cupcake
(This size looks like a regular serving for me!)

Giant Taco! Olé!

Sunday, April 1, 2012

Big Mouth Critters

OK, so I've seen those clay critters on the internet where students make pinch pots and use those for the mouths of a critter frog, fish, beaver, monster, etc. They are CUTE and I knew I had to make them with my home school kids. They've been working so hard these past few weeks I wanted to treat them to some clay time!

What a cute doggie!

I showed the children examples of caricatures. We discussed why an artist would use that technique and compared real photos of people to caricature drawings of them. What a great conversation we had!

I don't have a kiln, so we used air dry clay for this project. The children seemed to have a great time making these! And I could see doing a variation of this for medieval gargoyles or for a fun nature project.

Here are some of my notes from this project:

  • I started by giving each child enough clay for a pinch pot only and walked them through the technique of making a pinch pot.
  • Then I gave each child another ball of clay (about the same size as the first) for their critters' features and limbs. This helped to ensure that the critters did indeed have a large mouth and the students were able to create the pinch pot--an integral part of the project.
  • Air dry clay works OK. I used Crayola brand with my students, but one bucket of clay was more moist than the other. I just had the kids knead the dry dough and work in a little water to make it more pliable. I used 2 five pound buckets of Crayola air dry clay for 12 critters.
  • I used a bit of the clay in some water to make slip (a slurry of clay and water used to attach clay pieces together). I demonstrated to the children how to "scratch and attach" the clay pieces such as eyeballs and legs to the pinch pot form. I gave each student a cotton swab and a toothpick for this.  Using this technique allows the pieces of air dry clay to fuse together better than just squeezing them together.
  • I brought in a hot glue gun the next week to attach any pieces that may have come off during drying. Most were pretty good.
  • We used acrylic craft paint to finish our critters. The colors are nice. Next time I might try finishing them with a varnish or clear coat to make them shiny.

We loved this project! Try it yourself (and send me pictures!!)!

Enjoy!
A bunny.

A turtle.


A "blood thirsty" beaver
(I'm not making this up!).

A frog and its dinner (a fly).