Pages

Tuesday, March 27, 2012

Origami Butterfly Wreath for Easter or Spring

My family loves origami! So when I saw the directions for an origami butterfly on Pinterest, I knew I had to create a project that used them! So, here 'tis! This is a relatively simple and VERY inexpensive project that would be suitable for children grade 2 and up (the origami may be a bit challenging for a young one and the tissue paper can be time consuming).


The butterfly origami directions are from Go Origami. Many of the gorgeous projects on this site are too advanced for me, but the butterfly is easy enough.

Enjoy making this lovely wreath and bringing a bit of Spring into your home!

Origami Butterfly Wreath for Easter or Spring

Supplies Needed:

  • One paper plate
  • Pencil
  • Scissors
  • Elmer's glue
  • Glue tray (I used the lid of a yogurt tub)
  • Tissue paper in green (I used three colors of green for interest)
  • Three pieces of origami paper (or thin colored paper), assorted colors
  • Hole punch
  • Ribbon
Directions:

1. Trace a 5" circle in the center of the paper plate. Use the scissors to poke a hole in the center circle and then cut and remove the center circle so you are left with an outer ring of a paper plate. This is the base of your wreath.

2. Cut the tissue paper into 1" squares. I can't tell you how many squares you'll need, but you'll probably end up cutting WAY more than you need.

3. Pour a bit of glue into the tray. Take a 1" square of tissue paper and CENTER it over the eraser end of the pencil, smoothing the edges of the tissue paper around the eraser and pencil. Use your fingertips to HOLD the tissue in place and then dip the covered end of the eraser into the glue. Gently touch the tissue-covered eraser to the plate, and remove the pencil. The tuft of tissue paper should remain. You'll be attaching the tufts of tissue paper to the underside of the plate--not the side you'd eat on.


4. Repeat with additional tissue paper squares until the surface of the plate ring is covered. It helps to place the tissue paper tufts next to each other as you go--this will ensure that the wreath is nice and full and doesn't have any bald spots! If you are working with a younger child, you can work with him/her on this part. Many children won't mind the help and it's a wonderful time to sit and chat quietly with your child. 

5. Once the front surface of the wreath ring is covered with tissue paper tufts, use a hole punch to make two holes about 5" apart on the top edge of the wreath. This will allow you to hang the wreath up later. Set the wreath aside to dry.

6. Trim the origami paper so that one piece is 6 inches square, another is five inches square, and the third is four inches square. Fold into butterflies. Directions can be found here.

7. Attach ribbon to the wreath. Trim if necessary.

8. Use glue to attach butterflies in a pleasing arrangement. 


You're done! Welcome Spring!

**Another option to make this much easier for little ones is to reduce the size of the plate wreath. Making the wreath ring 5-6" across will be much easier for a single child to do on his/her own. Then adjust the size of the butterflies accordingly, maybe a butterfly made from a 5" square flanked by butterflies made from 4" squares. 

Tuesday, March 20, 2012

Complementary Color Crazy Quilts

This amazing "quilt" was done by some of the students in my home school art class. This past summer, I picked up a book called, "Using Color in Your Art!" by Sandi Henry. I LOVE her books--they are always full of wonderful, kid-friendly projects! One of the projects she calls, "Dancing Stripes," is really a  lesson in complementary colors and color mixing. It reminded me of a crazy quilt square so I thought my home school students would enjoy making these and then we could group them together at the final art show for an amazing art piece.


I began by showing my students some books I have on quilting (both traditional and "story quilts"). I also had a beautiful poster of crazy quilts that was perfect to show them. We then created the pieces using acrylic paints on canvas boards. One of the parents had donated three sets of acrylics to the class, so I was able to introduce "real" paint and canvases to the children. The children enjoyed mixing primary colors to achieve secondary colors and then mixing the complementary colors and watching an array of earth tones and neutrals appear.

I think the final pieces came out great and it allowed me to teach the children how to use acrylics  as well as color mixing and brush techniques, but I think that next time I may structure the class a little differently. Here are my tips:


  • If the children you are teaching are young, use tempera paints instead of acrylics. Color mixing can use A LOT of paint when kids are doing it. Ours were donated and grown-ups are in charge of dispensing paint in my classroom, so we could monitor it a bit.
  • Begin with a color wheel. I teach 2nd-5th graders in my class. The older kids had a good grasp of the color wheel, but the younger ones weren't as sure. Have the children do a color wheel before or along side their canvas. 
  • Sandi Henry suggests breaking the canvas into four sections: 1 for each primary color and one for black and white. I'd only stick to the primaries. My younger students got confused dividing up the canvas into so many sections.
  • Maybe work in some "hands-on" color mixing. I thought that next time I may break the students into groups and have them mix secondaries in plastic bags and then squirt the resulting color onto a palette for the group to use. It might pace the class better and the older students could help the younger ones. Plus, everyone loves squishing paint in a zip top bag!
  • Have better definitions of color terms as well as examples where artists have used complementary colors in their work. I want the students to understand WHY color mixing and color theory is important.
  • I may use different sized canvases next time. I had wanted to display these as a "quilt" all linked together. One idea I saw online for displaying artwork like this (that would have been perfect) was duct-taping zip-top bags together at the seams to create a quilt. Each baggie forms a reusable "pocket" for a child's artwork allowing the teacher to display the pieces together as a unit and change them out when s/he likes. HOWEVER, the 9x12" canvases I used won't fit in standard-size baggies. Maybe 8x10" canvases would work (gallon size freezer bags are roughly 10x10"). SIGH. 
I will certainly do this project again, but I'm going to try some tweaking to make the process easier and hopefully more understandable to the children. Ah...live and learn!

Friday, March 16, 2012

One Point Perspective Paintings

The focus of this year with my home school art class is art from the 1500's-1700's. One of the things I really wanted to teach them about was perspective, but I felt like a couldn't quite find a project that would work for 2nd-5th graders that wouldn't turn into a circus! So I put it off and put it off, but then I saw Natalie's project on one point perspective at the blog, "SmArt Class," and I thought, "This just might work...."


This student has lots of lovely details in her picture!

Well, I'm happy to say, it did! The first week, I showed the students some examples of paintings with and without perspective in them. Then, I walked the students through a guided drawing exercise using Natalie's step-by-step instructions so I didn't miss anything.

The second week, the children finished their pencil drawings (most of them were still drawing windows on buildings) and added details for interest. Then they used Sharpies to ink their drawings. When done, they used erasers to remove their guide lines. I gave a demo on using watercolors properly. Rules I shared were:

  • proper brush technique
  • no splashing the water
  • dabbing brushes dry on paper towels
  • no scrubbing the brush
  • how to create areas of color by using gradual washes of color, etc...
Most of the students were able to start their painting on week two.

The third week, students continued to add color to their pictures with watercolors. Everyone finished up by the end of this class.

The students were very proud of their pieces--they kept saying things such as, "It really looks like you can go down the road!" I was very happy I tried this project with my students!

Love the bridge and the car in this one!


Even the youngest students in my classes really got into this project!


Tuesday, March 13, 2012

Mexican Folk Art Trinket Boxes

The final project that I did with my after school art class, Art Around the World 2, needed to be quick and easy since they were also finishing up their Oaxacan snakes. I had such wonderful success at Christmastime having students make Mexican Folk Art Tooled Metal Ornaments, so I had them use that process to make metalwork tops for wooden trinket boxes. They came out great! The boys in the class had just as much fun creating these as the girls did.


Mexican Folk Art Trinket Boxes:

Supplies Needed:

  • Tooling aluminum from www.dickblick.com
  • Newspapers
  • Dull pencil
  • Sharpies or other permanent markers
  • Wooden box (I bought ours at AC Moore for $1.00 each, I think)
  • Acrylic paints, assorted colors
  • Paintbrush
  • Paper plate for palette, water & paper towels
  • Hot glue & glue gun
  • Mod Podge (glossy) or spray varnish, optional

Directions:

1. Cut a circle from tooling aluminum slightly smaller that the top of the wooden box.

2. Place the aluminum onto a stack of newspapers and use the dull pencil to press the design into the aluminum.

3. Flip the aluminum over and use the Sharpies to add color to the raised design. Set aside.

4. Choose a color for your wooden box. Put a bit of paint onto the palette and add a couple of drops of water to it to thin the paint slightly. Use your paintbrush to work quickly and paint the outside & inside of the box. While the paint is still wet, use a paper towel to wipe off the excess. This technique creates a stained effect on the wood of the box, allowing the wood grain to show through. You may need to work in sections to be able to wipe the paint off while it is still wet. Let the box dry completely.

5. You can now add a decorative pattern to the box. Choose 1-2 colors that coordinate with your design and squeeze a bit of each color onto your palette (about a pea-sized amount of each). Dip the wooden end if the paintbrush into the paint and touch it to the surface of the box to make a dot. Continue around the edge of the cover or around the base of the box, as you like.

6. Once all the paint is dry, you can seal the wood with 1-2 coats of Mod Podge, if desired.


7. Once the sealant is dry, attach the tooled metal piece to the top of the box using hot glue (a grown-ups job). 


Thursday, March 8, 2012

Oaxacan Papier Maché Snakes

I love papier maché, even though it is messy! Many children seem to love it as well (although there are a few who don't like the goopy paste on their hands!). In my Art Around the World 2 Class, we studied the art of Mexico and I had the children make snakes from papier maché and decorate them in the style of Oaxacan woodcarvings. So beautiful!


Beautiful colors and patterning!

About traditional Oaxacan carvings:
The folk art carvings from the state Oaxaca (pronounced wa-HAH-ka) in Mexico are colorful and unique and steeped in generations of tradition. Carved entirely by hand from copal wood, each piece is then uniquely painted with bright colors and patterns. Carvings can include figures such as mermaids, saints and everyday people or any sort of animal, both real or imaginary.

While this art form is centuries old, it is thought that one carver, Manuel Jiminez popularized the style that we see today. There are many great artists in Oaxaca and their carvings have become so popular they can be seen in museums and private collections from around the world!

This project idea came from the book "A Survival Kit for Elementary & Middle School Teachers," by Helen D. Hume. I have mentioned this book before. The projects are for upper elementary school students and each project has a "teacher page" and a "student page." The original lesson encouraged students to make whatever animal they wanted (there were size parameters), but I wanted to keep the lesson somewhat under control since this was the first time my students would be doing papier maché.

I was able to show them images from two wonderful books: "Oaxacan Woodcarving: The Magic in the Trees," by Shepard Barbash and the children's book, "Dream Carver" by Diana Cohn. Both of these books are wonderful and full of a variety of images that will get student's creative juices flowing! The book by Barbash does contain figures with some cartoon nudity so may not be appropriate for all ages.

Oaxacan Snakes

Supplies Needed:
  • Aluminum foil
  • Ripped up pieces of newspaper
  • Papier maché paste (recipe to follow)
  • Waxed paper sheets
  • White tempera paint
  • Elmer's glue
  • Paint brushes
  • Water containers & paper towels
  • Acrylic paints
Directions:

1. Mix up a batch of papier maché paste:

Papier Maché Paste
(from the book "The Little Hands Art Book" by Judy Press)

3 cups cold water
1 1/2 cups flour
oil of peppermint (optional)

In a heavy saucepan combine the flour and water.
Cook over low heat until the mixture thickens to
a creamy paste. Cool and then stir in a couple
drops of oil of peppermint to act as a preservative.
(I didn't, but I used the paste right away).

2. I gave each child two pieces of aluminum foil about 3 feet long. I had them lay their pieces on top of one another, so that there was a double thickness of foil 3" long. I then had them twist and bend the foil into the shape of a snake. We discussed different positions a snake could be in: straight, zig zig, ready to strike, curled up in its nest, etc.

3. Take a newspaper piece and dip it into the paste. Use your fingers to squeegie the excess paste from the newspaper and then lay it onto the foil snake form. Repeat until the entire snake form is covered with a nice layer of newspaper. Let dry on waxed paper (this can take a day or so).

4. Apply another layer of newspaper and paste. Let dry on waxed paper (this can take another day or so).

5. When your second layer of newspaper and paste is completely dry, mix one part Elmer's glue with one part white tempera paint to make a gesso or base coat that will cover the ink on the newspaper and make a nice surface for you to paint on. Paint on a coat of the homemade gesso and let dry thoroughly (a couple hours).

*If you don't want to use homemade gesso, you could paint a coat of white acrylic paint or just paint on a couple coats of whatever paint you are using.

6. Decide how you want to paint your snake and begin by dividing it into sections and painting the base coat of each section.

7. When the main colors of your sections are dry, you can add a second coat if needed. Then use Q-tips, small paint brushes and/or the wooden end of a paintbrush to dab dots and paint lines and patterns onto your snake in true Oaxacan style! The sky is the limit with your designs. Have fun and be creative!


Tuesday, March 6, 2012

SHARK! A Dollar Store Birthday Party

My littlest guy turned 5! He's a firecracker, and he decided he wanted a shark party (mostly because he saw a shark cake dripping fake blood when I was browsing online). SIGH.

I was excited to make a shark cake, but the kids and I created a few other things for the party that you might like. I have Pinterest to thank for many of them! Many of these supplies can be found at the dollar store.

The cake:


My family loves to watch the Cake Boss. I took cake decorating classes but the Cake Boss has really made me step up my cake decorating style! So, in true Cake Boss style, I shaped Rice Krispie Treats into the shape of a Shark's head, covered it with a light coat of frosting and then covered that with fondant tinted pink, white and grey. I added teeth and black bits for the nostrils and eyes. Then I put that on top of a 10" round of strawberry cake (little guys' choice) and covered the cake in bluish frosting. Voila! Great White lunging out of the water! (I was asked "Where's the blood?" since mine was gore-free--Hey, I didn't want to freak out the four- and five-year-olds that were going to be in attendance!)


Shark Attack Cake--Just like Little Guy Wanted
(OK, minus the blood)
Decorations:
Shark jaws: Made from dollar store paper plates! I couldn't believe this when I saw it! Easy, inexpensive and fast! And the kids LOVED them! We got many a picture of the kids holding scary shark teeth! I saw this idea on www.dollarstorecrafts.com.

Shark Jaws made from paper plates and view of the Table Runner
(After this photo was taken I set the table with plates and napkins, etc. )

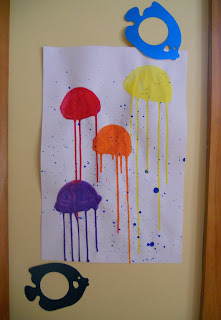
Wall art: I saw the jellyfish pictures on a favorite art blog of mine: "For The Love of Art" and I thought they were so pretty. I made a few of them, hung them on the wall and added some blue metallic fish shapes I bought at the dollar store.

My version of the jellyfish pictures don't do this art activity justice--
go to "For The Love of Art" to see the originals.
Table runner: We used tempera paints in a variety of colors with a big paint brush to make waves along a piece of paper from a roll. We then stamped on a few shark shapes cut from craft foam to give that "sharks are circling" effect.

Goodie Bags: I kept these simple since the children were making some crafts. I stamped a shark fin on the side of each and added blue "waves" from the scraps of the table runner. I then included a Star Wars coloring book (little guy's choice), a set of colored pencils, a couple of lollipops and a bag of Swedish fish (all from the dollar store). I put each child's name on his/her bag and as s/he would finish a craft I'd pop it in the corresponding bag.

Printmaking and Eric Carle-inspired waves!

Crafts:
Shark clips: I saw these on Pinterest originally and had to do them with the kids. They took no time at all and the children loved them (the four-year-olds as well as the ten-year-olds loved them!). I drew them on card stock, had the children color them in and hot glued them to clothespins (card stock and clothespins are from the dollar store).

Easy to make and fun!
T-shirts: OK, I didn't get the t-shirts from the dollar store, but I did get them from the craft store on sale for 4 for $10. I had originally wanted to have the children create shark t-shirts like one I saw in Family Fun Magazine years ago, but ran out of time to do the prep work necessary. So, I let the older kids design their own shark inspired t-shirts using clear contact paper and sprayable fabric paint. I purchased the clear Contact paper at the dollar store and one roll was enough for 8 t-shirts. The older kids went with a "Shark Attack" theme with their shirts. For the little ones, I cut shark head shapes from the contact paper and the little ones got to spray and draw on their shirts with fabric paint.


A shark coming up from the deep to investigate a swimmer...

This isn't going to end well...

This shows the empty shark cage and the shark with feet sticking out of its mouth.
YIPES! I assure you these are by well-adjusted children!

And the "Rest of the Story..."
I was also able to get "Happy Birthday"-themed paper products at the dollar store (cups, plates, napkins) as well as streamers, and balloons. They weren't "Shark"-themed, but were bright and colorful!

All-in-all I think the party went well! And little guy said he had a wonderful time hanging out with his friends!

Friday, March 2, 2012

A Class For Me/Mom's Night Out

It's no surprise that, next to the grocery store, the number one place I spend time and money at, is Michael's craft store. There's one just a couple miles from my home and this week I've been there four times. OK, so it's an unusual week for me. I'm balancing a couple of creative projects right now (many of which you'll be seeing in future posts). 


My first acrylic painting in more than 13 years.
Probably not going to hang in a museum, but it makes me smile when I see it!

Anyhow, I was intrigued when I saw that Michael's is now offering acrylic painting art courses by Grumbacher where a student can paint an entire painting in two hours. I browsed the offerings and I really liked the floral painting with daisies in a stoneware pitcher. Now, I haven't picked up my acrylics since college and even then, I had a teacher who constantly dissuaded me from using them. Gosh, I didn't think I was that bad! So I learned to avoid acrylics. But I did like that painting...

Why couldn't I just paint at home, you ask? Chuckle, chuckle, snort!...I have four kids. I'll just keep finding excuses to put it off...(and I do, actually, do a good amount of art in front of them and with them, but trying something I needed to really focus on? You get the idea.)...And sometimes you just need to DO something (especially in New England in the middle of winter!).

So, I enrolled in the Michael's class which was $25 for the class fee and then I spent about $40 on supplies. I thought the class would be step-by-step and that I'd learn techniques and such through little tidbits and anecdotes the instructor would sprinkle in along the way. That wasn't quite the case. She was very relaxed and instead of demonstrating the process she handed out the instructions that Grumbacher gives to the instructors to show the process. Thankfully, I had some experience with painting so I just read the instructions and followed them. The instructor didn't paint, but walked around the room making herself available if we needed her. I asked the instructor questions from time to time if I was stumped, particularly on color mixing or to clarify the process, but otherwise I spent the time painting and gabbing with my friend, Beth, whom I roped into taking the class with me (poor girl!). It wouldn't be a night out unless I had a friend by my side!

So if you are thinking of trying a class: I think the class would be best for children over 12 and grown-ups who want to try acrylic painting in a quick way that offers a good chance for success. As with any course, the instructor could really make or break this experience. Before taking the course, ask around to see exactly how it is run. If you have limited experience, make sure the instructor is hands on and helpful.

It was a relaxing time and I had fun being the student instead of the teacher! I did learn a few things and I increased my confidence with using acrylics. And, I LOVE my new painting!